


See who's really visiting your website: Achieving IP transparency with the Proxy Protocol
There are a few different ways to achieve IP transparency, but one of the most effective is with the help of the great Proxy Protocol.

IP transparency is essential for anyone responsible for networking and load balancing because it allows admins to monitor communications between clients and servers. There are a few different ways to achieve IP transparency, but one of the most effective is with the help of the great Proxy Protocol.
Here I'll explain how to configure the Proxy Protocol on your load balancer, as well as some examples of the applications capable of utilizing it and how to configure them. Because that's the kind of guy I am ; - ).
Different ways of achieving source transparency
Before we get going, at a high-level, there are two networking-based options for source IP transparency...
1. Routing-based Layer 4 NAT/DR options
2. TPROXY translation based for Layer 7 SNAT/reverse proxy
And two application-based options...
3. X-Forwarded-For HTTP only, but supported by most web servers
4. PROXY protocol, relatively new but works with any compatible TCP-based application
This is a somewhat simplistic overview however, and the focus here is on Proxy Protocol, but check out this blog on Load balancing client source IP transparency with your load balancer, for more detail on the other three options.
For those who like the small print...TProxy uses iptables, for example, so it could also be considered application- based transparency. Likewise, from an OSI model perspective, Proxy Protocol isn't application (Layer 7) but transport (Layer 4). So it all depends on the criteria you apply to this segregation.
For everyone else...let's move on to Proxy Protocol!
What is Proxy Protocol?
The Proxy Protocol provides a simple and safe way to transport TCP connection information across many different layers of NAT or TCP proxies (or load balancers), to the destination server. It does this while having only a minor impact on processing performance.
The Protocol itself was created by the magnificent Willy Tarreau at HAProxy, to ensure TCP connection parameters weren't lost when relaying TCP connections through proxies. Its wide acceptance in such a short time is a nod to Willy's genius, and its easy application.
Effectively, the Proxy Protocol adds a header that contains the client’s details at the beginning of a TCP connection (including the client's IP address, port, and protocol details), which carries across proxies. This allows backend servers to see the true origin of the connection, facilitating accurate logging, security, and more effective troubleshooting. All pretty awesome stuff.
TCP header info without the Proxy Protocol
A standard TCP header data stream without the Proxy Protocol contains the following:
- Source port
- Destination port
- Sequence number
- Acknowlegement number
- Header length
- Reserverd
- Flags
- Window size
- Checksum
TCP header info with the Proxy Protocol
A TCP header with the Proxy Protocol includes all of the above but with the addition of the client IP.
When to use Proxy Protocol
The Proxy Protocol effectively "tricks" the backend servers into logging the original source IPs by injecting data about the source and destination addresses at the beginning of a TCP connection.
Achieving IP transparency without proxy protocol
There is a way of logging the original source IPs without using the proxy protocol in certain higher-level protocols like HTTP. With HTTP, a proxy can add an extra Forwarded HTTP header, or an X-Forwarded-For-Header, to store the client’s original IP address so the server can retrieve it. However, this won't work for other protocols.
1.Extending coverage to upper-layer protocols
The Proxy Protocol fills this gap by running below TCP and extending coverage to all upper-layer protocols that use TCP/IP for message transmission.
It can also be used with many higher-level protocols such as FTP, SMTP, IMAP, or even SQL. The only caveat being, that the end application must support the Proxy Protocol.
2.SSL offloading on the backend
One of the other scenarios where Proxy Protocol has the upperhand is when the SSL offloading happens on the backend only, which allows for better scalability of your web application.
How to use the Proxy Protocol
Configuring a Loadbalancer ADC for Proxy Protocol
Ok, so, let's put all of the above into practice.....
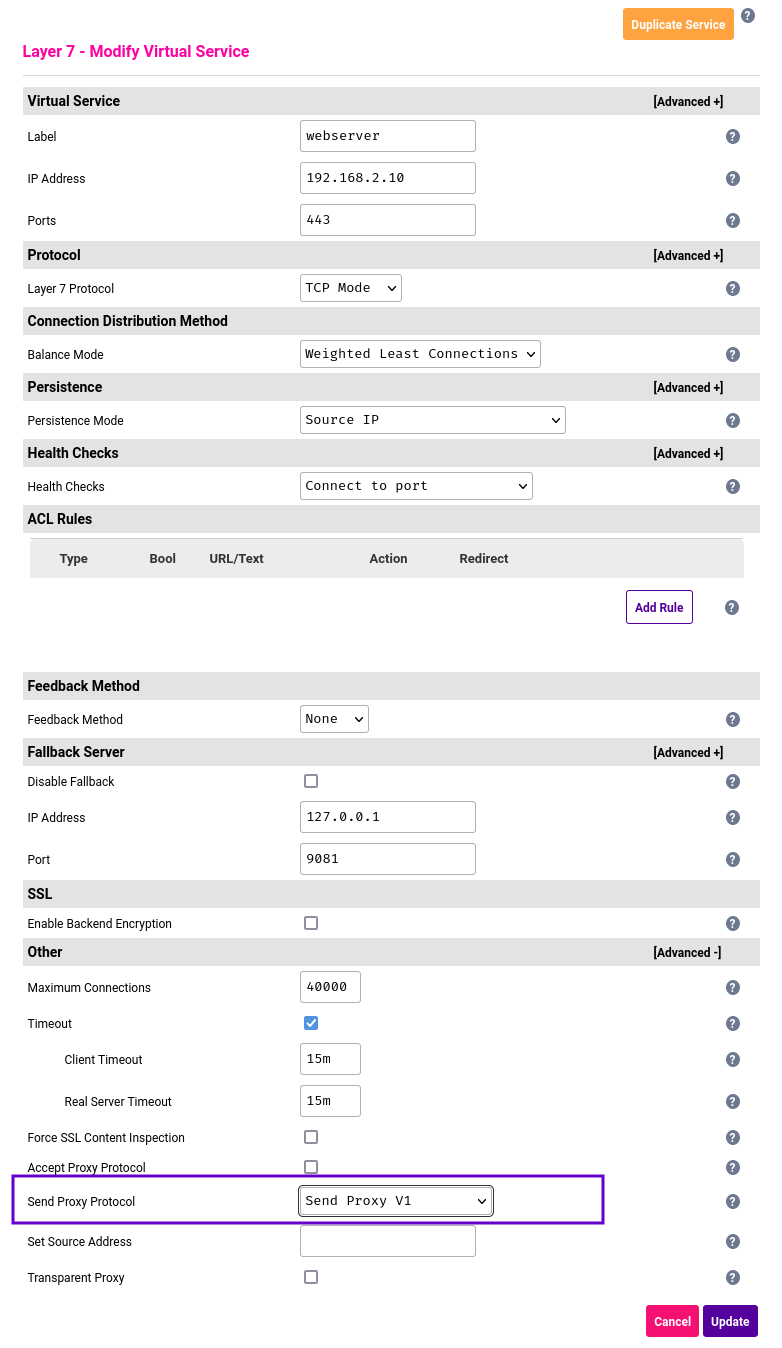
In the WebUI of your Loadbalancer Enterprise appliance:
- Go to Cluster Configuration → Layer 7 - Virtual Services
- Click the Modify button next to the name of the Virtual Service you want to enable the Proxy Protocol on.
- Select Send Proxy V1
- It should look something like this:
How to configure HAProxy for Proxy Protocol
For all our open-source loving friends, here’s a step-by-step guide on how to enable the Proxy Protocol in HAProxy:
- Open your HAProxy configuration file (commonly located at /etc/haproxy/haproxy.cfg) using a text editor.
- Locate the backend section where you define your server configurations.
- Add the `send-proxy` option to the server line for each backend server. For example:
backend website
server web_srv1 192.168.2.1:80 send-proxy
server web_srv1 192.168.2.2:80 send-proxy
4. Save and close the configuration file.
5. Reload HAProxy to apply the changes:
sudo service haproxy reload
And that's it!
Your HAProxy setup is now configured to use the Proxy Protocol when communicating with backend servers.
Applications that accept Proxy Protocol
Now for the good stuff.
Several applications support the Proxy Protocol, allowing them to seamlessly integrate with your load balancer and benefit from IP transparency. Here are a few examples:
1.Web Servers (Nginx, Apache)
- Configure your web server to accept the Proxy Protocol by modifying the server blocks or virtual host configurations.
Here's an NGINX example:
server {
listen 443 ssl proxy_protocol;
...
}
2.Databases (MariaDB, Percona)
Here's how to modify your database server settings to allow Proxy Protocol, using MariaDB as an example:
proxy-protocol-networks=::1, 192.168.2.0/24, localhost
3. Mail Servers (Postfix, Exim)
With mail servers, you need to Configure these to accept the Proxy Protocol in its configuration file.
Here's a Postfix example:
smtpd_proxy_filter = 192.168.2.21:25
The list goes on...
The examples shown above are by no means an exhaustive list of apps supporting the Proxy Protocol. Not only are there many more applications that do, but there are also additional options in each, allowing you to tweak how you utilize it. I strongly recommend you check the documentation for your application and follow the specific config advice contained in it.
Microsoft and Proxy Protocol
It's also worth noting that there are numerous Microsoft products that don't natively support the Proxy Protocol (e.g. Microsoft Exchange, Microsoft IIS). So you can't achieve the same level of transparency, unfortunately.
For those looking for an alternative, see the above section, "Achieving IP transparency without proxy protocol", with the caveat that this only works for HTTP.
Conclusion
The Proxy Protocol is particularly useful when you have multiple layers of proxies involved, like a load balancer in front of a web server, because it allows you to see the original client's IP address (great for security and logging). It also works with lots of different protocols (HTTP, HTTPS etc) and is easy to implement and integrate with your existing architecture, as shown above.
However, just because you think you need source IP transparency doesn't mean you actually do. For example, check out this blog by my colleague, Oli Warren, on how to achieve client source IP transparency with your load balancer which explains a couple of instances when you definitely DON'T need it.
Related resources:
- Configure proxy protocol support in AWS for your classic load balancer
- NetScaler proxy protocol
- Enabling proxy protocol on HAProxy


Loadbalancer proud to announce ISO 27001:2022 compliance with NQA certification


Related posts
ENVOY Proxy versus Loadbalancer.org: Why storage vendors need purpose-built load balancing for S3, NFS, and SMB

Hardening HashiCorp Vault with load balancing for always-on security

How to load balance a MariaDB Galera Cluster for performance and HA using LVS & Ldirectord
A simple Citrix SSO replacement; with Okta, Apache and OpenID Connect

HAProxy Enterprise Edition vs Progress Kemp LoadMaster: A no-fluff engineer comparison

Loadbalancer.org announces leadership transition and next phase of growth
Architecting resilient object storage: Delivering multi-site capabilities for HPE with Loadbalancer.org GSLB
Finally, a simple way to convert MaxMind GeoIP Database files to the legacy DAT format!