


Transparent Load balancing with HAProxy on Amazon EC2
One of our favorite methods of load balancing is using Layer 4 DR because it is transparent and fast. Unfortunately, because of Amazon's infrastructure, this is not possible in EC2 so we need to use another method which means we are left with layer 4 NAT and transparent HAproxy using TProxy.

This is a quick guide on how to setup transparent mode on HAProxy in Amazon's EC2. One of our favored methods of load balancing is using Layer 4 DR because it is transparent and fast. Unfortunately because of Amazon's infrastructure this is not possible in EC2 so we need to use another method which means we are left with layer 4 NAT and transparent HAproxy using TProxy.
Scott has already covered configuring transparent Haproxy on CentOS here so I won't cover that again but use it as a base to work from. For transparency to work the haproxy load balancer must be in the path of the return traffic from the real servers. There are 2 methods of doing this, with a dual subnet and a single subnet. Both methods also work for load balancing UDP and TCP at layer 4 NAT with LVS. So the post does not become too long I will presume you know the basics of launching instances in EC2, configuring security groups and creating a VPC.
Dual Subnet Method
To do this you will need 2 subnets inside your VPC in AWS, a public and private subnet. Here I am using a public subnet of 192.168.1.0/24 and a private subnet of 192.168.2.0/24.
- Firstly launch you CentOS instance into your public subnet and follow Scott's blog to get your HAProxy load balancer up and running.
As I am using a different network to Scott my haproxy.cfg looks as below:
global
daemon
log /dev/log local4
maxconn 40000
ulimit-n 81000

defaults
log global
contimeout 4000
clitimeout 42000
srvtimeout 43000

listen http1
bind 192.168.1.50:80
mode http
balance roundrobin
server http1_1 192.168.2.55:80 cookie http1_1 check inter 2000 rise 2 fall 3
server http1_2 192.168.2.56:80 cookie http1_2 check inter 2000 rise 2 fall 3
- Disable the source/Destination check on the instance in AWS. To do this go to the EC2 console and select your load balancer instance. Then select "Actions > Network > Change source/Dest. check" and Disable this option. Doing so enables the instance to receive traffic which has a destination IP it does not own.
- The next step is to deploy your real servers into your private subnet. For my test I just used a couple of Ubuntu servers with Apache on.
- We now need to configure the routing on your private subnet to route back through your load balancer in the public network. This way the load balance replaces the NAT instance in a typical NAT setup as described
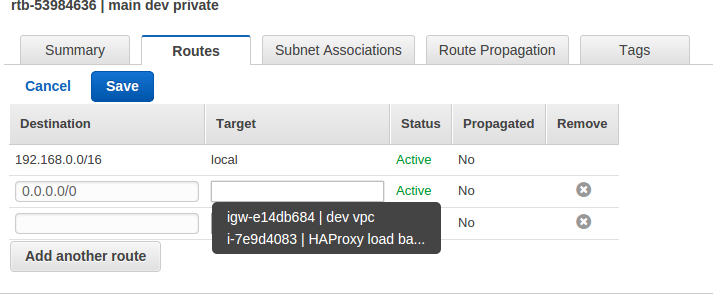
- Under the VPC dashboard, select Route Tables
- Select the route table that relates to the private subnet
- Select the Routes tab, and click Edit
- In the blank row at the bottom set the destination to 0.0.0.0/0 and set the target to be the ENI on the load balancer – in this example selecting the instance “i-7e9d4083 | HAProxy load balancer” insets the ENI as shown below.
- To access from the internet I have mapped a Elastic IP to my VIP address 192.168.1.50.
And that is all there is too it. Now when accessing the VIP through a browser either from the internet or from inside the public network the clients IP will be seen by the real servers and show in the apache logs.
Single Subnet Method
For the single subnet method to work the clients need to be on a different subnet to the load balancer. So this works great over the internet when attaching an Elastic IP to your VIP. The steps are as follows:
- Follow all the same steps in Andrei's blog to setup CentOS with HAproxy.
- Disable the source / Destination check on the instance in AWS.
- To Launch your real servers into the same subnet as the load balancer.
- Change the default gateway on the real servers to the IP address of your load balancer instance.
With the IP address of my load balancer instance being 192.168.1.182 my route table now looks like:
[root@ip-192-168-1-73 ec2-user]# route -n
Kernel IP routing table
Destination Gateway Genmask Flags Metric Ref Use Iface
0.0.0.0 192.168.1.182 0.0.0.0 UG 0 0 0 eth0
169.254.169.254 0.0.0.0 255.255.255.255 UH 0 0 0 eth0
192.168.1.0 0.0.0.0 255.255.255.0 U 0 0 0 eth0
Now when accessing my VIP through my Elastic IP address the real servers see the client IP address.
Need help?
Our experts are always here


Blocking invalid range headers using ModSecurity and/or HAProxy (MS15-034 - CVE-2015-1635)
Related posts
ENVOY Proxy versus Loadbalancer.org: Why storage vendors need purpose-built load balancing for S3, NFS, and SMB

Hardening HashiCorp Vault with load balancing for always-on security

How to load balance a MariaDB Galera Cluster for performance and HA using LVS & Ldirectord
A simple Citrix SSO replacement; with Okta, Apache and OpenID Connect

HAProxy Enterprise Edition vs Progress Kemp LoadMaster: A no-fluff engineer comparison

Loadbalancer.org announces leadership transition and next phase of growth
Architecting resilient object storage: Delivering multi-site capabilities for HPE with Loadbalancer.org GSLB
Finally, a simple way to convert MaxMind GeoIP Database files to the legacy DAT format!