


How to add Cloudflare in front of HAProxy
Cloudflare provides a content delivery network (CDN). A CDN is a worldwide network of servers that delivers web content to clients based on the geographic location of the client.


What is Cloudflare?
Cloudflare provides a content delivery network (CDN). A CDN is a worldwide network of servers that delivers web content to clients based on the geographic location of the client.
Using the Cloudflare network in front of any website can add extra security and performance. Cloudflare works as a proxy between clients and the actual web server. In the case of multiple web servers, it can sit in front of your hardware or software load balancer. Using their distributed network of worldwide servers, Cloudflare is even able to recognize and mitigate DDoS attacks. I assume this is one of the main reasons why you might want to use it.
Even the free Cloudflare plan adds SSL/TLS termination to your website. You can use client certificates already installed on the Cloudflare servers to prevent direct access to your website bypassing Cloudflare. These two features are the main subject of this blog.
Prerequisites for this tutorial
- You need a working web server with a website on it.
- You need to be the owner of the domain name so that you can make changes to its DNS records.
- You will need HAProxy installed or use our 30 day free trial as we did which includes HAProxy with enterprise grade support. You should understand the basics - how HAProxy works and how to set it up.
- You need a test client that can access your website. This is likely the computer in front of you.
Set up an account in Cloudflare
First, you need an account in Cloudflare. For my testing I used the free account which is sufficient for my explanation over here. You can create an account here.
Hint: DO NOT create a Cloudflare account from cloudflare.com/enterprise-free-trial/. I think it will just send a message to Cloudflare that you are interested in a free trial, so it's best to use the other link above to create an account.
Once the account has been created you will be offered to add your existing website to Cloudflare.
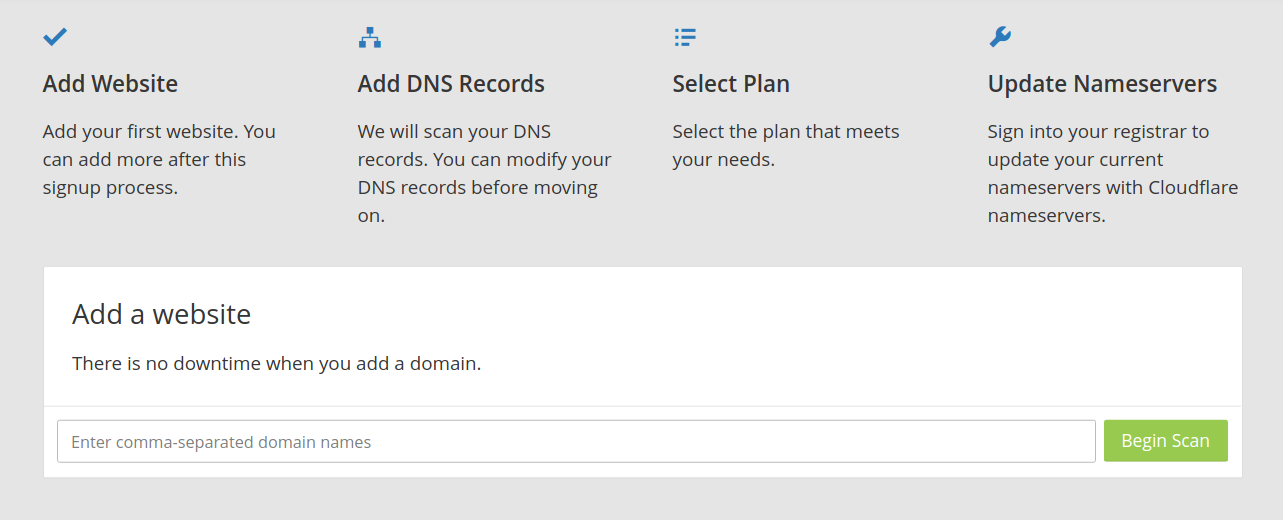
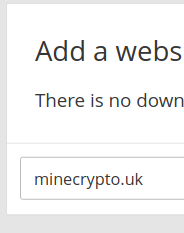
In the text field enter the domain name of your website. Let’s use the domain ‘minecrypto.uk’ for our example:
Click the 'Begin Scan' button and you can watch a video explaining the basics of Cloudflare while it’s working in the background. No problem if you don’t understand the video.
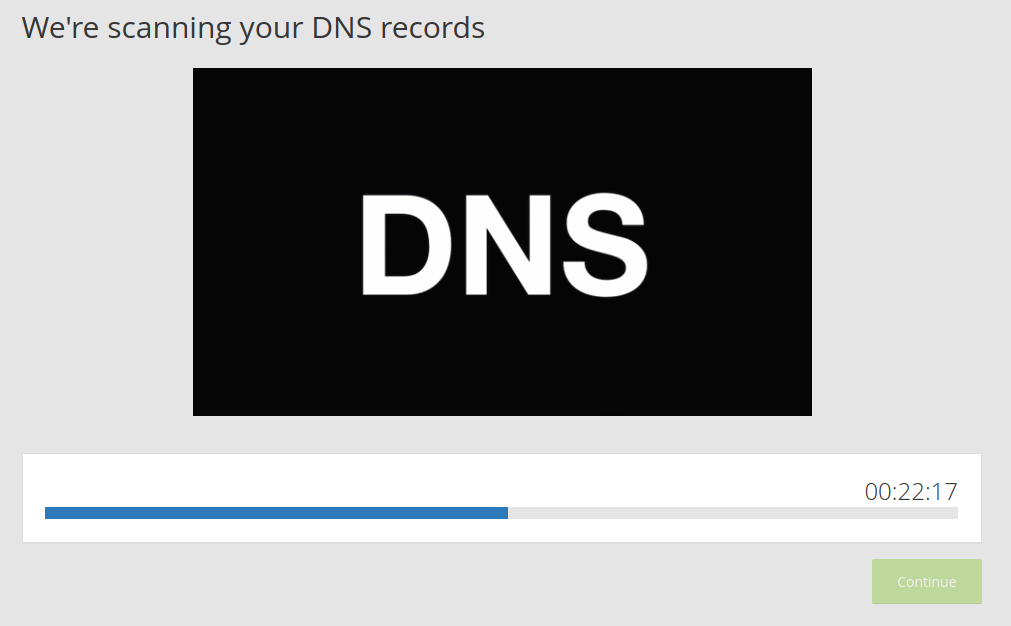
Just go ahead when the 'continue' button is not dimmed anymore. Then the scanning is done.
Now, you should see a screen like this one:
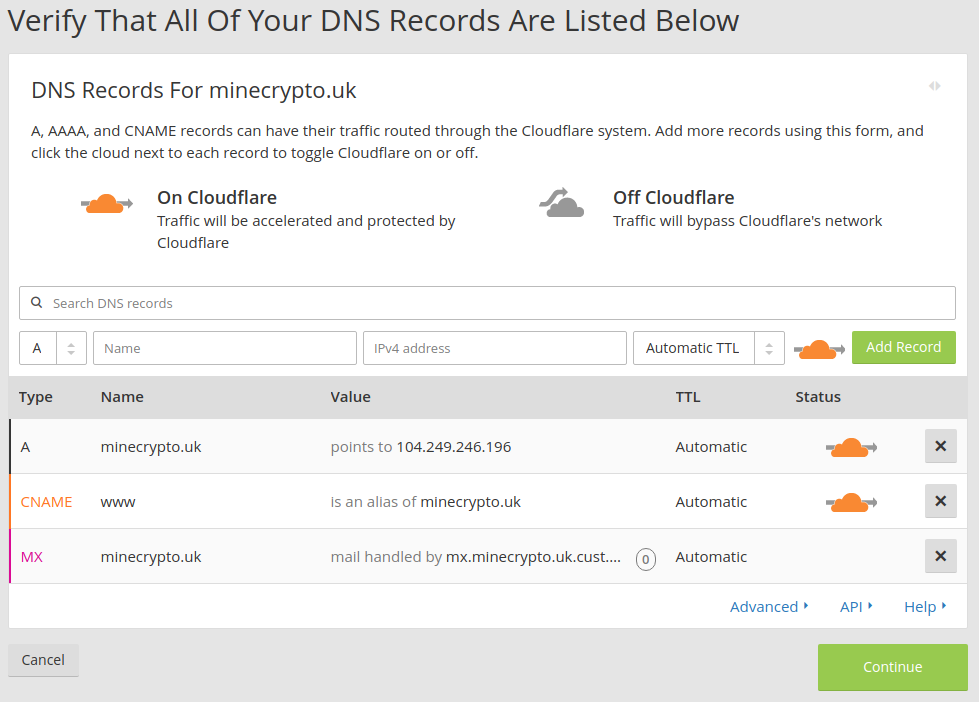
Check that all the information Cloudflare got about your existing web server and DNS is correct. Click 'continue' if all looks good to you.
The next page you see will be:
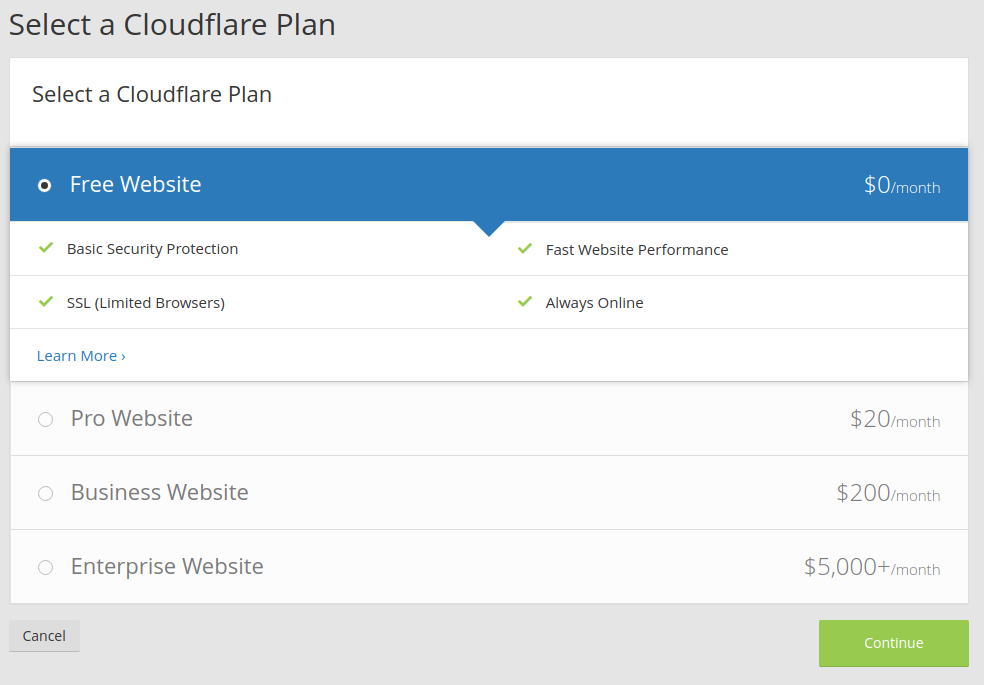
Choose any plan you like. For creating this documentation the option ‘Free Website’ was sufficient for me.
Click 'continue' and Cloudflare is asking you to change the nameservers for your domain name.
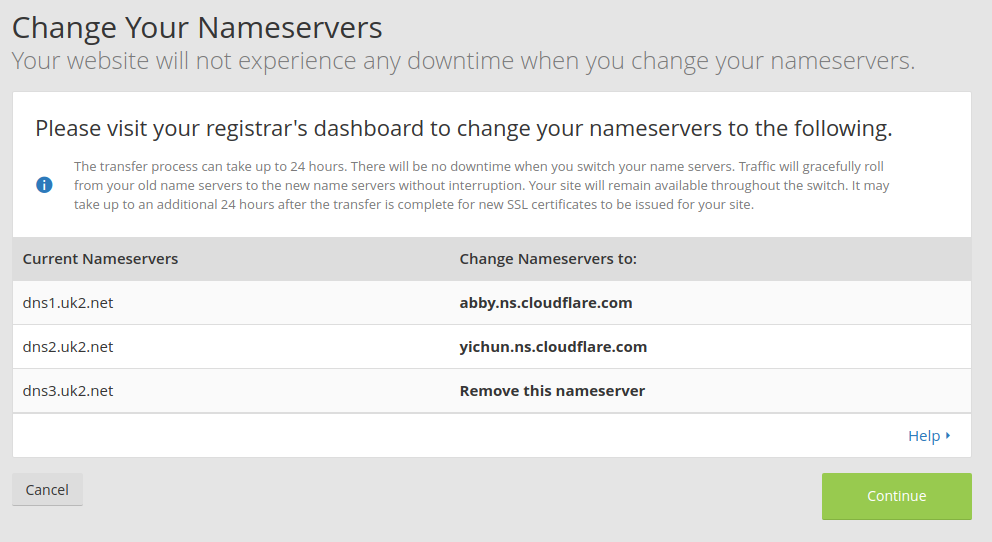
Now, please login to your DNS registrar’s dashboard and change the nameservers to the values mentioned in the screen. With these nameservers you state who is allowed to set A records. If you change it to Cloudflare then this allows Cloudflare to control the domain instead of you through your registrar’s account. Don't worry if you later decide to not go with Cloudflare - you can just revert the nameservers to what they were before and then restore your control over the domain.
After you changed the nameservers in your registrar’s dashboard then return to the Cloudflare page and click ‘continue’. Now Cloudflare makes all those changes required to send all traffic to your domain via the Cloudflare server and you can no longer set any records.
From this point all traffic to your domain goes via Cloudflare. This means your website is protected by Cloudflare now.
You can check at your registrar’s dashboard and you should see that the IP address of the A record has been changed to Cloudflare:
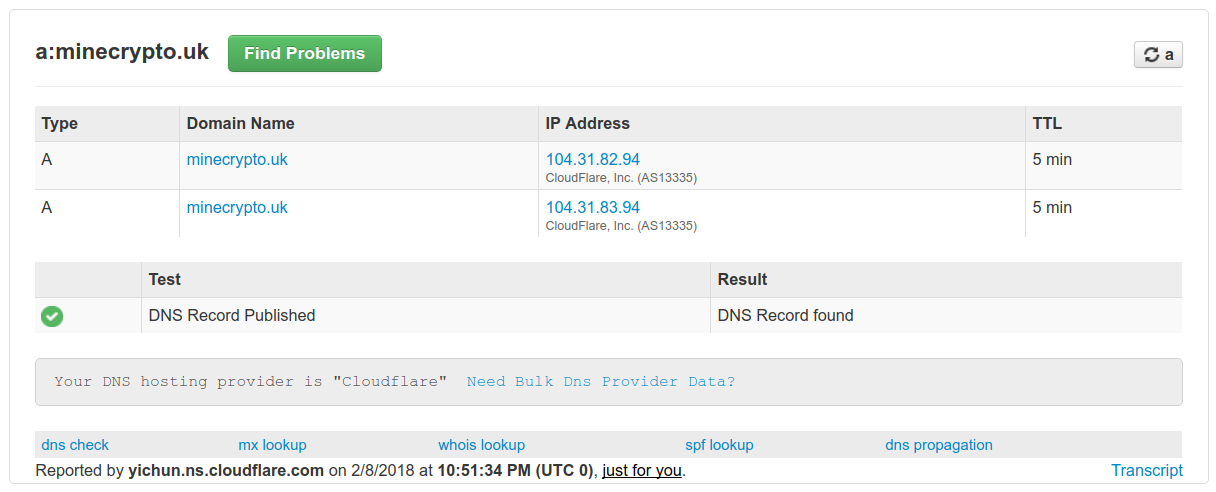
The screenshot above will look different for you as you are unlikely to have the same registrar.
It's a good idea to check that you can still access your website.
Now you see the Cloudflare dashboard in your browser and adding your website behind Cloudflare is done.

As I said before, your website is behind the Cloudflare server and this is what you have now:
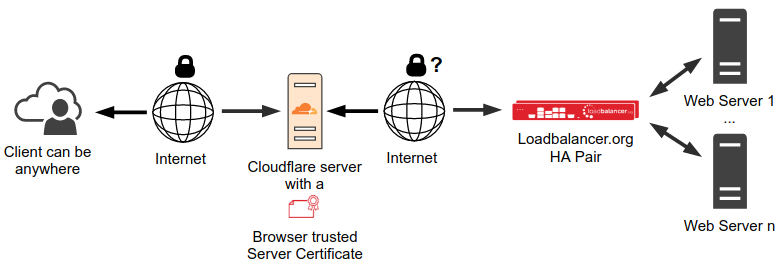
All traffic between the client and the Cloudflare server is TLS encrypted. The traffic from Cloudflare server to the load balancer is what it was before, encrypted or unencrypted, whatever was installed before. If this traffic is not encrypted yet and you want to have it encrypted or if you pay for the certificate and you don’t want to pay for it anymore then please read the next chapter.
Enable TLS Encryption between Cloudflare and the load balancer
In this chapter, I will show you how to enable TLS encryption for traffic between the Cloudflare server and HAProxy. I have used our Loadbalancer.org Enterprise VA appliance in the following example as shown in the network diagrams throughout.
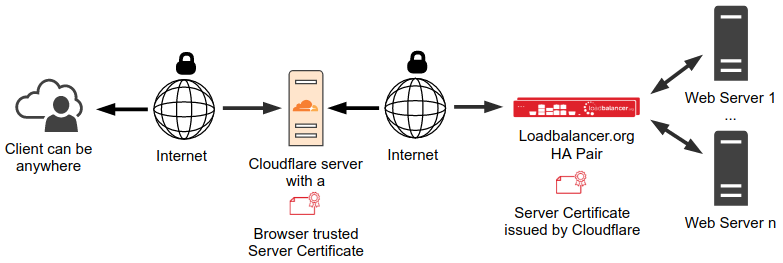
From Cloudflare’s point of view there are two servers in the traffic. The first one is the Cloudflare server. The second one is the server behind the Cloudflare server. In our case it’s the load balancer. However, Cloudflare is not aware that it’s a load balancer with multiple real servers behind.
Cloudflare calls the server that is behind the Cloudflare server the origin server. In our case the origin server is the load balancer. Both certificates in the picture above are server certificates. To distinguish them the certificate installed on the Cloudflare server is called the ‘Edge certificate’. The certificate installed on the load balancer (the origin server) is called the ‘Origin certificate’. At the moment the edge certificate is a shared certificate that Cloudflare provides for free. You can order your own edge certificate from Cloudflare. The free shared certificate is good enough for this documentation.
The edge certificate is installed on the Cloudflare server already. You don't need to do anything else to get that feature.
The following section explains how to get and install an origin certificate.
Generate an Origin Certificate
In order to get the traffic between Cloudflare server and get the load balancer encrypted we need to install a proper server certificate on the load balancer first. You could use the default certificate that’s already installed on the load balancer. However, it is a self-signed certificate and why not use Cloudflare’s offer to get a real certificate for free?
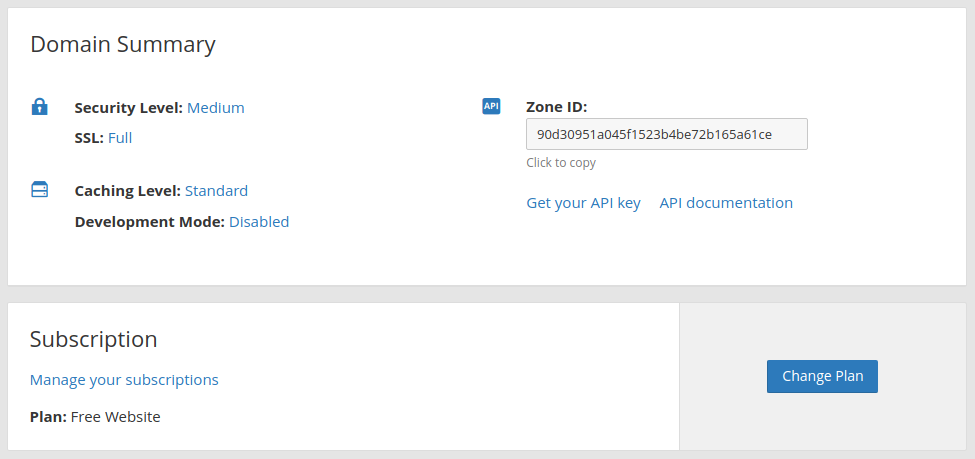
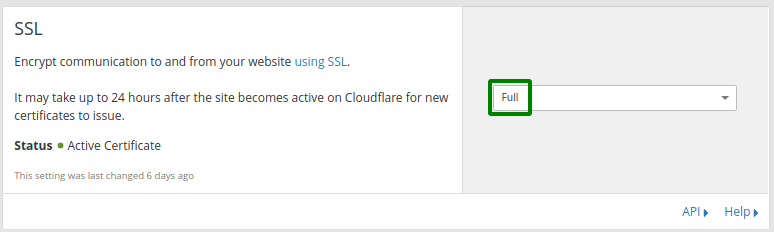
Go to the Cloudflare dashboard and click the 'Crypto' tab. The first section you can see in this page is SSL. Here you have the choice of multiple options. We are only interested in options ‘Full’ and ‘Full (strict)’ because the other options do not support encrypted traffic between the Cloudflare server and the load balancer.
With option ‘Full’, any certificate on the load balancer will be accepted by the Cloudflare server.

With option ‘Full (strict)’ enabled, the Cloudflare server validates the certificate. It does not allow a connection to the load balancer including the following: an expired certificate; a self-signed certificate; a certificate without a matching domain name or a certificate not signed by a trusted root CA, just to mention a few. For option ‘Full (strict)' you need to install a valid certificate on the load balancer.
Be careful with this setting. If the traffic from the Cloudflare server to the load balancer is not encrypted yet then use option 'Flexible'. If this traffic is encrypted but it uses an invalid server certificate then use option 'Full'. Be aware that Cloudflare still does not accept every invalid server certificate even with option 'Full'. If your traffic is encrypted and you have a valid server certificate on the load balancer then you can use option ‘Full (strict)’. If in doubt, don’t touch this option now and leave it as 'Flexible'.
As the clients will never see the certificate installed on the load balancer you could actually work in ‘Full’ mode and install a self-signed certificate and save the money for a certificate signed by a trusted root CA. But you don’t have to because Cloudflare comes with a valid certificate signed by its own trusted root CA for free. You just need to create a new server certificate from the Cloudflare dashboard, option 'Origin Certificates'. You can have more than one Origin Certificate. However, one certificate is all we need for our purpose. Using the certification generated by Cloudflare you avoid the trouble with an invalid certificate as it’s hard to find out the reason if Cloudflare does not accept an invalid certificate.
Click button ‘Create Certificate’.

You will see a page like this:
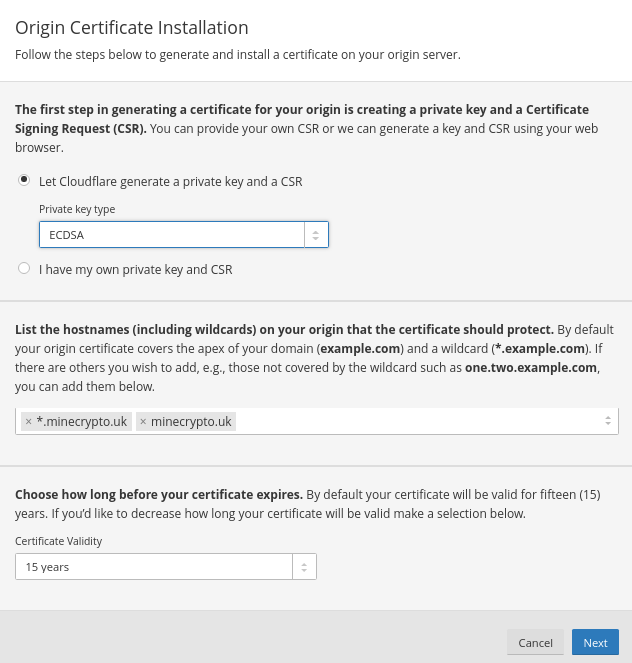
I suggest that you use 'Private key type' ECDSA instead of RSA. However, both will work.
Click ‘Next’. In the next page select ‘PEM (Default)’.
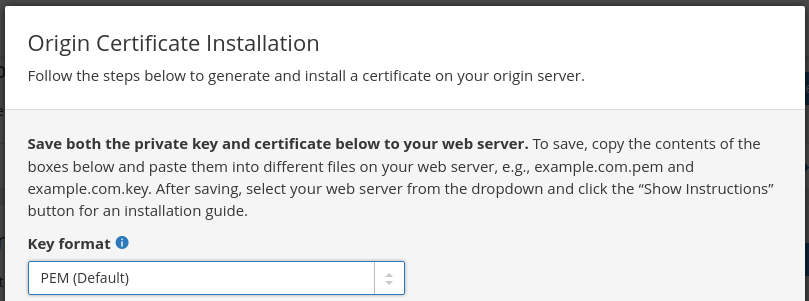
Below that selection for the key format you will see the origin certificate and further down you see the private key:
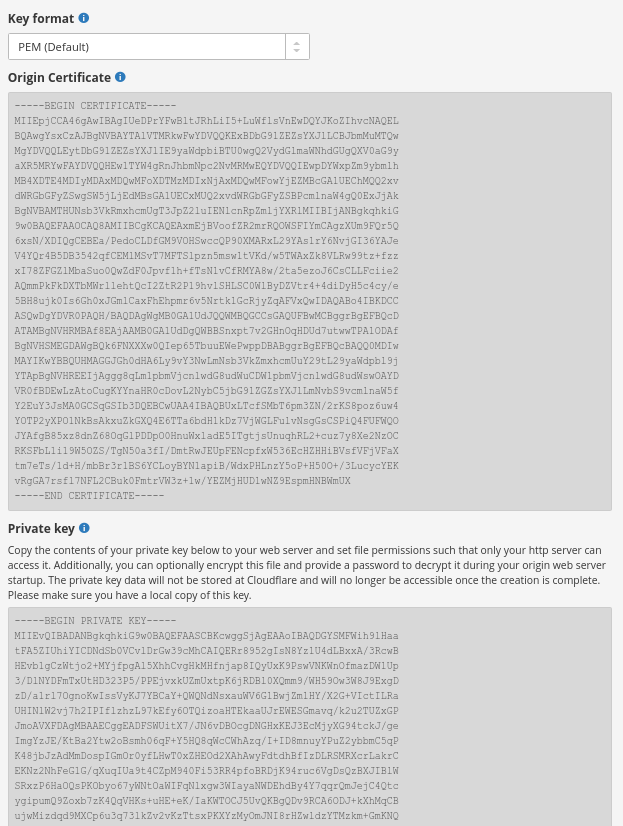
Set option 'Web Server for Installation' to 'Other (Not Listed)'. However, I don't think this option makes any difference because the key and certificate have been generated already.

Copy the content of the grey box with the origin certificate and paste it into a new plain text file on your computer. Then copy the content of the grey box with the private key into that text file.
You can add the private key at the beginning or the end of the file. We prefer to have the private key first and then the certificate.
A Linux computer is preferred. For Windows, ensure that the line ends remain Linux line ends. You can use Wordpad editor for that as Wordpad can recognize Linux line ends. We had a few issues with Windows line ends in certificates on Linux.
Give the .pem file any reasonable name. In our example we use
origin-server.pem
The structure of your origin-server.pem file on your computer should be:
-----BEGIN PRIVATE KEY-----
MIIEvQIBADANBgkqhkiG9w0BAQEFAASCBKcwggSjAgEAAoIBAQDJUUgf0OEYj1IY
...
Qpn70YQmnoInzxD5wa4Uvw4=
-----END PRIVATE KEY-----
-----BEGIN CERTIFICATE-----
MIIEpjCCA46gAwIBAgIUaw7tksbyA3R/7/0AU0nm28bBgTkwDQYJKoZIhvcNAQEL
...
iOYcKqi1NYAh1sJttQM3bMI3UDGIGZ/xDR+FEEi8o2YNbmzUQC9R5njV
-----END CERTIFICATE-----
Upload the Origin Certificate to the load balancer
Now you can upload the origin-server.pem file to our HAProxy server but as we are using a commercial load balancer with a WUI in this example we have a couple of options. You can just use scp (from Linux) or WinSCP (from Windows) to copy it over remembering to copy it to both appliances if using a highly available pair. Or you can use the upload feature of the WebUI of the load balancer. I will explain the latter way now...
On the master load balancer go to menu ‘SSL Certificate’ as shown below.

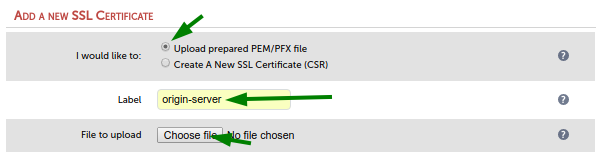
Click button ‘Add a new SSL Certificate’.
In the next screen select option ‘Upload prepared PEM/PFX file’.
Enter a reasonable label. The label will be used for the path and file name of the certificate on disk. Upper case letters in your label will be turned into lower case in the file name. Upload the origin-server.pem file from your computer via the ‘Choose file’ button.
Now you can use this certificate on your load balancer via STunnel as usual. If you did the steps above on the master of a load balancer pair then the certificate has been automatically replicated to the slave load balancer.
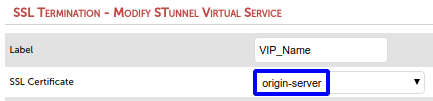
However, considering our task in a later section we will use HAProxy for SSL/TLS termination and not STunnel. So, please feel free to ignore the previous screenshot or play with the certificate in STunnel as you like.
In the next section, I will show you how to use this origin server certificate in an HAProxy configuration for SSL/TLS termination and load balancing.
SSL/TLS termination using HAProxy
Now I want to show you how to use this origin server certificate in HAProxy. It’s a few more steps than usual as we need to do manual changes to the HAProxy configuration.
We will not need a separate SSL/TLS termination service because HAProxy will do that termination for us.
First create a new HAProxy virtual service.
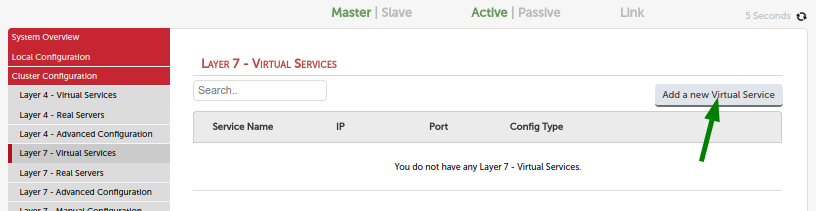
The port of the virtual service should be 443 as this is the port the Cloudflare server will use to access the load balancer.
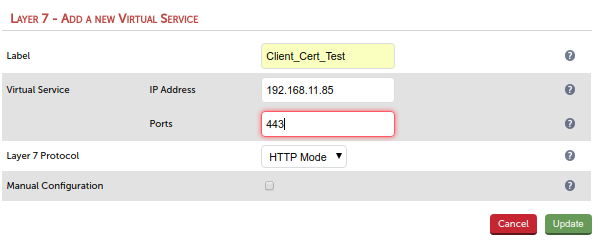
You might have spotted that we are using HTTP Mode but intend to receive HTTPS (port 443) which actually won’t work. It will work in our case because we terminate the TLS traffic via HAProxy in a manual step later.
Add your web server as real server to the new virtual service. You can start with one server for now. You can add more real servers later.
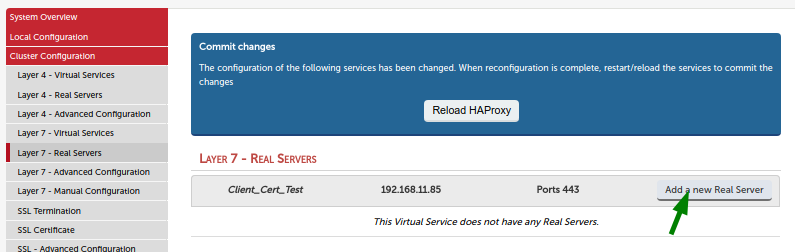
Use the port your server is listening to for HTTP traffic, usually port 80.
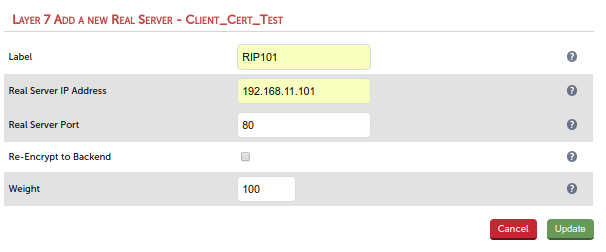
Adjust the virtual service and the real server settings in the WebUI according your needs. In doubt just leave the default settings. They work well for most web sites.
Go to ‘View Configuration > Layer 7’ and copy the complete configuration of the new service into the clipboard of your computer. The configuration of the new service begins with the listen line and ends at the next empty line.

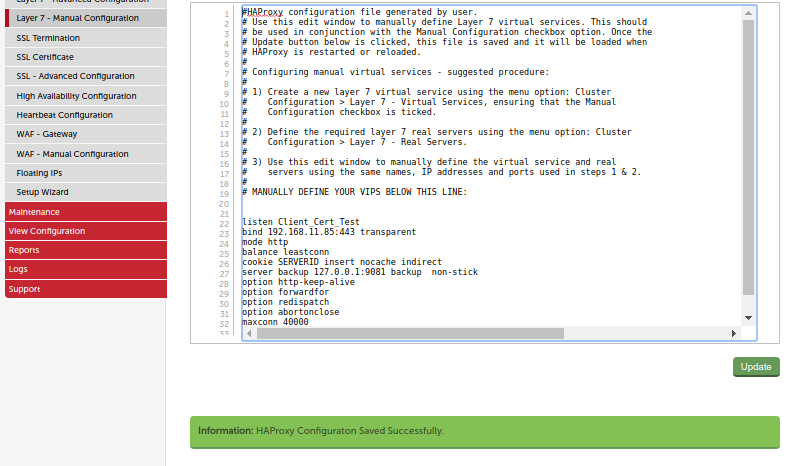
Go to ‘Cluster Configuration > Layer 7 - Manual Configuration’ and paste the service at the end.
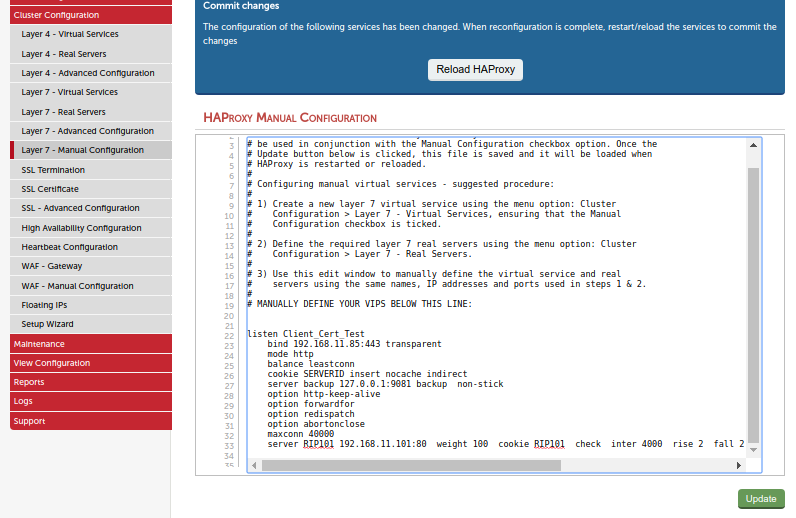
Do not reload HAProxy yet.
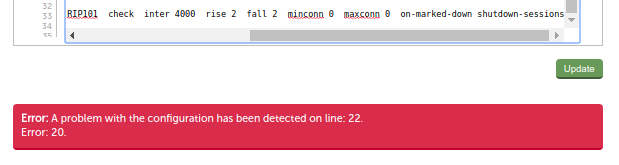
Click 'update' and you will see an error - but don't worry, that’s fine. All we want from the 'update' button is to save our changed file.
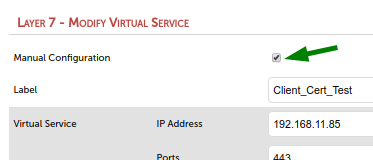
Go back to your virtual service.
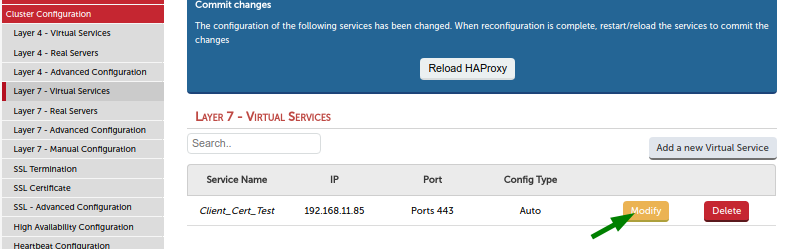
Enable option ‘Manual Configuration’ and click 'update'. This will remove the configuration for this virtual service from the normal haproxy.cfg file. We don’t need it over there as we have it in the manual haproxy file.
Go back to ‘Layer 7 - Manual Configuration’, click 'update' and now you see the green box saying that all went well.
In the editor window append the following text to the bind line:
ssl crt /etc/loadbalancer.org/certs/server.pem

File 'server.pem' is the self-signed default certificate on the load balancer.
Click the 'update button, then click 'Layer 7 - Manual Configuration' in the menu. Then click on the 'Reload HAproxy' button. Now the website will work, if you set the SSL option in the Cloudflare dashboard to ‘Full’.
Option ‘Full (strict)’ won’t work here because the server certificate in the bind line is the default self-signed certificate on the load balancer which is not considered a valid certificate by the Cloudflare server. We will change this now and use the origin-server.pem from Cloudflare instead.
First we need to find out where on the load balancer the origin-server.pem file is that we uploaded to the load balancer before: ssh (or PuTTY) into the load balancer and find your origin-server.pem file in folder
/etc/loadbalancer.org/certs/
or in a subfolder of this folder.
The certificate is not a folder. It’s a file with extension .pem. Depending on your load balancer version it can be in the certs folder or more likely in a subfolder of the certs folder. If you see it in both in folder certs and in a subfolder then use the certificate from the subfolder.
I use/etc/loadbalancer.org/certs/origin-server/origin-server.pem
which is the certificate I uploaded before.
Go back into the manual haproxy configuration editor and replace/etc/loadbalancer.org/certs/server.pem
by the path and file name of your certificate:

Click the 'update' button and then click the 'Layer 7 - Manual Configuration' button in the menu. Then click on the 'Reload HAProxy' button.
Set the SSL option in the Cloudflare dashboard to ‘Full (strict)’ and your website should work in ‘Full (strict)’ SSL mode now with a valid server certificate installed. All traffic from client to the load balancer is encrypted now.
Part 2 - Using Cloudflare's Authenticated Origin Pulls with a load balancer
If you doubt someone could somehow bypass the Cloudflare server and access the website via the load balancer directly then I will be writing a follow-up blog which will be available shortly - so do check back for further updates...
In the meantime though, if you require any assistance with the above or have any questions, please don't hesitate to get in touch. You can do so by leaving a comment below, opening a chat on the right-hand side, or emailing us: info@loadbalancer.org.

American customer service, German engineering and British values bring royal recognition for Loadbalancer.org


Does the new multi-threaded support in HAProxy finally solve the 10G problem?

Related posts
Multi-AZ resilience: Why the recent AWS outage shows you need it

How Loadbalancer.org provided this medical imaging vendor with more technical and commercial flexibility in AWS

Why is public cloud potentially a bad idea from a programmer's perspective?

Cloudian takes object storage performance to the next level —with a tailored load balancer
HAProxy Enterprise Edition vs Progress Kemp LoadMaster: A no-fluff engineer comparison

Loadbalancer.org announces leadership transition and next phase of growth
ENVOY Proxy versus Loadbalancer.org: Why storage vendors need purpose-built load balancing for S3, NFS, and SMB

Architecting resilient object storage: Delivering multi-site capabilities for HPE with Loadbalancer.org GSLB