


While a single MariaDB server might suffice for your application's backend, a MariaDB Galera Cluster offers significant advantages, making it a far superior solution — because it's a true multi-master topology.
And, unlike a traditional MySQL replicated database, you don't have to separate reads from writes at the application layer.
So let's explore how to build one. And more importantly why you need to use a load balancer with it!
A variation of this setup was even part of my technical interview for Loadbalancer.org, so it's a solution close to my heart ; ).
Table of contents
- What is a MariaDB Galera Cluster
- Why would you need a Galera cluster rather than a simple database
- MariaDB cluster use case
- Bare metal lab configuration
- Prerequisites on all systems
- How to load balance MariaDB with Ldirectord using Layer 4 DR
- How a Loadbalancer appliance can make this process a lot easier
What is a MariaDB Galera Cluster?
MariaDB is an open-source relational database management system (RDBMS), frequently utilized as a high-availability synchronous replication solution. It is also a highly compatible and enhanced fork of MySQL.
At its heart, Galera is a multi-primary cluster for MariaDB, offering features like Active-Active topology, read/write on any node, true parallel replication with automatic membership, and node joining with an emphasis on the native MariaDB experience.
MariaDB Galera Cluster advantages
MariaDB is one of the most popular database servers worldwide for good reason, providing:
- True multi-master topology
- No data loss when nodes crash
- Data replicas remain consistent
- No complex and time-consuming failovers
- Parallel transaction execution on all cluster nodes
- No slave lag
- No lost transactions
- Reads/writes scalability
- Smaller client latencies
- Support of multi-cloud and multi-region deployments
More information on the MariaDB Galera cluster.
Why would you need a Galera cluster rather than a simple database?
The need for highly available synchronous replication in database servers is paramount for mission critical workloads where data loss is unacceptable.
Unlike asynchronous replication, which confirms a transaction commit before changes are propagated to replicas, synchronous replication ensures that a transaction is only considered complete once it has been successfully written to both the primary server and at least one secondary replica.
This commit-acknowledgment from the replica guarantees zero data loss during a failover event, offering the highest level of data integrity and consistency. While this method can introduce slightly higher latency due to the wait time for replica confirmation, the guarantee of business continuity and data protection is a vital trade-off, making it essential for applications requiring maximum fault tolerance and reliability.
But don't forget that your Galera cluster still needs load balancing!
MariaDB cluster use case
The MariaDB Galera Cluster ensures high availability with built-in disaster recovery through synchronous multi-master replication.
It's ideal for active-active setups, providing strong consistency and automatic failover which makes it perfect for critical applications needing continuous uptime.
And when paired with an HA (High Availability) pair of Loadbalancer appliances, you have a truly impressive setup for data storage.
Bare metal lab configuration
After deploying your Ubuntu 25.04 LTS machines, make sure that these are all up to date:
| Component | vCPU | vRAM | O/S Disk | Data Storage |
|---|---|---|---|---|
| MariaDB Node1 | 2 | 6GB | 50GB | 150GB |
| MariaDB Node2 | 2 | 6GB | 50GB | 150GB |
| MariaDB Node3 | 2 | 6GB | 50GB | 150GB |
/etc/sysctl.conf for system configuration during boot. Instead, it honors the systemd-recommended path: /usr/lib/sysctl.d/50-default.conf recommended by systemd. But fear not, later on I'll show you a new way to resolve the ARP problem using these newer systems.Prerequisites on all systems
Right! Let's get to it.
Run updates
Make sure the system is up to date:
sudo apt update && sudo apt upgrade -y Prepare the data drive
Identify the second drive:
lsblk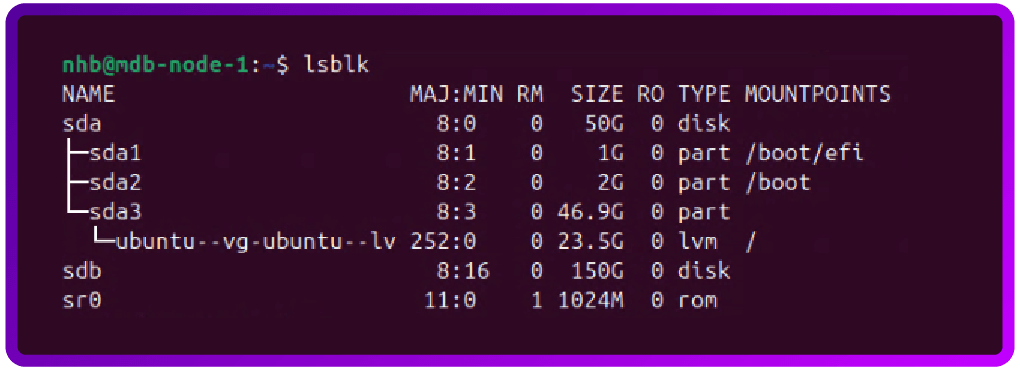
In my case the new data drive will be /dev/sdb.
Next create the file system on the new drive, WARNING this will erase the drive.
sudo mkfs.ext4 /dev/sdb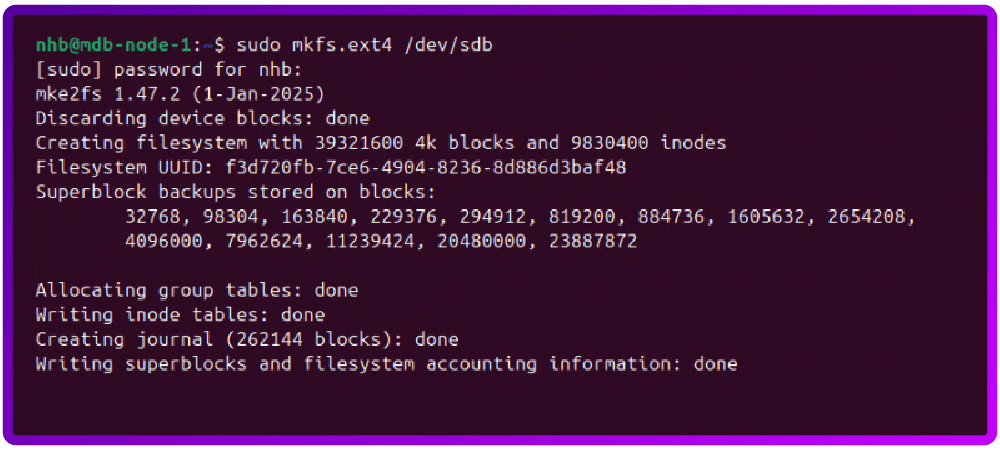
Now create a temporary mount point and mount the drive:
sudo mkdir /dataGet the UUID of the new drive:
sudo blkid /dev/sdb
Configure auto mounting:
sudo nano /etc/fstab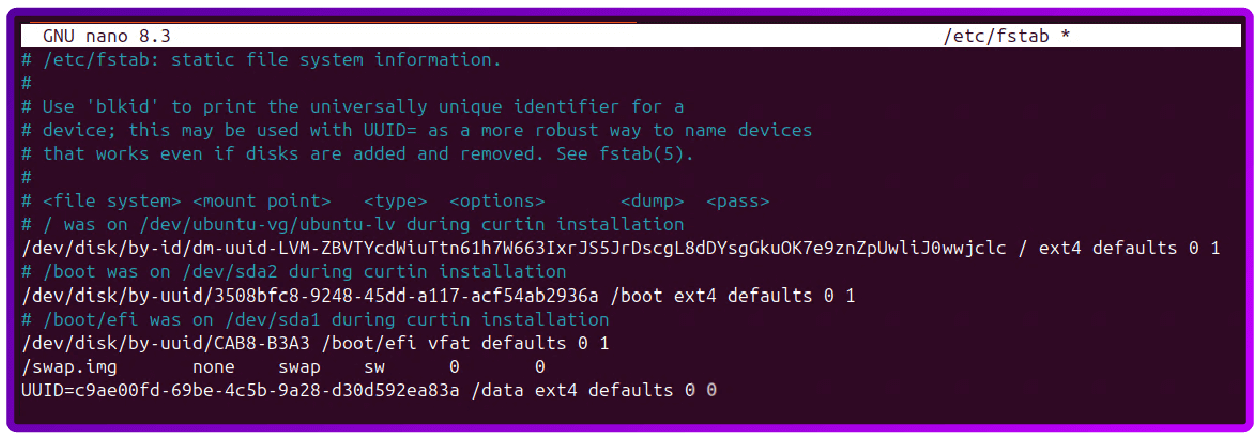
Close nano with Ctrl + X, Y to save the modified buffer and enter to the file name.
Reload the fstab config:
sudo systemctl daemon-reloadConfigure the system Firewall
We will now configure the UFW (Ubuntu):
sudo ufw app list        # Find a list of apps that can be allowed thougt the firewall
sudo ufw allow <apps found above> # run this command for each app found
sudo ufw allow 3306/tcp  # MariaDB client connections
sudo ufw allow 4567/tcp  # Galera replication (multicast and unicast)
sudo ufw allow 4567/udp  # Galera replication (multicast)
sudo ufw allow 4568/tcp  # Incremental State Transfer (IST)
sudo ufw allow 4444/tcp  # State Snapshot Transfer (SST)
sudo ufw enable          # If firewall is not already enabled
- Command may disrupt existing ssh connections. Proceed with operation (y|n)? y
sudo ufw reload
Install MariaDB and Galera
If using Ubuntu 24.04 LTS and older ONLY, configure the Ubuntu server for the MariaDB and Galera repo:
sudo apt update

sudo apt install dirmngr software-properties-common apt-transport-https ca-certificates curl -y

curl -LsS https://r.mariadb.com/downloads/mariadb_repo_setup | sudo bash

sudo apt update
Install MariaDB and Galera:
sudo apt install mariadb-server mariadb-client galera-4 -ySecure the MariaDB installation:
sudo mariadb-secure-installationFor the lab, I will use the following:
- Enter current password for root (enter for none): enter
- Switch to unix_socket authentication [Y/n]: n
- Change the root password? [Y/n]: n
- Remove anonymous users? [Y/n]: y
- Disallow root login remotely? [Y/n]: y
- Remove test database and access to it? [Y/n]: y
- Reload privilege tables now? [Y/n]: y
Allow MariaDB to listen to requests from the network (or Loadbalancer appliance):
sudo nano /etc/mysql/mariadb.conf.d/50-server.cnfEdit it with the following:
Find:
bind-address            = 127.0.0.1
and change it to
bind-address            = 0.0.0.0
Tell MariaDB to use the new data drive
At this point we need to move MariaDB’s file to the new drive.
Copy MariaDB’s file to the new drive:
sudo systemctl stop mariadb
sudo rsync -avP /var/lib/mysql/ /data/mysql
Tell MariaDB to use the new storage location:
sudo nano /etc/mysql/mariadb.conf.d/99-custom-datadir.cnfAnd add the following to the file:
[mysqld]
datadir=/data/mysql
Configure AppArmor for the new MariaDB data drive
Edit the AppArmor config:
sudo nano /etc/apparmor.d/tunables/aliasAdd the following to the bottom of the file:
alias /var/lib/mysql/ -> /data/mysql/,Close nano with Ctrl + X, Y to save the modified buffer and enter to the file name.
Reload AppArmor:
sudo systemctl reload apparmorConfigure each cluster node
The following config needs to be placed in the following location on each node in the cluster: /etc/mysql/conf.d/galera.cnf
[mysqld]
# Basic MariaDB settings
binlog_format=ROW
default_storage_engine=InnoDB
innodb_autoinc_lock_mode=2
bind-address=0.0.0.0 # Binds to all network interfaces. Adjust if you have a specific private IP for cluster traffic.

# Galera Provider Configuration
wsrep_on=ON
wsrep_provider=/usr/lib/galera/libgalera_smm.so # Adjust path if different (e.g., /usr/lib64/galera-4/libgalera_smm.so)

# Galera Cluster Configuration
wsrep_cluster_name="my_galera_cluster" # A unique name for your cluster

# IP addresses of ALL nodes in the cluster, comma-separated.
# Use private IPs if available for cluster communication.
wsrep_cluster_address="gcomm://node1_ip_address,node2_ip_address,node3_ip_address"

# This node's specific configuration
wsrep_node_name="node1" # Must be unique for each node (e.g., node1, node2, node3)
wsrep_node_address="node1_ip_address" # This node's own IP address
- wsrep_cluster_name = A unique name for your cluster
- wsrep_cluster_address = List the IP addresses of all nodes in the cluster on every node
- wsrep_node_name: Must be unique for each node (e.g., node1, node2, node3)
- wsrep_node_address: Set to the specific IP address of the node you are configuring.
Start or bootstrap the cluster
Node 1: Bootstrap the cluster
sudo galera_new_cluster
sudo systemctl status mariadb
Join Node 2 and 3: Start the other nodes one at a time
sudo systemctl start mariadb
sudo systemctl status mariadb
Test the cluster
Check the cluster size:
sudo mariadb -e "SHOW STATUS LIKE 'wsrep_cluster_size';"The output should show 3.
Test replication
On node 1 create a test database:
sudo mariadb -e "CREATE DATABASE galera_test;"On each of the other nodes check that the database now exists:
sudo mariadb -e "SHOW DATABASES LIKE 'galera_test';"Create a test user with remote access
Login to MariaDB as the root user:
Sudo mariadb -u root -p Note, you will be asked for the root user password twice.
Next, create the new remote user — as this is for testing only I've used basic settings and allowed access from every device on the network.
Basic for testing only
CREATE USER 'testuser'@'%' IDENTIFIED BY 'TestPassword';

A secure way
CREATE USER '<username or random string>'@'<IP of system connecting in>' IDENTIFIED BY '<Secure Password>';
Grant user permission to the database.
As this is for testing only I've used basic settings and allowed access from every device on the network to every database:
Basic for testing only
GRANT ALL ON *.* TO 'testuser'@'%' IDENTIFIED BY 'TestPassword' WITH GRANT OPTION;

A secure way
GRANT ALL ON <Database Name>.* TO '<username or random string>'@'<IP of system connecting in>' IDENTIFIED BY '<Secure Password>' WITH GRANT OPTION;
Finally flush the privileges table and close the connection:
FLUSH PRIVILEGES;
EXIT;
Now, you're ready to start load balancing!
How to load balance MariaDB with Ldirectord using Layer 4 DR mode
Why load balance a Maria Galera Cluster?
Before we start configuring the load balancer, I thought it might be worth saying a few words about why we're bothering to load balance a MariaDB Galera Cluster, even though Galera itself offers synchronous multi-master replication (meaning all nodes are technically masters and can accept reads and writes).
The bottom line is that load balancing is essential to translate the cluster's high-availability and multi-master capabilities into a robust, single-point-of-access solution for your application.
To put it another way, while Galera Cluster provides the database backbone for high availability and redundancy, a load balancer provides the necessary intelligence and resilience to manage client connections and traffic flow effectively, ensuring the application can fully benefit from the cluster's capabilities.
Now we've reminded ourselves of the 'why', let's move onto the 'how'...
Load balancing prerequisites
For this section we will use a single Ubuntu 24.04 with LVS kernel based load balancing managed by the Ldirectord daemon, for information on how to do this with the Loadbalancer.org appliance please see the section below: "How a Loadbalancer appliance can make this process a lot easier".
First deploy a Ubuntu 24.04 server with the following spec (Test lab only):
| Component | vCPU | vRAM | O/S Disk |
|---|---|---|---|
| Ldirectord | 2 | 2GB | 25GB |
Getting the system ready
Update the system and install the required software:
sudo apt update && sudo apt upgrade -y
sudo apt install -y ldirectord ipvsadm
Configure IP forwarding and make it permanent:
sudo sysctl -w net.ipv4.ip_forward=1
echo "net.ipv4.ip_forward = 1" | sudo tee /etc/sysctl.d/90-ip-forward.conf
Configure Ldirectord for LVS maintenance and health checks
We'll now configure ldirectord to balance the connection to our MariaDB cluster in a Round Robin using Layer 4 DR mode. This mode is built for speed and offers the highest performance and lowest latency compared to other Layer 4 or Layer 7 load balancing methods. See this blog for "Why we love DR mode".
Edit the config file:
sudo nano /etc/ha.d/ldirectord.cfAdd the following to the new file:
#Global settings
checktimeout=3
checkinterval=5
autoreload=yes
logfile="/var/log/ldirectord.log"
quiescent=no

#Virtual Server for MariaDB Galera Cluster
virtual=<Floating IP>:3306
   #Real servers using Driect Routing (gate)
   real=<Real IP node 1>:3306 gate 100
   real=<Real IP node 2>:3306 gate 100
   real=<Real IP node 3>:3306 gate 100
   scheduler=wrr
   protocol=tcp
   checktype=connect
   checkport=3306
Configuring the floating IP
Get the name of the network adapter:
sudo ip a
In my case, the interface I'll use is ens33.
Add the floating IP to the network adapter:
sudo ip addr add <Floating IP>/24 dev <Adapter Name>Start Ldirectord and make it autostart:
sudo systemctl start ldirectord
sudo systemctl enable ldirectord
Solving the ARP Problem
As we are using Ubuntu on the real servers, we will solve the ARP Problem on them as follows.
On each node in the MariaDB Galera carry out the following steps.
First SSH to the node, get the name of all network adapter on the system:
sudo ip aEdit the new conf file:
sudo nano /usr/lib/sysctl.d/50-default.confAdd the following to the 50-default.conf, updating the interface name to match what your system has:
net.ipv4.conf.all.arp_ignore=1
net.ipv4.conf.eth0.arp_ignore=1
net.ipv4.conf.eth1.arp_ignore=1
net.ipv4.conf.all.arp_announce=2
net.ipv4.conf.eth0.arp_announce=2
net.ipv4.conf.eth1.arp_announce=2
net.ipv6.conf.lo.dad_transmits=0
net.ipv6.conf.lo.accept_dad=0
Apply the setting to the node:
sudo sysctl --systemAdd the floating IP to each nodes loopback adapter:
sudo ip addr add dev lo <Floating IP>/32And confirm that it has been added:
sudo ip aAt this point you should have a working MariaDB Galera Cluster with traffic running through a Pure Ldirectord load balancer in DR mode.
This can be tested by pointing a system that has MariaDB (MYSQL) command line tools, or the MYSQL Workbench Community tool installed at the floating IP address.
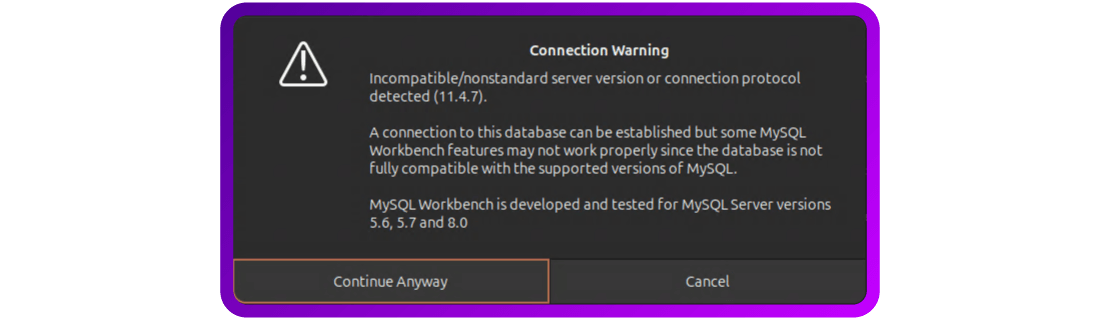
However, here’s the good news. There is actually a much simpler way to doing all this!
How a Loadbalancer appliance can make this process a lot easier
You almost certainly want a high-availability pair of load balancers, a graphical interface, and built in monitoring and logging tools.
And, because the Layer 4 component of the Loadbalancer.org appliance is actually based on LVS and Ldirectord, you can even get help migrating your current open source configuration.
Here's how to do it.
First, log in to your active primary node.
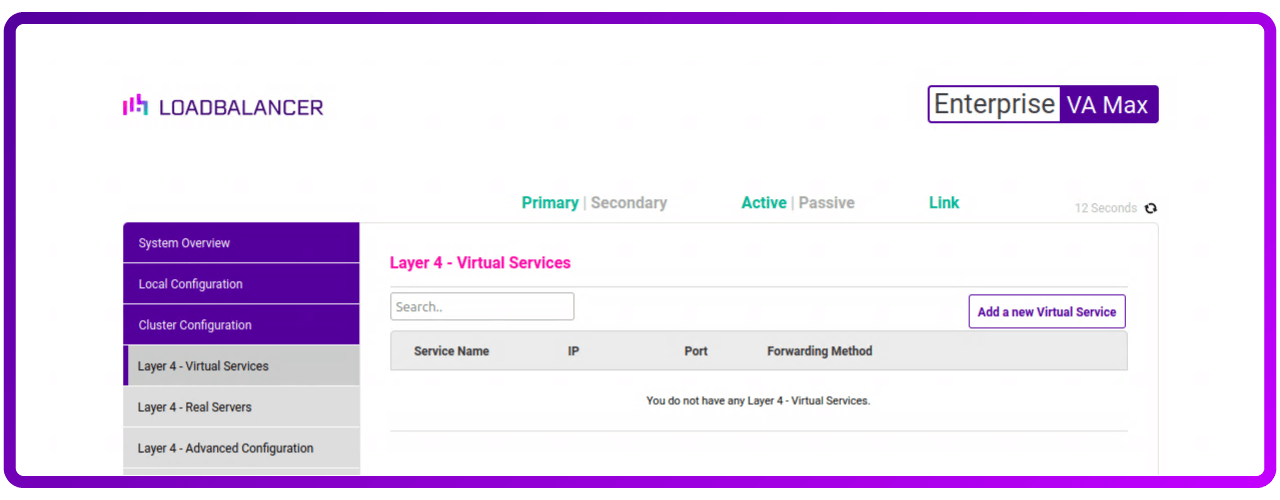
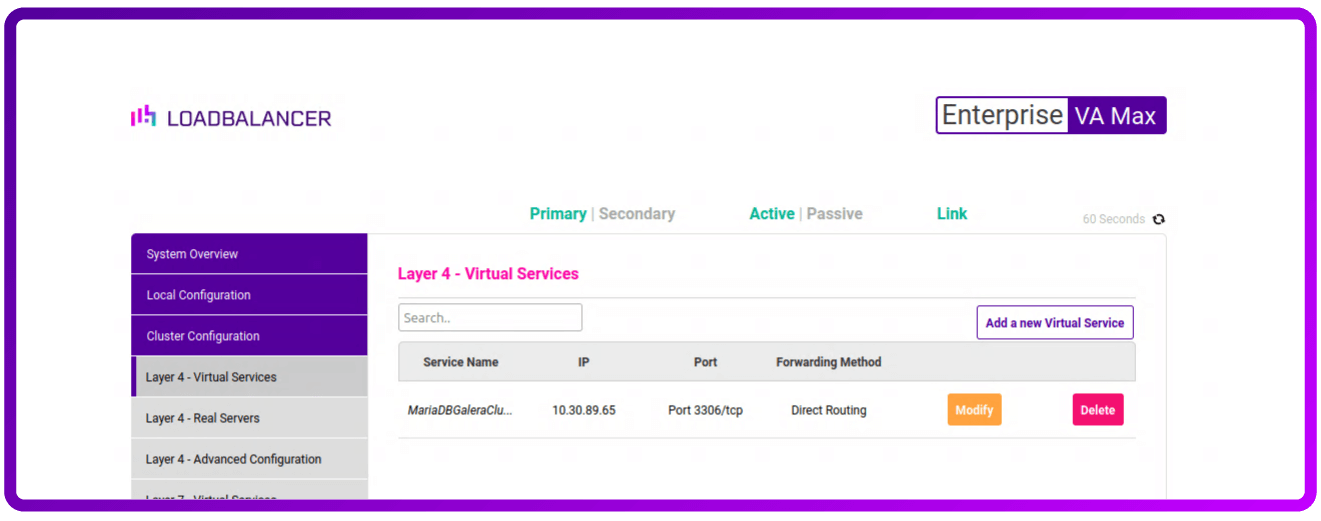
Next, navigate to Cluster Configuration -> Layer 4 - Virtual Services
and click “Add a new Virtual Service".
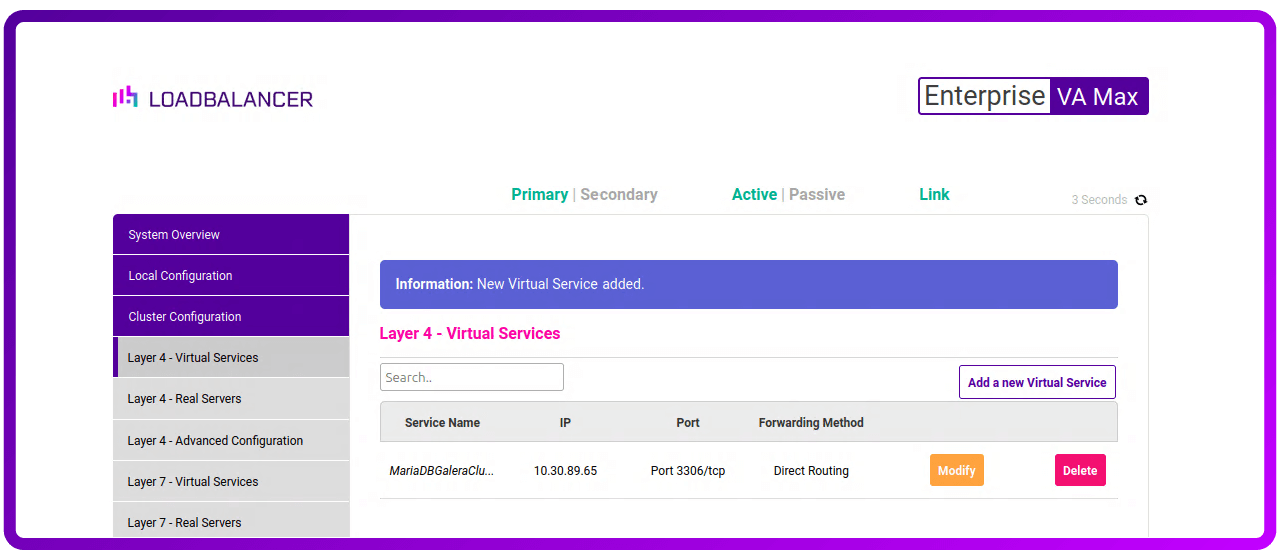
Now we need to give to give the new virtual service some details like:
- Label: make it something meaningful - MariaDBGaleraCluster_VIP
- IP Address: this is the floating IP address - 10.30.89.65
- Ports: this is the MariaDB Port number - 3306
- Protocol: leave this as TCP
- Forwarding Method: set this to Direct Routing

Now click “Update“ to create are new Virtual Service:
Next, let's add some Real Servers. Click on “Layer 4 - Real Servers" in the side menu and then click on “Add a new Real Server“ button next to our newly created Layer 4 service (repeat this step for all the nodes in the MariaDB Galera Cluster).
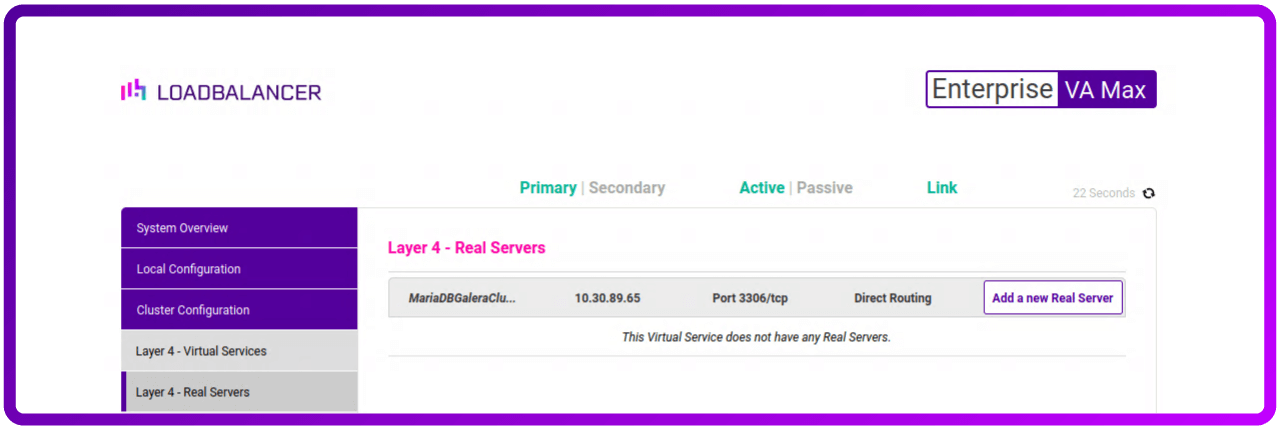
We then need to give the new Real Server some details like:
- Label: make it something meaningful like the real servers name - MDB-Node-1_RIP
- Real Server IP Address: this is the IP of the real server in the MariaDB Galera cluster
- Weight: can be left at 100
- Minimum Connection: can be left at 0 for not set
- Maximum Connection: can be left at 0 for not set
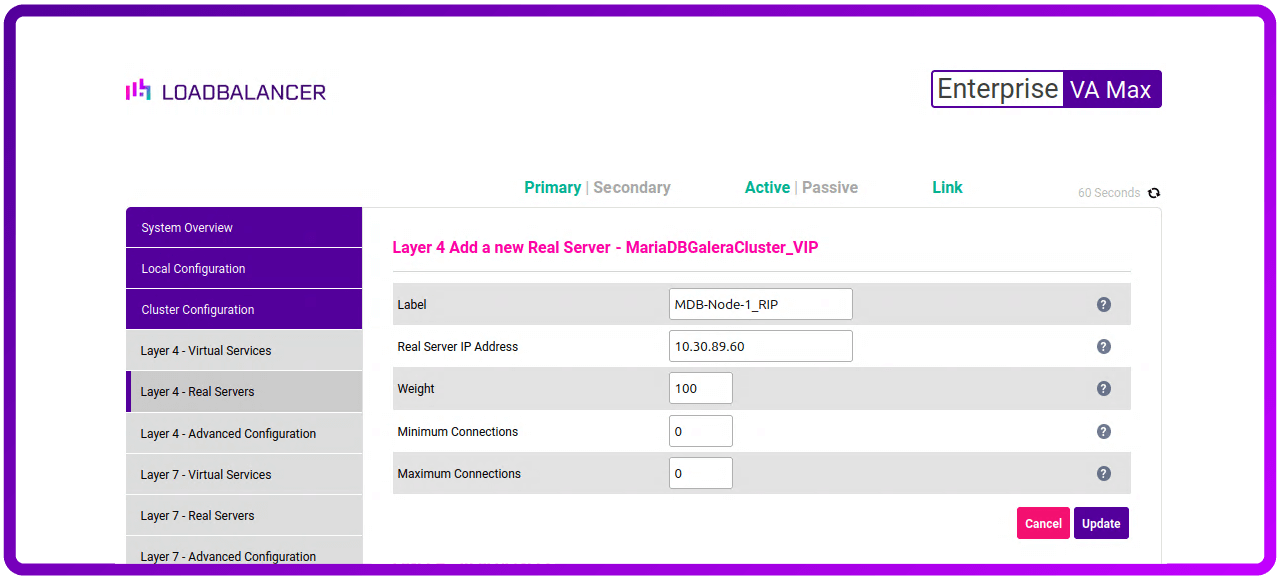
Now click “Update" to add this Real Server to the new Virtual Service.
After solving the ARP Problem as described above, you should have a working a working MariaDB Galera Cluster with traffic running through our Loadbalancer.org appliance in DR mode.
This can be tested by pointing a system that has MariaDB (MYSQL) Command line tools or MYSQL Workbench Community tool installed at the floating IP address.

Bonus item: Let's make it even better!
Ok, so who doesn't like a bonus item?! Let's make the monitoring of the MariaDB Galera cluster even better with the Loadbalancer.org appliance.
At the moment our Virtual Service is only checking that the nodes in the cluster are switched on and responding to a connection on port 3306.
So let's make the load balancer log in to each node in the cluster and ensure it's accepting the log in (rather than just checking that MariaDB is up and running).
If your cluster is hosting just a single database, then using this database for monitoring would be a good approach. However, if your cluster is hosting multiple databases or you have security concerns, it’s worth setting up a database just for the check to work against — the approach we'll take with this next part of the blog...
Getting the MariaDB Galera Cluster ready
So at this point there are two ways to create the required data and users:
- You can either do it with the MYSQL Workbench; or
- (like I will show you here) via the command line.
The first thing you will need to do is SSH to each node in the cluster.
On any node in your cluster login to MariaDB with the root account (or a user that has admin privileges):
sudo mariadb -u root -p
- OR -
mariadb -u <adminuser> -p
Remember, if using the root account you could be asked to login in twice.
Create a new database called “ healthcheckdb “ and check it was created:
CREATE DATABASE healthcheckdb;
SHOW DATABASES;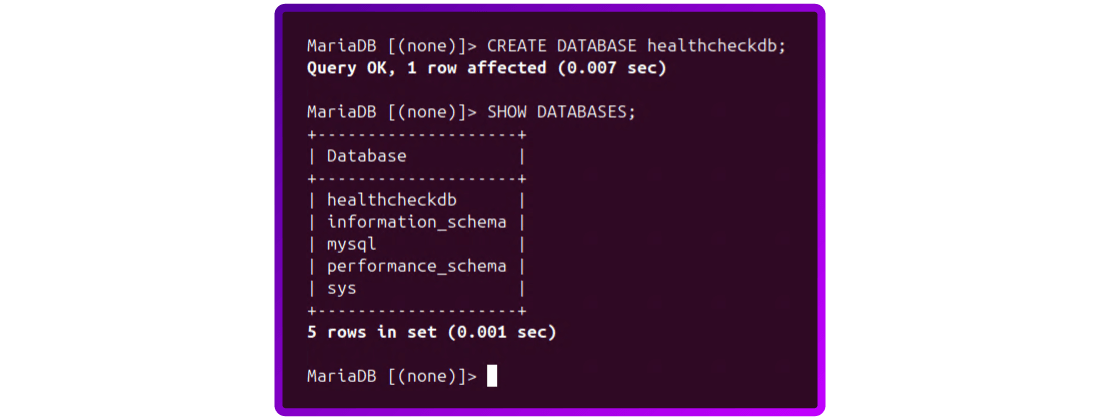
You should see the new database in the list.
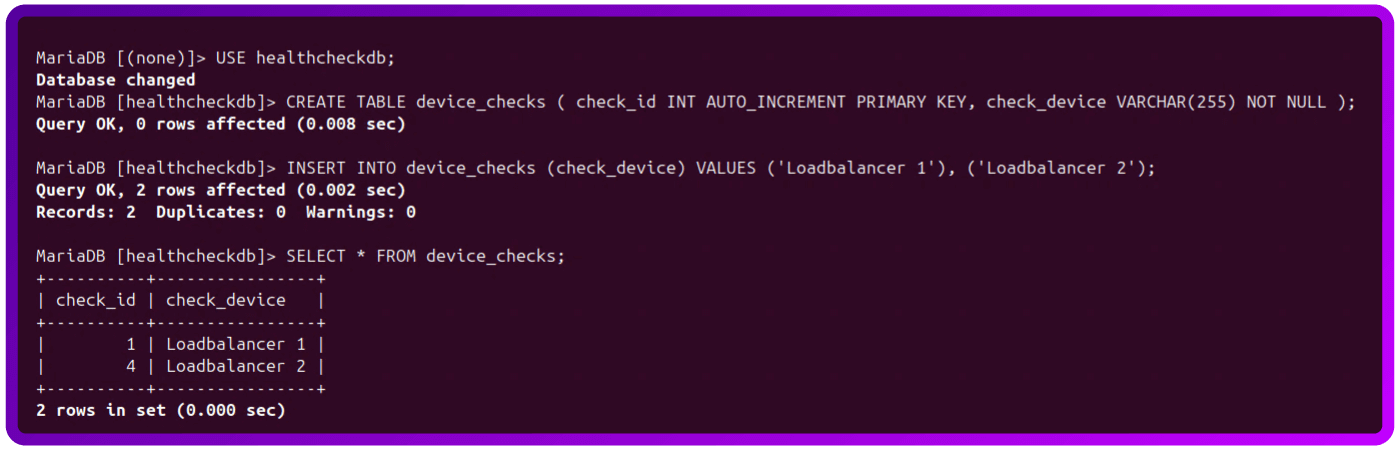
Next we need to create a table that we can use to check and a dummy data in it:
USE healthcheckdb;
CREATE TABLE device_checks ( check_id INT AUTO_INCREMENT PRIMARY KEY, check_device VARCHAR(255) NOT NULL );
INSERT INTO device_checks (check_device) VALUES ('Loadbalancer 1'), ('Loadbalancer 2');
SELECT * FROM device_checks;
Now let's create two new users one for each of our loadbalancer as we are going to restrict access to the load balancer’s base IP address:
CREATE USER 'loadbalancer-hc'@'<IP of system connecting in>' IDENTIFIED BY '<Secure Password>';
Let's check that the new user got created:
SELECT User, Host FROM mysql.user;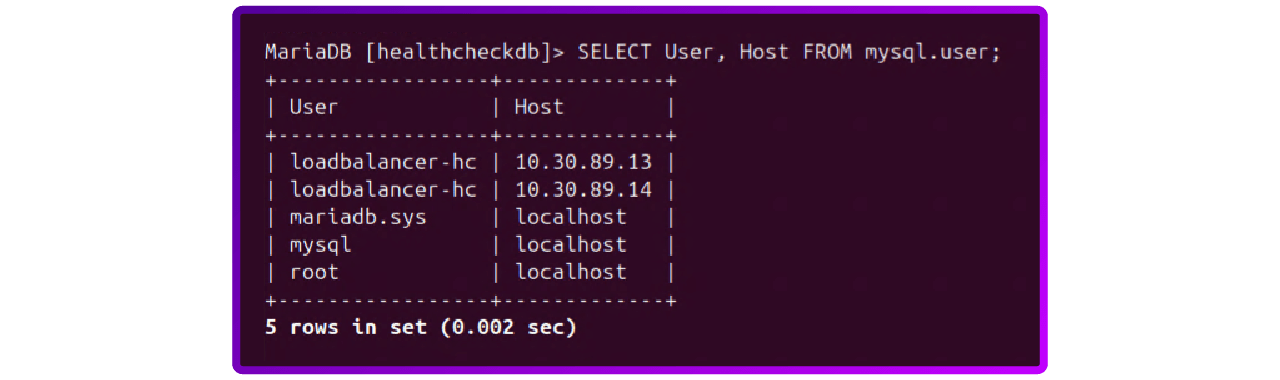
Give users access to the database:
GRANT SELECT ON healthcheckdb.* TO 'loadbalancer-hc'@'<IP of system connecting in>' IDENTIFIED BY '<Secure Password>';
Let's check that the new user permissions got set:
SELECT User, Host, Select_priv, Insert_priv, Update_priv, Delete_priv Create_priv, Drop_priv, Reload_priv, Shutdown_priv, Grant_priv, Alter_priv, Super_priv FROM mysql.user WHERE User = 'loadbalancer-hc';

SHOW GRANTS FOR 'loadbalancer-hc'@'<IP of system connecting in>';
SHOW GRANTS FOR 'loadbalancer-hc'@'<IP of system connecting in>';
If you would like to test the other nodes in the cluster to see if what we have done has replicated here are a set of commands you can use:
sudo mariadb -e "SHOW DATABASES;"

sudo mariadb -e "SELECT User, Host FROM mysql.user;"

sudo mariadb -e "SELECT * FROM healthcheckdb.device_checks;"

sudo mariadb -e "SELECT User, Host, Select_priv, Insert_priv, Update_priv, Delete_priv Create_priv, Drop_priv, Reload_priv, Shutdown_priv, Grant_priv, Alter_priv, Super_priv FROM mysql.user WHERE User = 'loadbalancer-hc';"

sudo mariadb -e "SHOW GRANTS FOR 'loadbalancer-hc'@'<IP of system connecting in>';"
sudo mariadb -e "SHOW GRANTS FOR 'loadbalancer-hc'@'<IP of system connecting in>';"
Configure the load balancer
Configure the Loadbalancer.org appliance Layer 4 virtual service to use the new database for health checks.
Go to Cluster Configuration -> Layer 4 - Virtual Services and click "Modify" next to our "MariaDbGaleraCluster" entry:
Next scroll down the page and find the "Health Checks" section change the "Check Type" to "Negotiate":
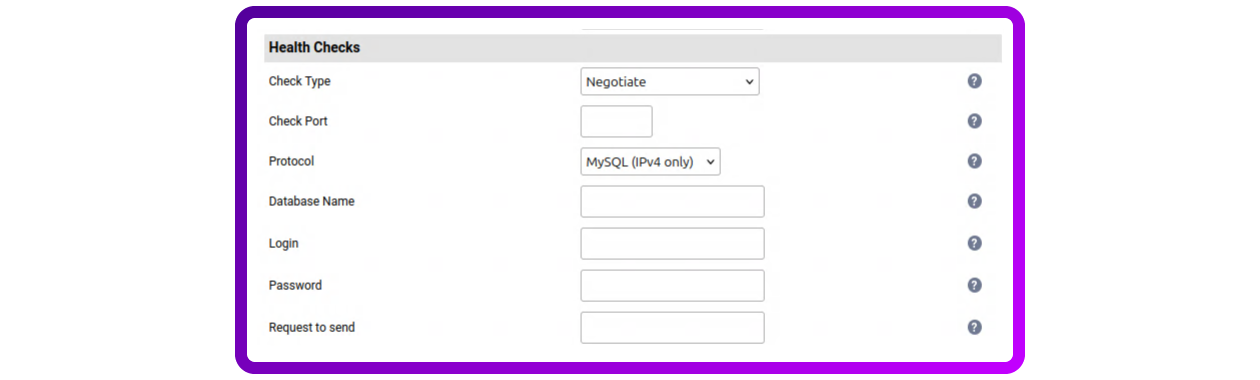
- Check Port: can be left blank as we are using the default MariaDB port on the real servers
- Protocol: can be left set to - MySQL (IPv4 only)
- Database Name: healthcheckdb
- Login: loadbalancer-hc
- Password: the secure password created in MariaDB
- Request to send: SELECT * FROM healthcheckdb.device_checks
But wait. Oh no, my Virtual service is down?!
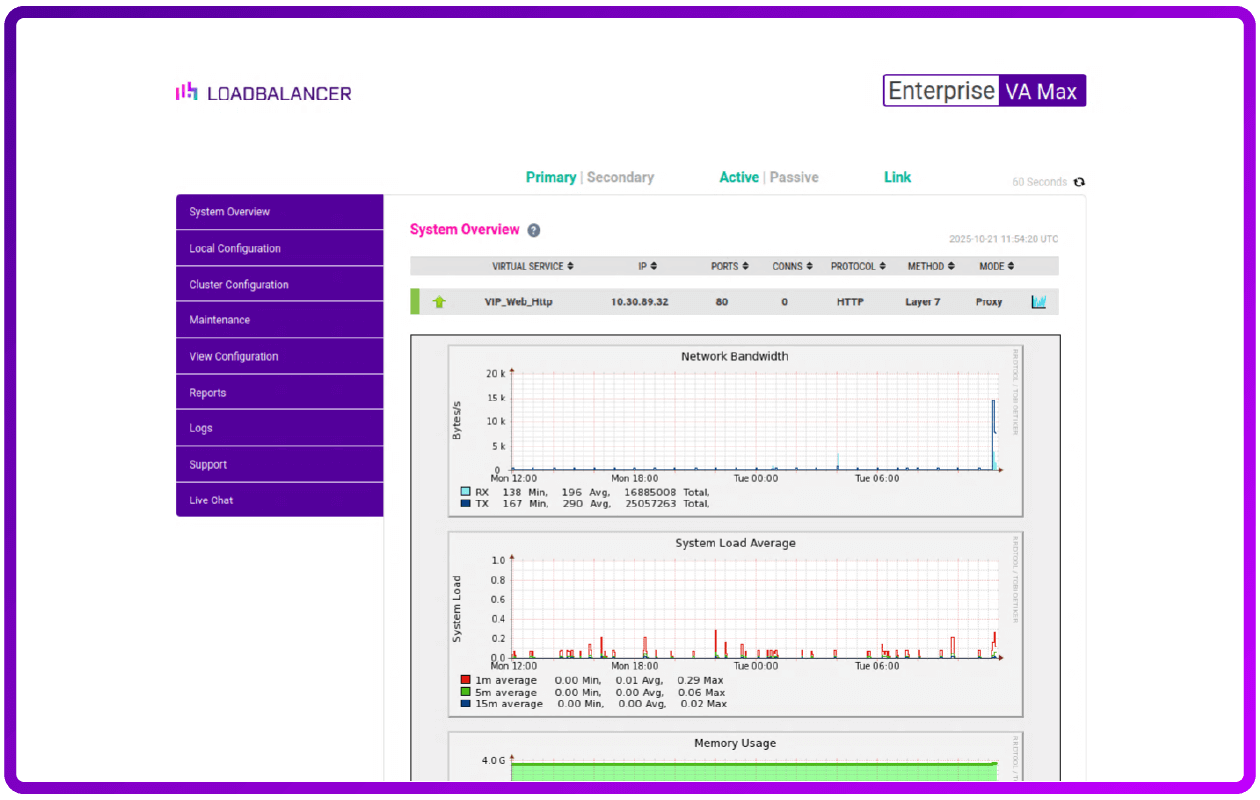
So after making this change you might find that the "System Overview" page shows your MariaDBGaleraCluster service as being down:
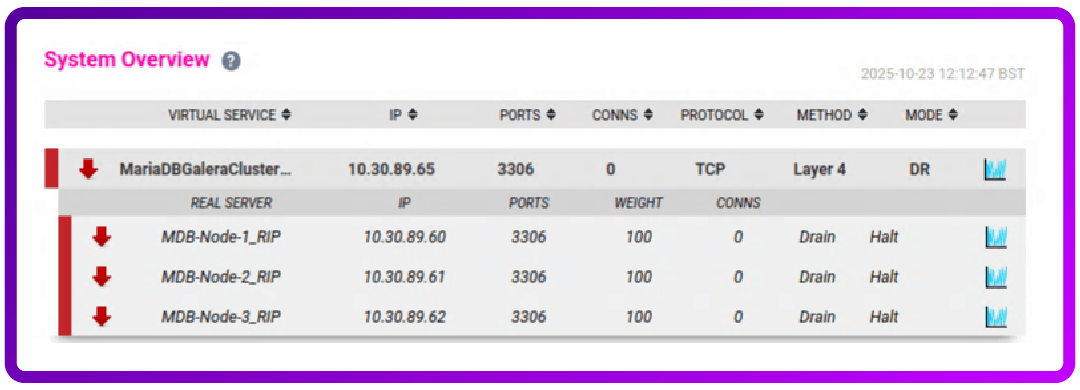
There are two possible reasons this may of happened:
- MariaDB could be blocking the connection; or
- A value has been incorrectly used.
To fix this, let's try first of all resetting the block on MariaDB...
On one of the MariaDB Galera nodes run the following command
sudo mariadb-admin flush-hostsAnd, if that was the fault, your MariaDBGaleraCluster virtual service will come back online and recover:
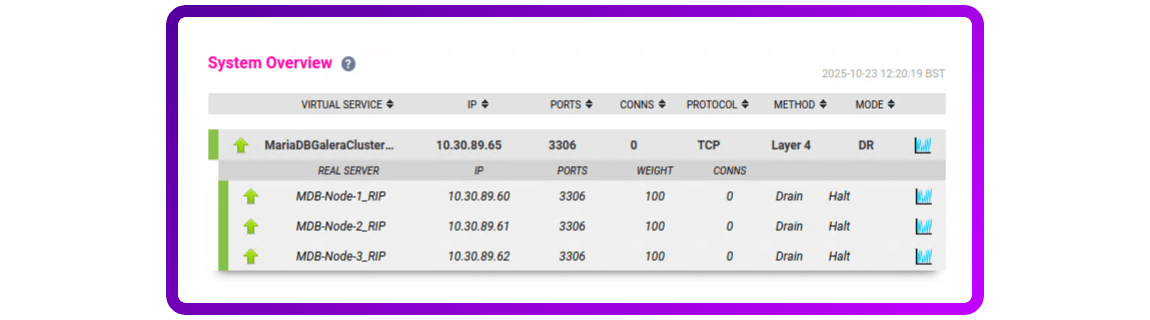
If this doesn't work then don't worry, just go back over each step to make sure all the details are correct.
As a final point you will need to failover to the other node and check that the health check is working from there as well.
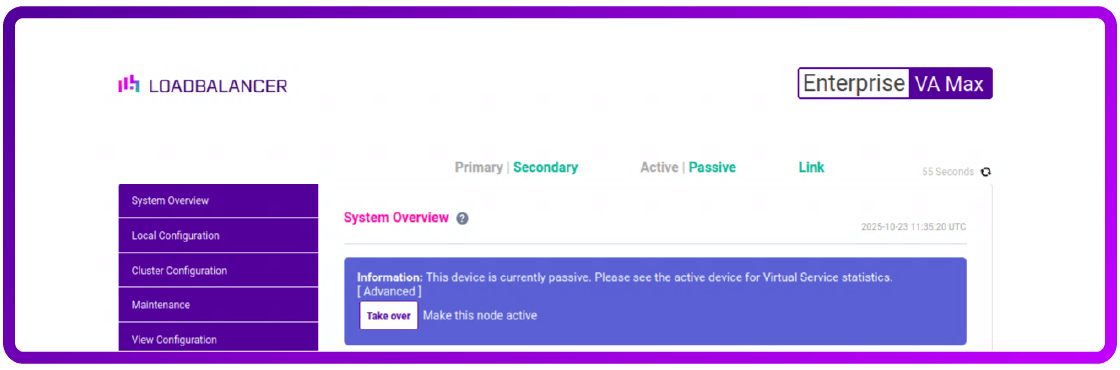
Log on to your secondary node and click on "[Advanced]", then click on the "Take over" button and OK the popup to take over:
Now we just need to wait a couple of minutes to make sure that the health checks are passing. This is a good time to run some test traffic through the load balancer to the cluster.
Then the final stage is to fail back over to the primary load balancer.
Back on the primary node (you might need to refresh the page) click "[Advanced]", then click on the “Take over “ button and OK the pop-up to take over.
Are LVS and Ldirectord the right solution for an HA MariaDB Galera Cluster?
LVS and Ldirectord are a GREAT solution if you're looking for a high-performing, highly available MariaDB Galera cluster.
But, as with most open source tools, you need to make sure that you design and configure you're environment correctly.
In this brief 'how-to' guide I've covered most of the issues. But what I haven't covered is disaster recovery, backup, or an open source HA solution for the load balancer itself (it needs to be HA because you'll definitely want two of them to avoid a single point of failure)!
If you're only after open source HA and want to take this further yourself, then I recommend you take a look at Keepalived.
However, it's an awful lot easier to achieve the desired solution with the help of a commercial vendor who's not only done this before, but also understands the underlying open source technologies that you've been struggling with.
Either way, you still need a decent load balancer to keep your database cluster working smoothly. And that is something we can definitely help with.