


One of the questions I get asked a lot is how to install an SSL certificate in Linux. The terms and technology are enough to confuse anyone, so I thought I would try and cover the basics here by explaining how to create an SSL certificate and the various files that you'll end up with.
Certificate Authority (CA)
The Certificate Authority (CA) is the entity which signs your SSL certificate, validating it as part of the issuing process. You can either create your own CA, which you would then need to trust on your browser, or you can apply to a 3rd party CA who has gone through a (costly) validation process in order to have their CA included, along with major browsers such as Firefox, Chrome, Edge, Opera and the rest.
All certificates should be signed by a CA, and in most cases, even the CA files are signed by other CAs all the way down to a "root CA" - this is known as the trust chain.
Certificate Signing Request (CSR)
Regardless of whether you are self-signing or requesting a 3rd party commercial CA signs your certificate to validate it, you will need a Certificate Signing Request (CSR). You can either generate a CSR in your browser through a control panel such as the one found in Loadbalancer's Appliance, or from the command line. Doing so will also create a key file. This key file should be kept secret and not shared, just as you wouldn't share the password to your bank account or keys to a safety deposit box.
Once generated, your CSR should be submitted to the CA who will send you a signed certificate in return.
Depending on the validation process you choose for your certificate, the generation process can take anything from a few minutes to several weeks.
Types of SSL validation
Domain validation
This is the quickest and cheapest, used by many providers, including free providers such as Let's Encrypt. Best suited for small businesses, it offers simple checks to prove you have control over the domain.
Organizational validation
This offers a medium level of validation. It checks that you own the domain and also that the details you enter in the CSR are valid.
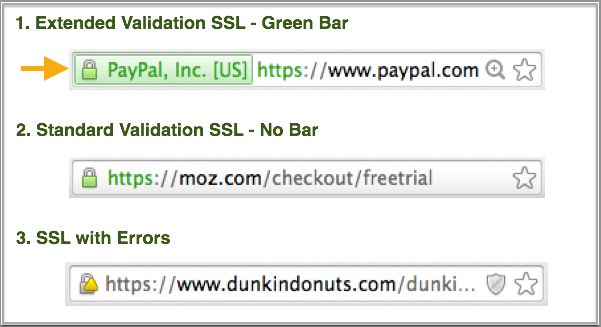
Extended validation (EV)
This is the green bar in your browser and is the most expensive and thorough level of validation. In addition to checking that you have control over the domain, SSL providers will validate that your business actually exists (usually through checks with Dun and Bradstreet), as well as that your physical address is valid.
Types of Certificate
Single domain
This protects a single URL and cannot be used for subdomains.
Wildcard
This protects an unlimited number of subdomains.
Multi-domain
This is sometimes called a Subject Alternative Name (SAN) or Unified Communication Certificate (UCC). It protects up to 250 domains with a single SSL certificate.
Steps to generate an SSL certificate
Watch out here for Step 7, as this is where most people fall down!
- Collect the relevant information (domain, business details, location, email contact, phone number, etc)
- Decide on your validation level
- Choose a Certificate Authority (CA)
- Generate a Certificate Signing Request (CSR)
- Submit your CSR to your chosen authority
- Await validation by your chosen CA
- Install your certificate
Installing your certificate is usually not just a case of uploading the .crt file that you received in the email.
Your web server is usually expecting a PEM file, and this PEM file is a sequence of several tasks, and the order usually does matter!
First in the list is the .key file which you generated as part of the CSR process. Then there's the .crt file. Finally there are the intermediate CA files which you received with your SSL certificate that validate the certificate.
You should create a PEM file and then paste each of the above files into that PEM file in order. Extract examples can be seen here:
-----BEGIN EC PRIVATE KEY-----MHcCAQEEIA+FYpJwZsGs7TpgiSj3S+4Bll5aYHtGnzpDWKmjeRDoAoGCCqGSM49JV3qFmJ2Fi+aVFAF3ITfU6UK47naqPGQKtzAKVA==
-----END EC PRIVATE KEY-----

-----BEGIN CERTIFICATE-----MIIFWzCCBEOgAwIBAgISBDbDrpi+D1P4Lafn1xLk77z8MA0GCSqGSIb3DQEBCwUAHSuRMD8l5YyvZdOcTpgiSj3S+4BlBA46WS52QwZuog==
-----END CERTIFICATE-----

-----BEGIN CERTIFICATE-----MIIFFjCCAv6gAwIBAgIRAJErCErPDBinU/bWLiWnX1owDQYJKoZIhvcNAQELBQAwnLRbwHOoq7hHwg==-----END CERTIFICATE-----

-----BEGIN CERTIFICATE-----MIIFYDCCBEigAwIBAgIQQAF3ITfU6UK47naqPGQKtzANBgkqhkiG9w0BAQsFADA/Dfvp7OOGAN6dEOM4+qR9sdjo6GtPAQw4dy753ec5
-----END CERTIFICATE-----You should end up with a file server.pem to go with the existing server.key and server.crt files. Place these in /etc/ssl and you're ready to configure your server!
If you're using a web browser/wizard then at this stage you would upload the PEM bundle file.
Configuring your web server directly you would then do the following...
In Apache, you want to point your server configuration as follows:
SSLCertificateKeyFile /etc/ssl/server.key
SSLCertificateFile /etc/ssl/server.pemWhereas in NGINX you would update the following configuration lines:
ssl on;
ssl_certificate /etc/ssl/server.pem;
ssl_certificate_key /etc/ssl/server.key;Once done, restart your web server (nginx -s reload or apachectl reload) and you should now be able to connect to your web server using https!
Congratulations!
Caveat: if you're looking to create a self-signed certificate using OpenSSL or similar then these are the commands you need:
openssl req -new -nodes > cert.csr
openssl rsa -in privkey.pem -out key.pem
openssl x509 -in cert.csr -out cert.pem -req -signkey key.pem -days 1001
cat key.pem>>cert.pemYou can also use -nodes if you do not wish to protect your private key with a passphrase (essential if you want your web server to restart automatically!).
And there you have it!
P.S. If you're trying to get SSL certificates with Let's Encrypt, this blog might come in handy: Let's Encrypt!
Not sure which solution you need?
Speak to one of our technical experts

A thank you from Loadbalancer.org's Co-Founders: Celebrating 20 years of clever, not complex, high availability solutions

Related posts
Finally, a simple way to convert MaxMind GeoIP Database files to the legacy DAT format!

Optimizing data storage: Using content-length headers to solve the 'small objects problem'
IPv6 and Loadbalancer.org: Finally making friends with those impossibly long addresses

Extending the ModSecurity WAF, with Denial Of Service protection — using HAProxy

Loadbalancer.org announces leadership transition and next phase of growth
ENVOY Proxy versus Loadbalancer.org: Why storage vendors need purpose-built load balancing for S3, NFS, and SMB

Architecting resilient object storage: Delivering multi-site capabilities for HPE with Loadbalancer.org GSLB