This blog post will cover the instructions on how to install HAProxy and configure it on RHEL 7 (Red Hat Enterprise Linux).
Why Loadbalancer.org for Layer 7?
The Engineers' choice for smarter load balancing
Before we dive into the installation and configuration, first we will have to compile it.
In order to compile HAProxy we will require the following prerequisites:
yum install gcc openssl-devel readline-devel systemd-devel make pcre-devel
Once the prerequisites are installed, we will download the latest stable Lua and HAProxy:
curl https://www.lua.org/ftp/lua-5.4.2.tar.gz > lua-5.4.2.tar.gz
curl http://www.haproxy.org/download/2.3/src/haproxy-2.3.2.tar.gz > haproxy-2.3.2.tar.gz
Follow the link to view the readme.
Next we'll extract, then compile – and install:
Lua
tar xvf lua-5.4.2.tar.gz
cd lua-5.4.2
make INSTALL_TOP=/opt/lua-5.4.2 linux install
HAProxy
cd ..
tar xvf haproxy-2.3.2.tar.gz
cd haproxy-2.3.2
make USE_NS=1 \
USE_TFO=1 \
USE_OPENSSL=1 \
USE_ZLIB=1 \
USE_LUA=1 \
USE_PCRE=1 \
USE_SYSTEMD=1 \
USE_LIBCRYPT=1 \
USE_THREAD=1 \
TARGET=linux-glibc \
LUA_INC=/opt/lua-5.4.2/include \
LUA_LIB=/opt/lua-5.4.2/lib
make PREFIX=/opt/haproxy-2.3.2 install
We will also create an unpreviliged user and group for HAProxy.
groupadd -g 188 haproxy
useradd -g 188 -u 188 -d /var/lib/haproxy -s /sbin/nologin -c haproxy haproxy
In order to control how HAProxy will be started, stopped, restarted, reloaded or monitored, using your text editor of choice, a SystemD Unit file /etc/systemd/system/haproxy.service will be created
[Unit]
Description=HAProxy 2.3.2
After=syslog.target network.target

[Service]
Type=notify
EnvironmentFile=/etc/sysconfig/haproxy-2.3.2
ExecStart=/opt/haproxy-2.3.2/sbin/haproxy -f $CONFIG_FILE -p $PID_FILE $CLI_OPTIONS
ExecReload=/bin/kill -USR2 $MAINPID
ExecStop=/bin/kill -USR1 $MAINPID

[Install]
WantedBy=multi-user.target
To set environment variables required by HAProxy and to notify SystemD when its started, a SystemD Environment file /etc/sysconfig/haproxy-2.3.2 will also be created.
# Command line options to pass to HAProxy at startup
# The default is:
#CLI_OPTIONS="-Ws"
CLI_OPTIONS="-Ws"

# Specify an alternate configuration file. The default is:
#CONFIG_FILE=/etc/haproxy/haproxy-2.3.2.conf
CONFIG_FILE=/etc/haproxy/haproxy.cfg

# File used to track process IDs. The default is:
#PID_FILE=/var/run/haproxy-2.3.2.pid
PID_FILE=/var/run/haproxy.pid
To load these configuration changes, SystemD will be reloaded:
systemctl daemon-reload
Unless it has been created already, the directory for the configuration will be created mkdir /etc/haproxy with the corresponding user and group ownership.
The final step for HAProxy installation and configuration: enable it to run at boot.
systemctl enable haproxy
Here's a sample of a simple haproxy.cfg that will load balance two IIS servers running on both 443 and 80:
global
daemon
log 127.0.0.1 local2 #Log configuration
chroot /var/lib/haproxy
pidfile /var/run/haproxy.pid
maxconn 4000
user haproxy
group haproxy
stats socket /var/lib/haproxy/stats
defaults
mode http
log global
option tcplog
option dontlognull
retries 3
maxconn 10000
option redispatch
timeout connect 4s
timeout client 5m
timeout server 5m
listen stats
bind *:8080
mode http
option forwardfor
option httpclose
stats enable
stats show-legends
stats refresh 5s
stats uri /stats
stats realm Haproxy\ Statistics
stats auth loadbalancer:loadbalancer
stats admin if TRUE
listen FrontendName
bind 192.168.77.100:80,192.168.77.100:443
mode tcp
option tcplog
balance leastconn
stick on src
stick-table type ip size 10240k expire 30m
server RIPName0 192.168.77.200 check port 80 inter 10s rise 2 fall 3
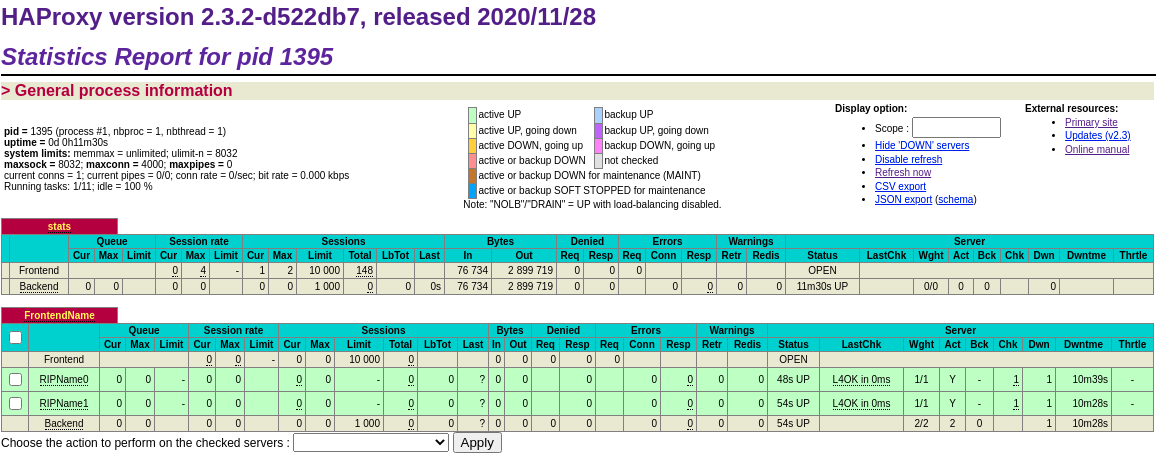
server RIPName1 192.168.77.201 check port 80 inter 10s rise 2 fall 3The stats page can be accessed in a browser at http://192.168.77.10:8080/stats using the username and password 'loadbalancer', as set in the configuration file.
It should look something like this: