


To be honest. As an F5 engineer, when Loadbalancer asked me to review their load balancer ADC Portal, I was sceptical. F5 already have their own offering, BIG-IQ, so I wasn't expecting a third-party provider to be able to offer me anything over and above this. But the ADC Portal definitely punches above it's weight, with a much simpler interface, which makes managing day-to-day tasks potentially much easier.
What problem does the ADC Portal solve for me?
The ADC Portal is a highly secure, cloud-hosted platform designed for centralized
management of Application Delivery Controllers (ADCs) from various vendors. It
currently supports devices from F5, Citrix Netscaler and Progress Kemp.
If you have ever had the pleasure of dealing with a large enterprise environment, you'll be all too aware of the chaos and complexity that multiple application delivery controllers from multiple vendors can cause. It's a nightmare keeping on top of backups, updates, security issues and config drift.
What are the benefits of using the ADC Portal?
Instantly see what matters
With the ADC Portal, organizations gain a unified dashboard that displays all load
balancing devices, regardless of their physical or network location. It provides clear access to critical data such as system status, HA (High Availability) configuration, firmware version, and IP address. Administrators can simplify operations by grouping ADCs with custom Namespaces and Tags. Additionally, each ADC’s Web interface is just one click away, whether it's hosted locally or remotely.
Know that you are secure
The platform enhances security by automating key monitoring tasks. It continuously scans all connected ADCs for known vulnerabilities (CVE monitoring), immediately flagging any issues for quick resolution. SSL certificate health is also tracked, alerting admins when certificates are nearing expiration or have expired. Soon, the portal will also notify users when new firmware updates are available.
Less downtime, more confidence
Routine maintenance tasks are easy to automate with the portal. Backups can be
scheduled at custom intervals—daily, weekly, monthly, or annually. Each backup is
encrypted, securely stored, and can be reviewed, restored, downloaded, or removed as needed. Additional automation features, such as scheduled software updates, are on the roadmap.
Security first: How does it connect to your network?
All communication is conducted over a secure WebSocket connection (WSS) using
mutual TLS (mTLS). With mTLS, both the client and the server must present valid
certificates to each other, ensuring mutual authentication. This two-way verification adds a robust layer of defense against impersonation attacks. A secure channel is only established after successful authentication on both sides, at which point data exchange can begin safely:
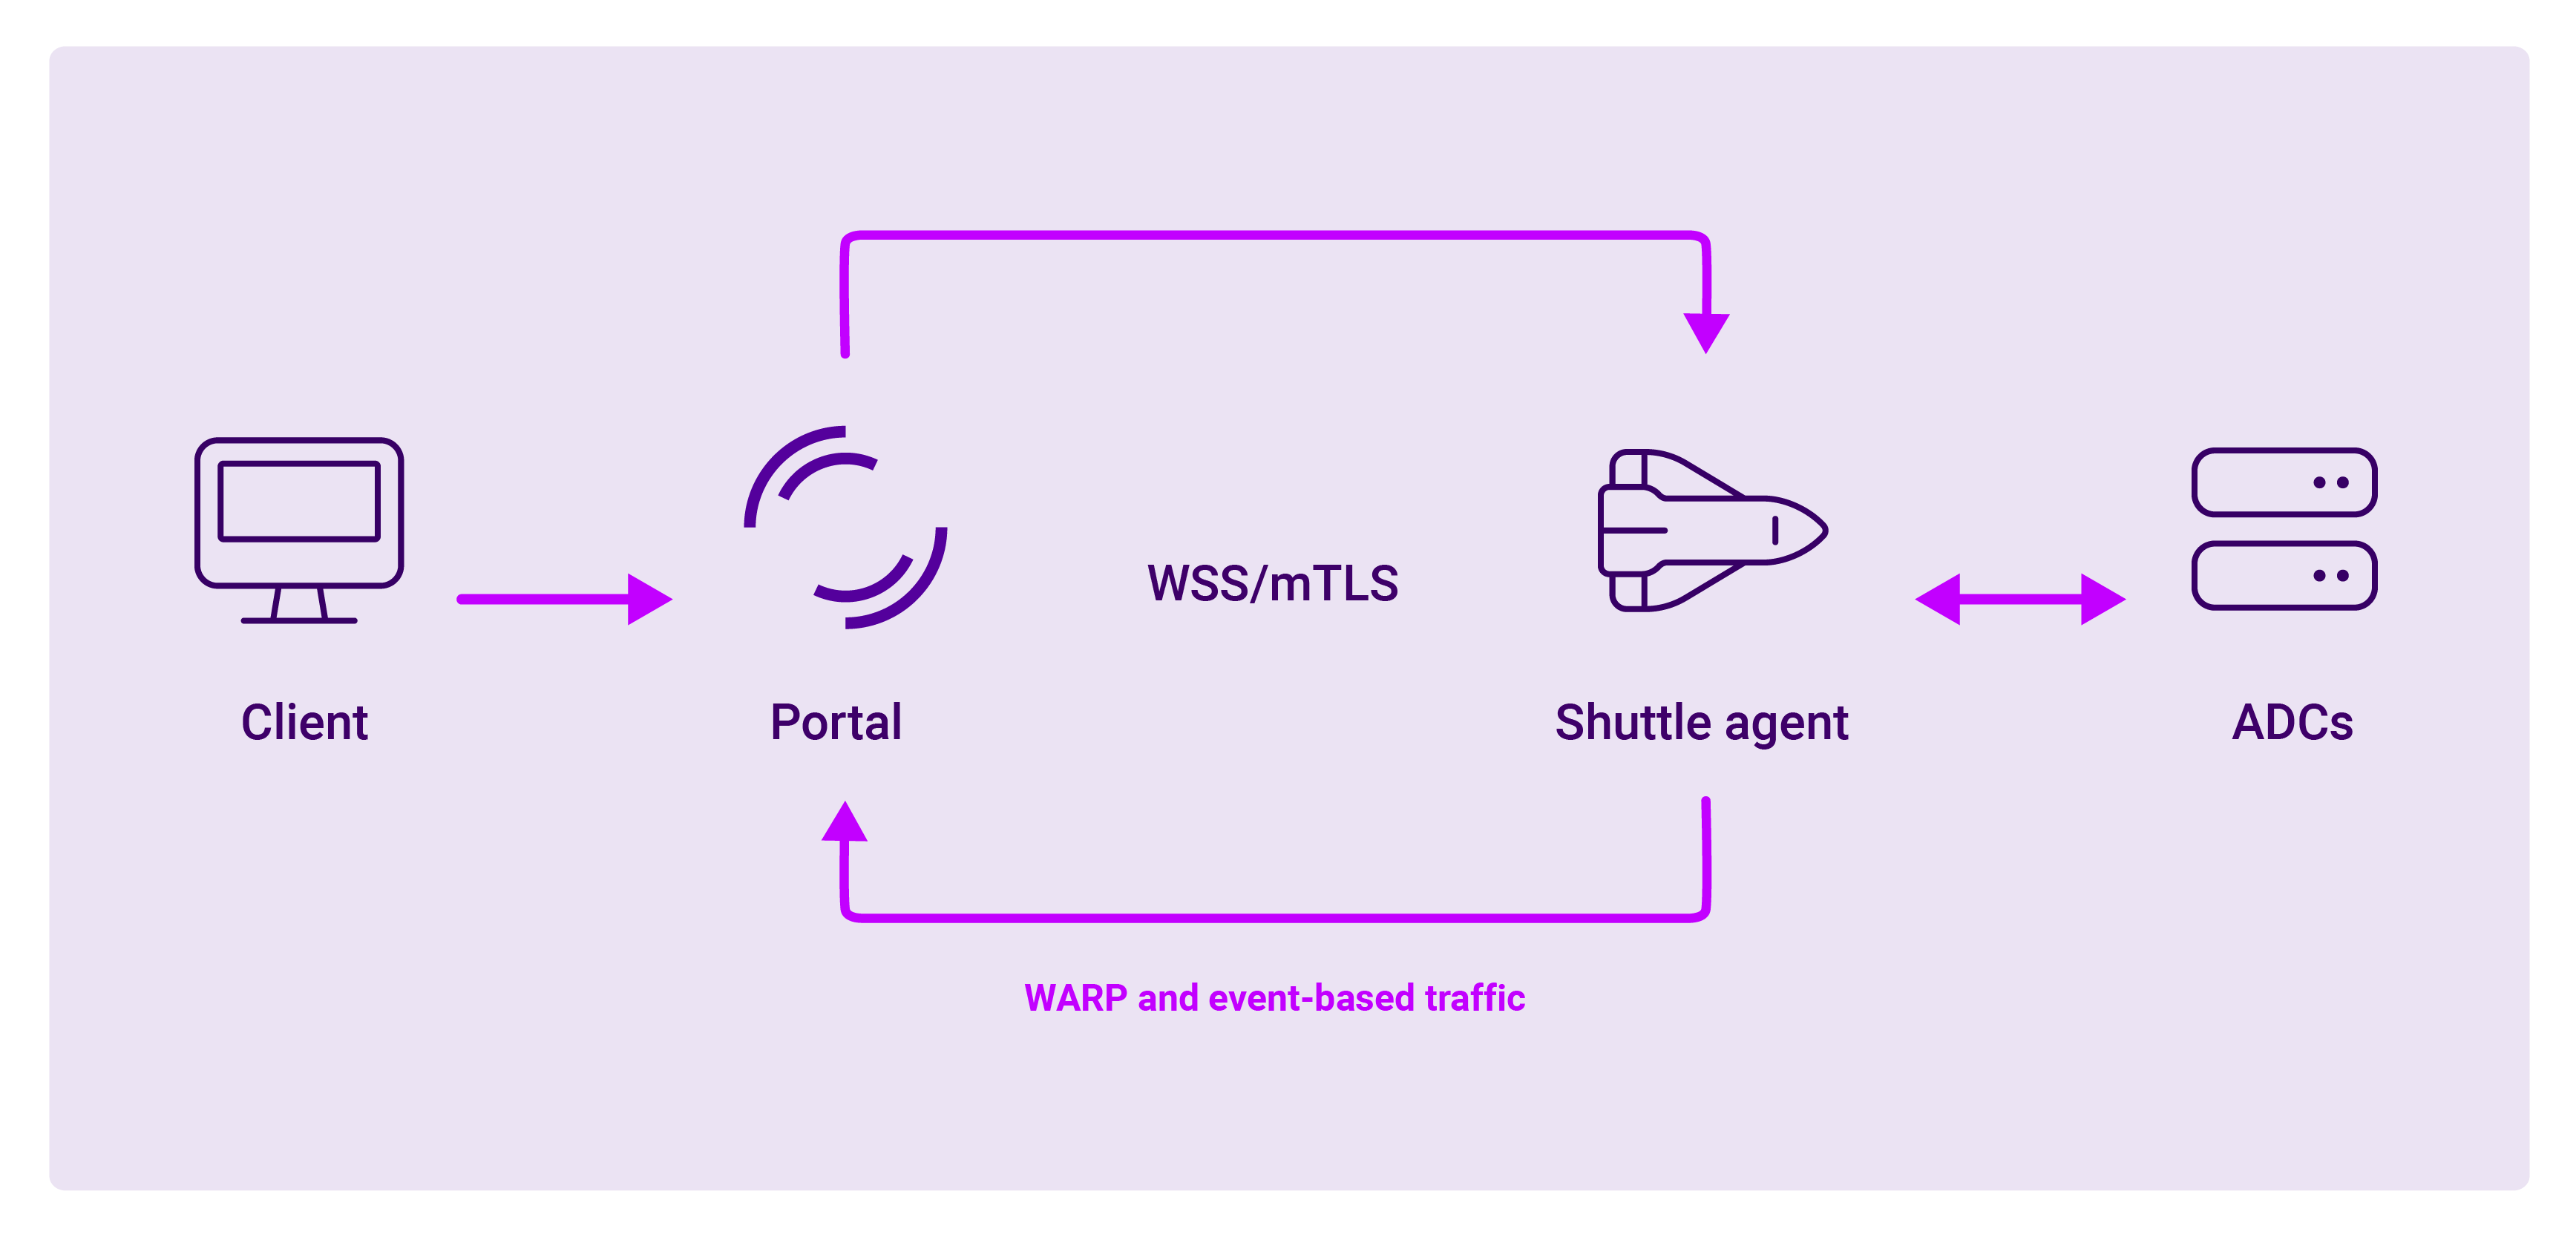
All commands are carried out through the secure API, with full RBAC control. And the remote access technology (WARP) is a secure proxy. So you are not opening any ports to your network to pass through traffic that could be hacked. And if at any point you want to disable access you can do it, at the F5, at the shuttle or in the portal.
And of course it's Zero Trust...
Because I don't trust anyone, and neither should you! I particularly like the line in the manual that says:
If you forget your password (or lose your private key), we can't recover it for you, because Loadbalancer don't keep copies of your keys.
And naturally the Enterprise tier of the product integrates SAML, RBAC and SSO to your existing security & compliance architecture.
OK, let's get started!
Before writing this blog, I set up a test environment, using the following components:
| Component | Version |
|---|---|
| F5 BIG-IP | BIGIP-17.1.2.1-0.0.2 |
| Ubuntu (Linux machine) | Ubuntu 24.04.2 LTS |
| Shuttle | 5.6 |
| Curl | Curl 8.5.0 |
The logical architecture implemented for the writing of this blog is shown in the diagram below:
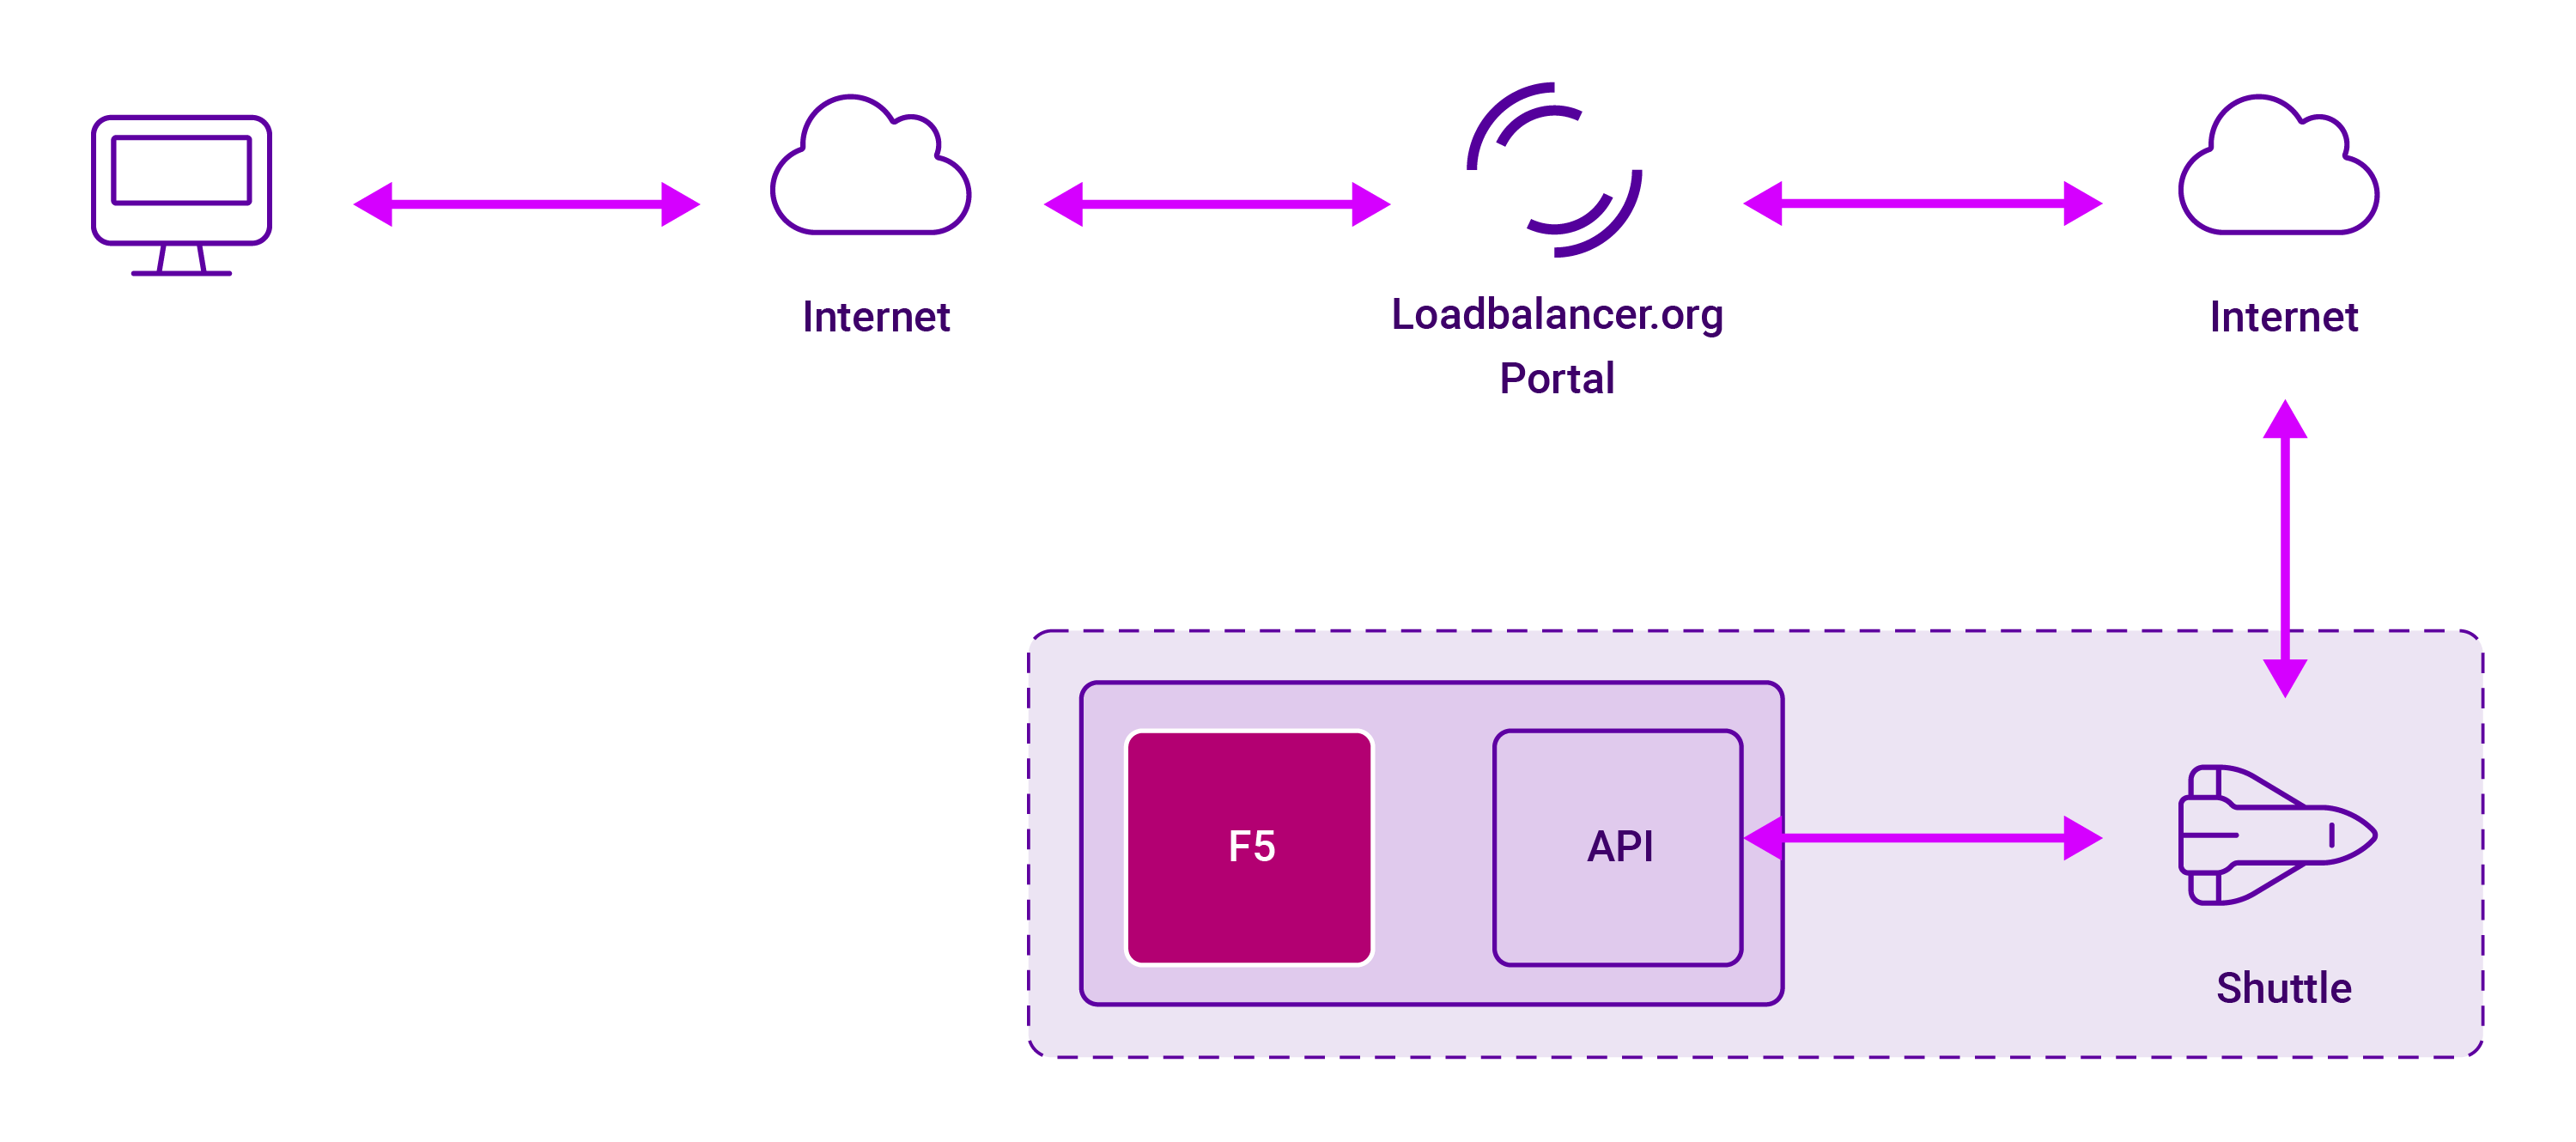
My F5 & Linux servers are in a remote data center and I'm accessing the Loadbalancer ADC Portal from my home computer.
Step One: Set up an ADC Portal account
You can easily and quickly set up an account online. They have multiple account tiers, but the 90 day free trial gives you all the Business level features. And when that expires it drops back to the Free tier if you don't subscribe. The business level is incredibly good value for money, but doesn't have the extended compliance features of the Enterprise level.
Currently the third-party functionality is limited but includes:
- The ability to connect multiple load balancers (including NetScalers, F5s, and
Kemp appliances, as well as Loadbalancer's own ADC) - Unlimited backups of both configurations and SSL certificates
- SSL certificate expiry monitoring
- Real-time CVE monitoring
- Secure Direct access
- Secure Remote access (WARP)
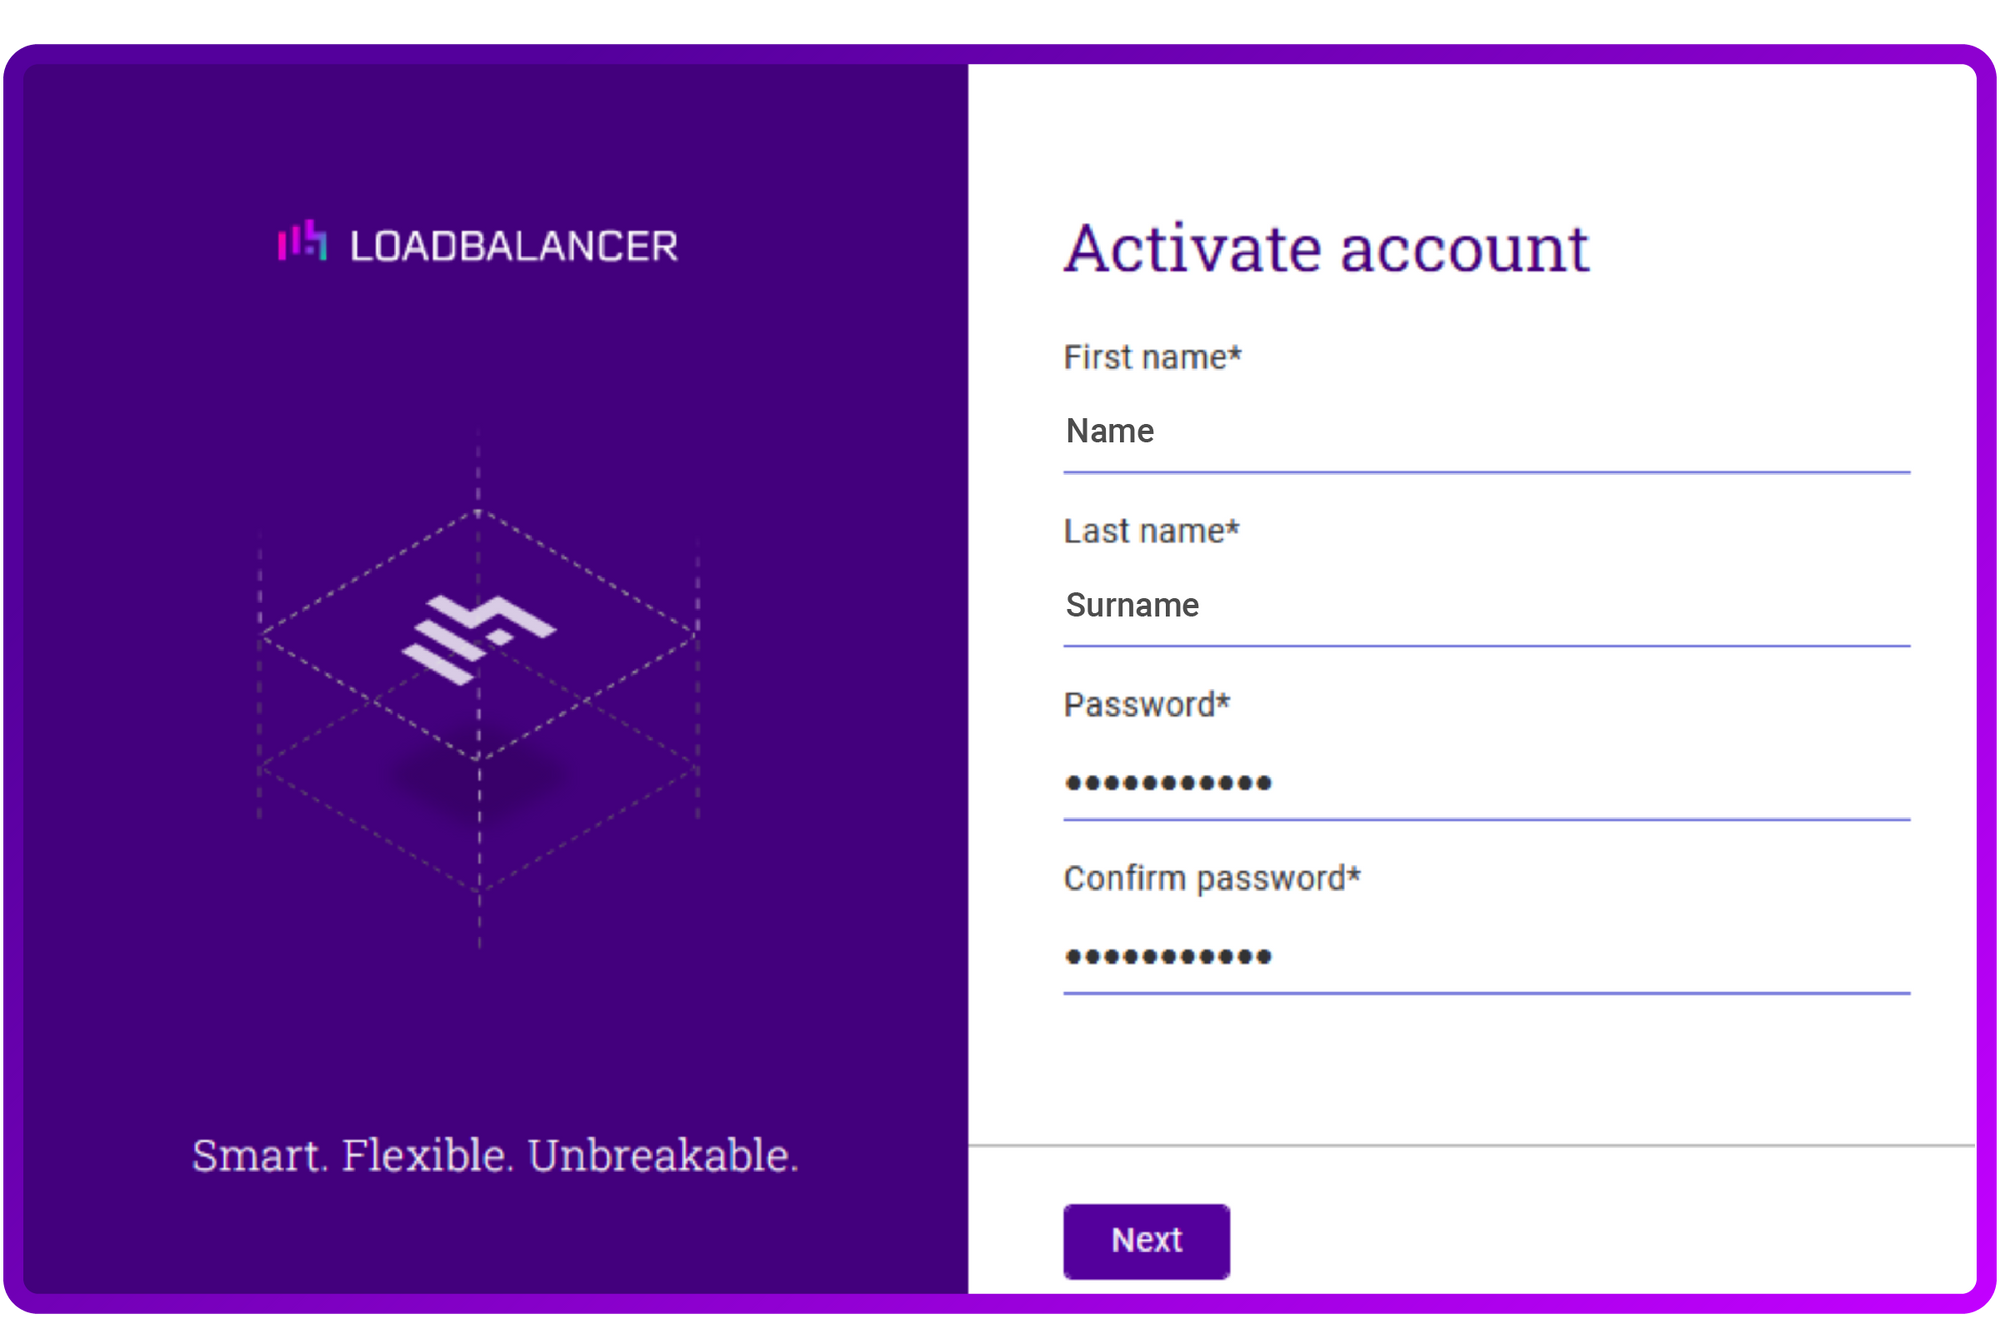
The setup is very easy. You can navigate to the ADC Portal home page, click the
'Create account' link and enter your details:
If you do require some additional guidance, they document the process very neatly in the quick start guide.
After entering the details of your account, the screen presents you with a
unique lbUserPrivate.key:
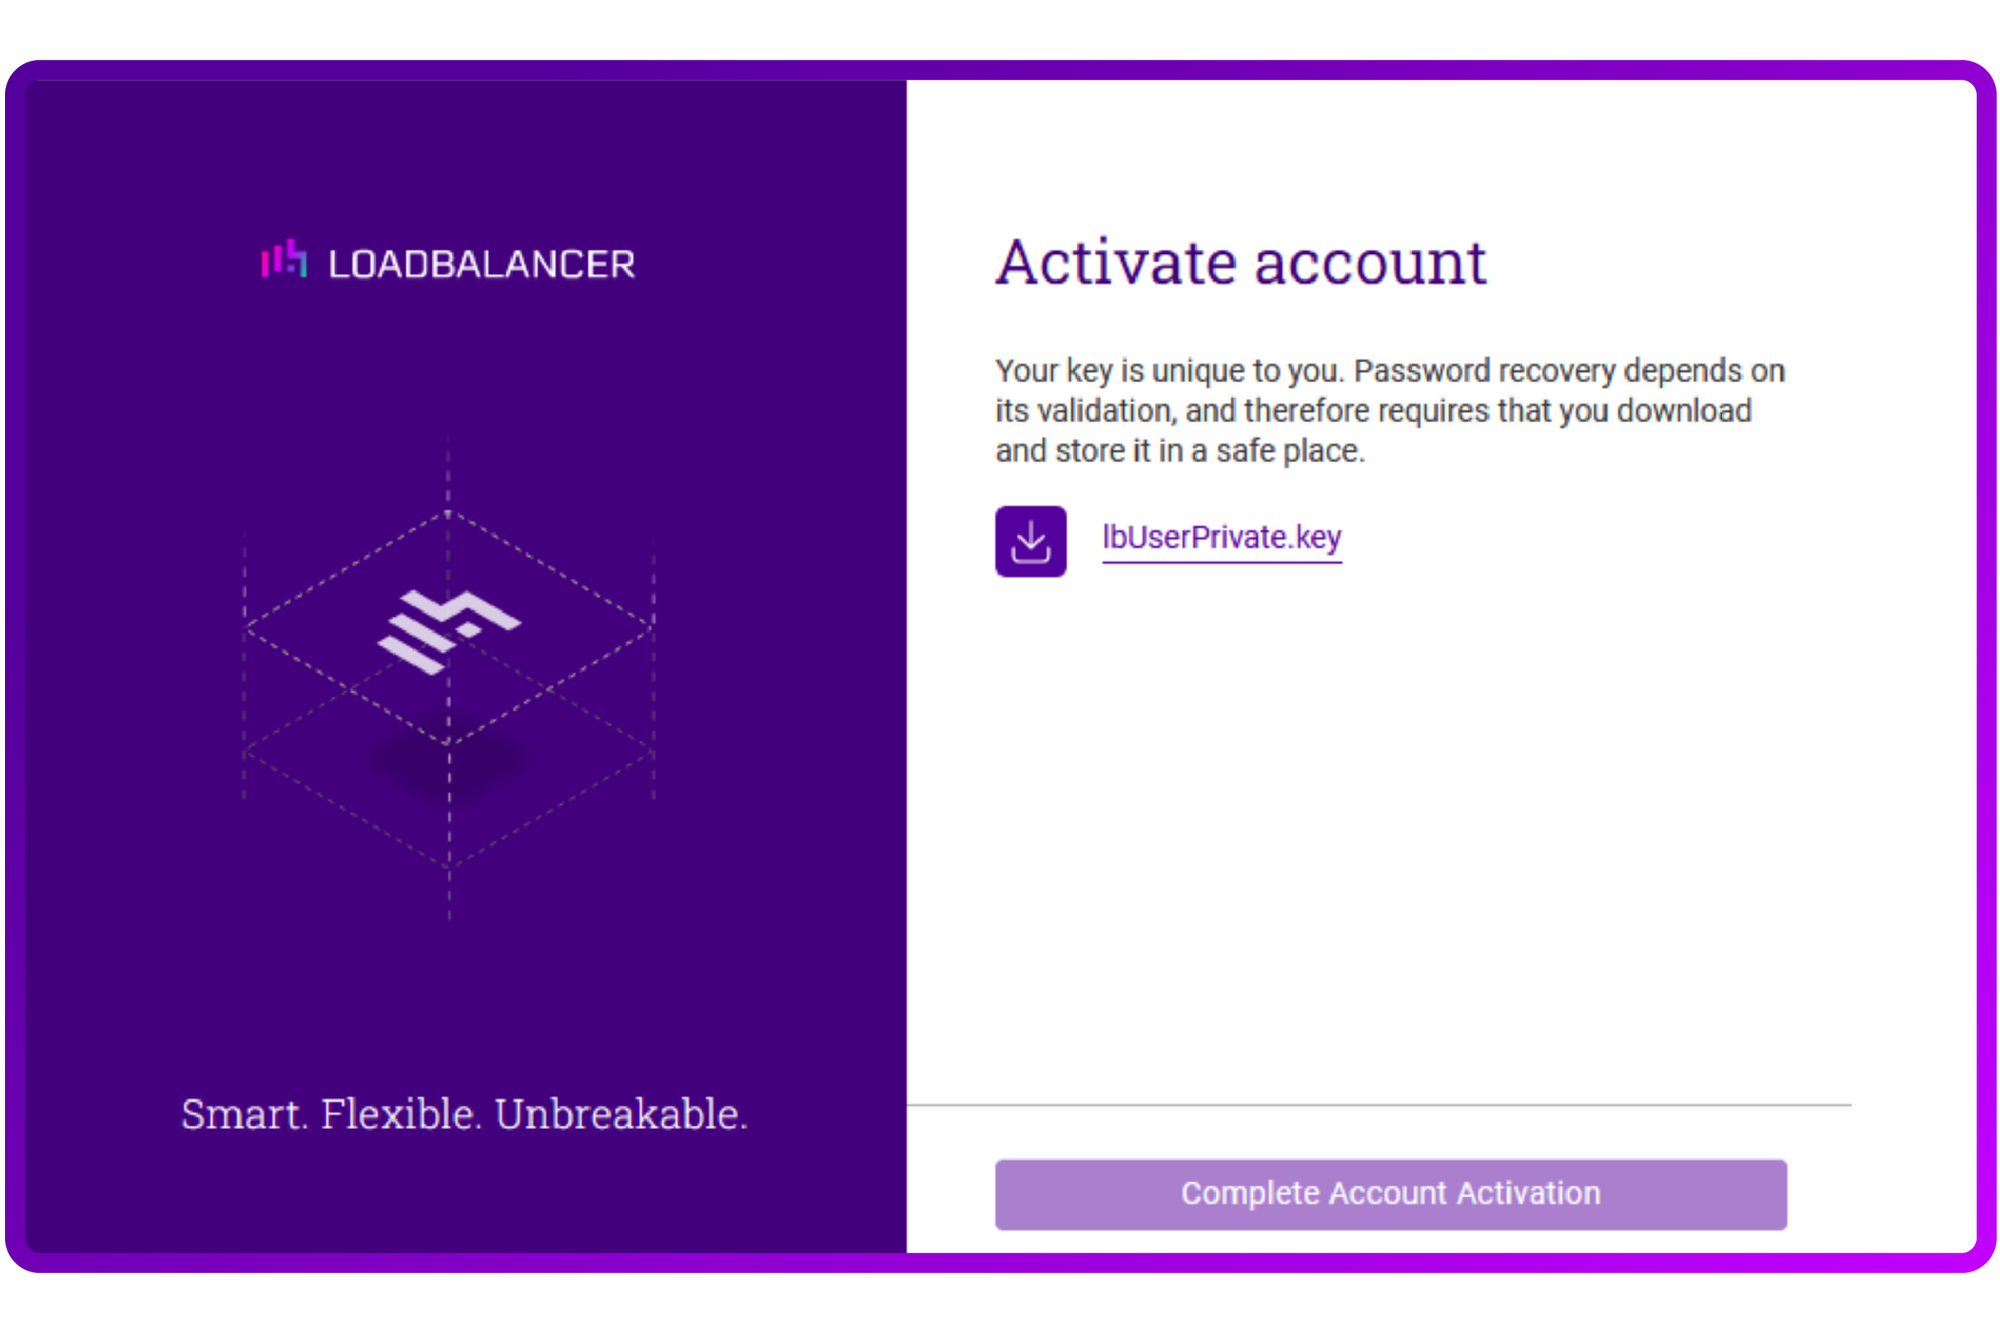
You might wonder why they chose an approach like this, but the answer is simple;
everything is encrypted.
Upon creating your 'Organization' (the next step in the account creation process),
you will also be presented with a lbOrgPrivate.key.
Everything you do in the ADC Portal is encrypted using these keys as they take
security very seriously. As such, if you lose the keys, Loadbalancer is not able to
help you. So be sure to save the keys in a secure place, you might need them
someday; you have been warned!
Step Two: Add F5 Big-IPs to the ADC Portal
Although the product supports managing multiple ADC solutions (such as NetScaler, F5, Kemp, etc.), my focus in this blog is solely on managing F5 appliances.
First you need to add a sidecar agent called the Shuttle
A standalone Shuttle is a dedicated Linux instance that runs the Shuttle service. The instance requires wget and curl to be installed to allow the required installation files to be downloaded.
Prepare the Linux instance
- Deploy a new Linux instance that will be used as the standalone Shuttle.
- It must have access to the same subnets as your F5 ADC.
- Ensure that wget and curl are installed.
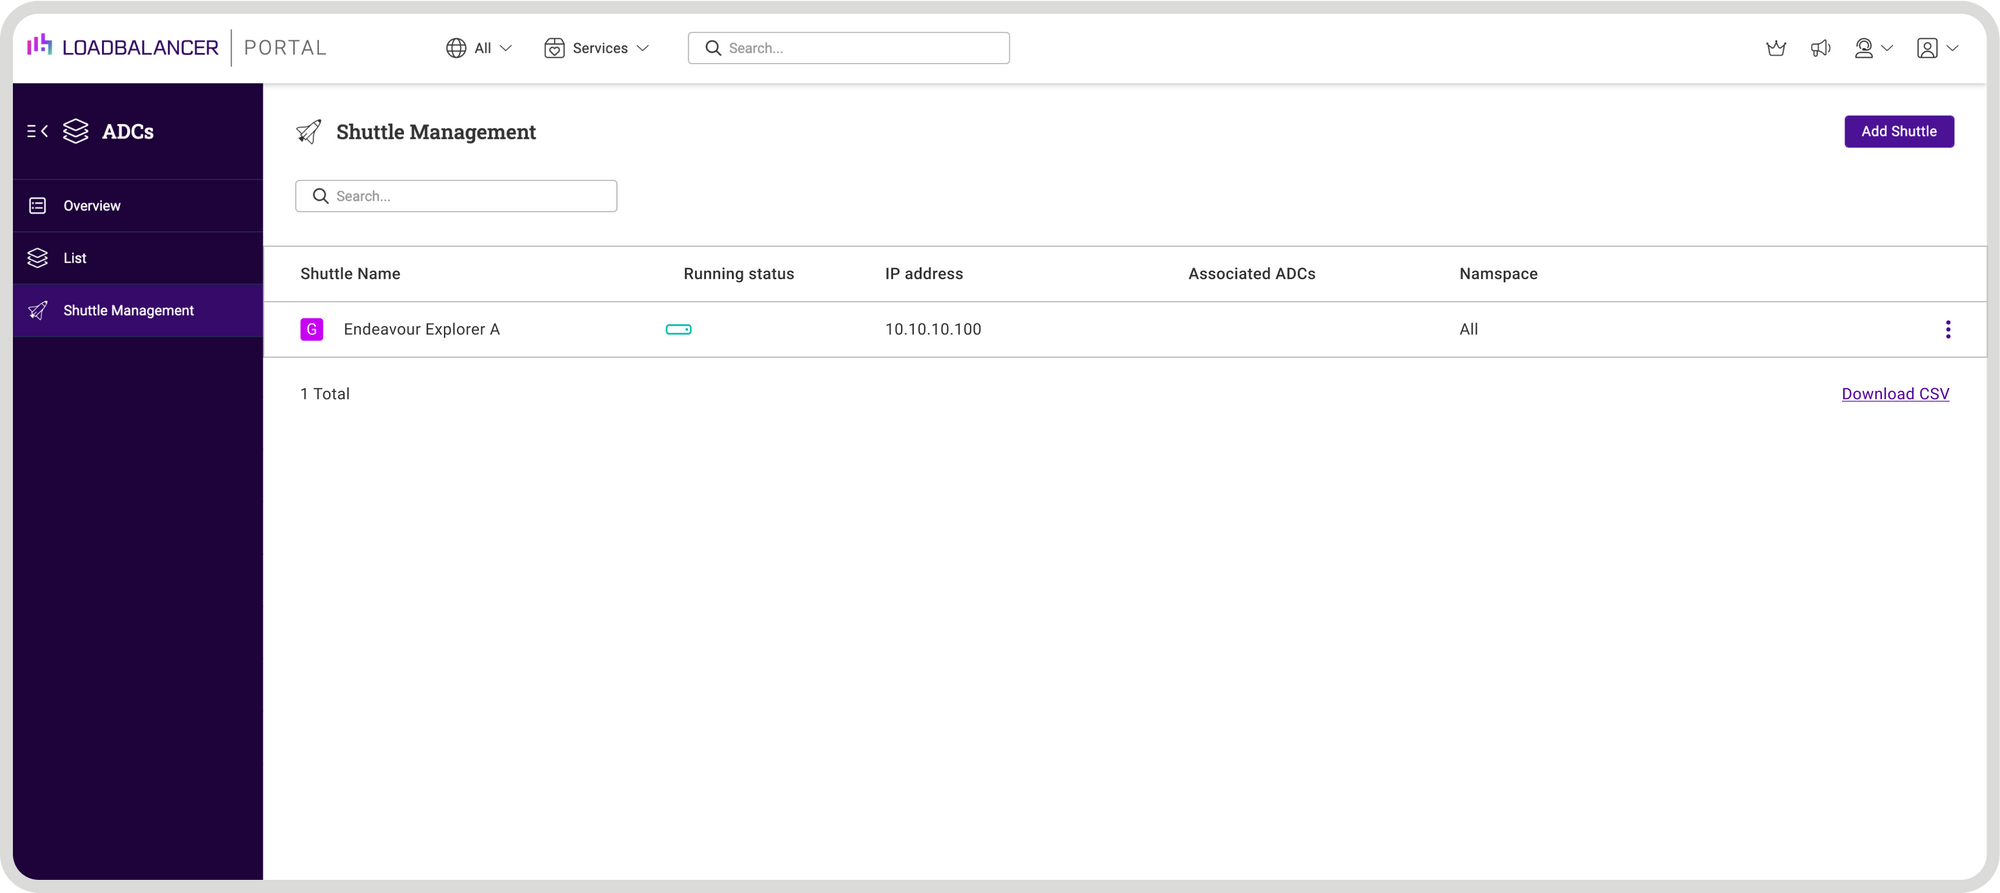
Configure the Shuttle
- Click LOADBALANCER | PORTAL in the Portal’s main menu bar to view the
dashboard. - In the ADCs panel:
- If there are currently no ADCs, click Connect an ADC.
Using the menu to the left, select Shuttle Management. - If ADCs have already been added, click View my ADCs.
Using the menu to the left, select Shuttle Management.
Click the Add Shuttle button.
3. Click the Add button for the Standalone Shuttle.
4. Copy the installation command/token as directed using the copy link provided:
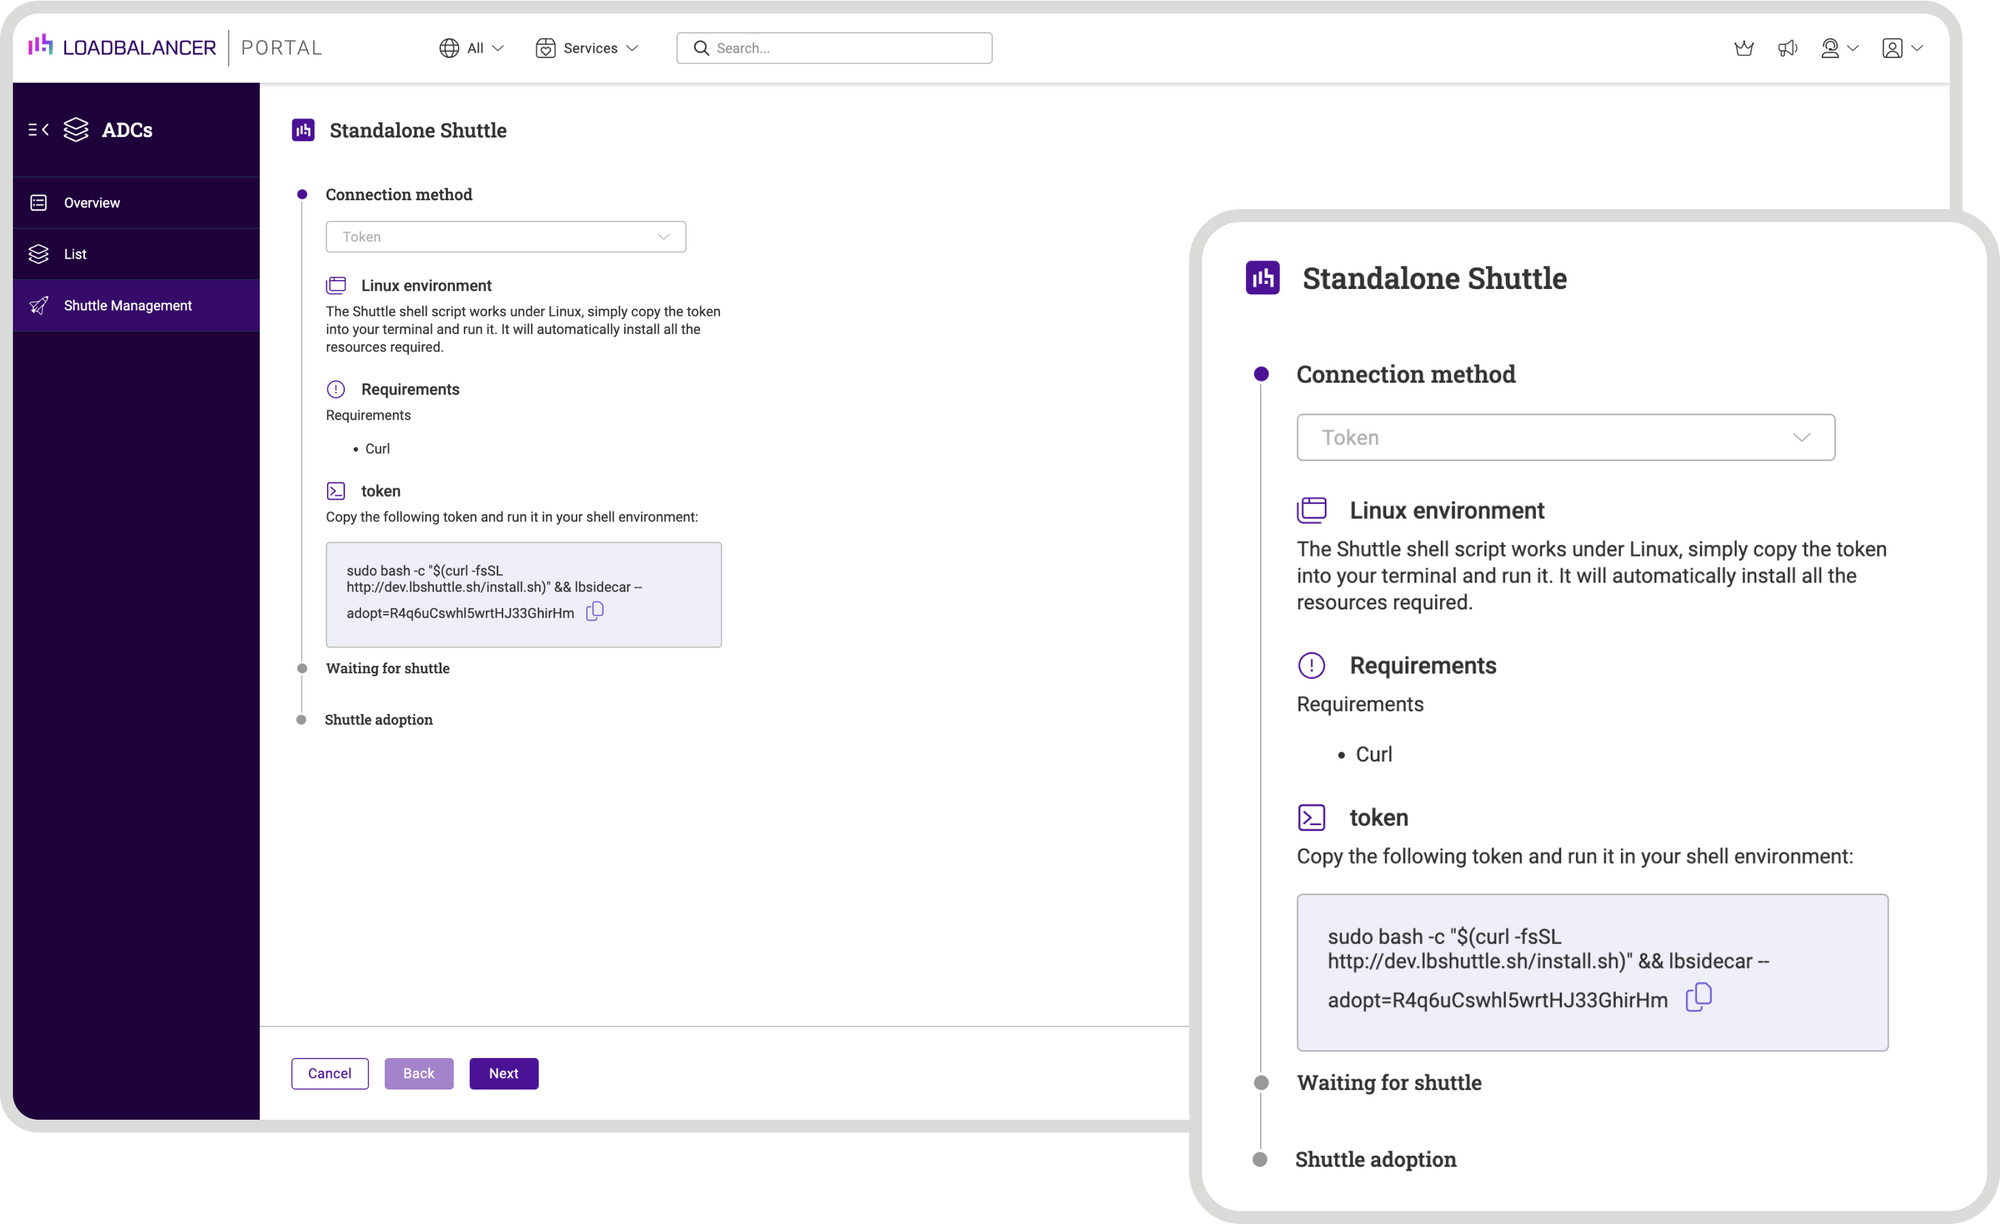
The Standalone Shuttle form will now display Waiting for adoption…
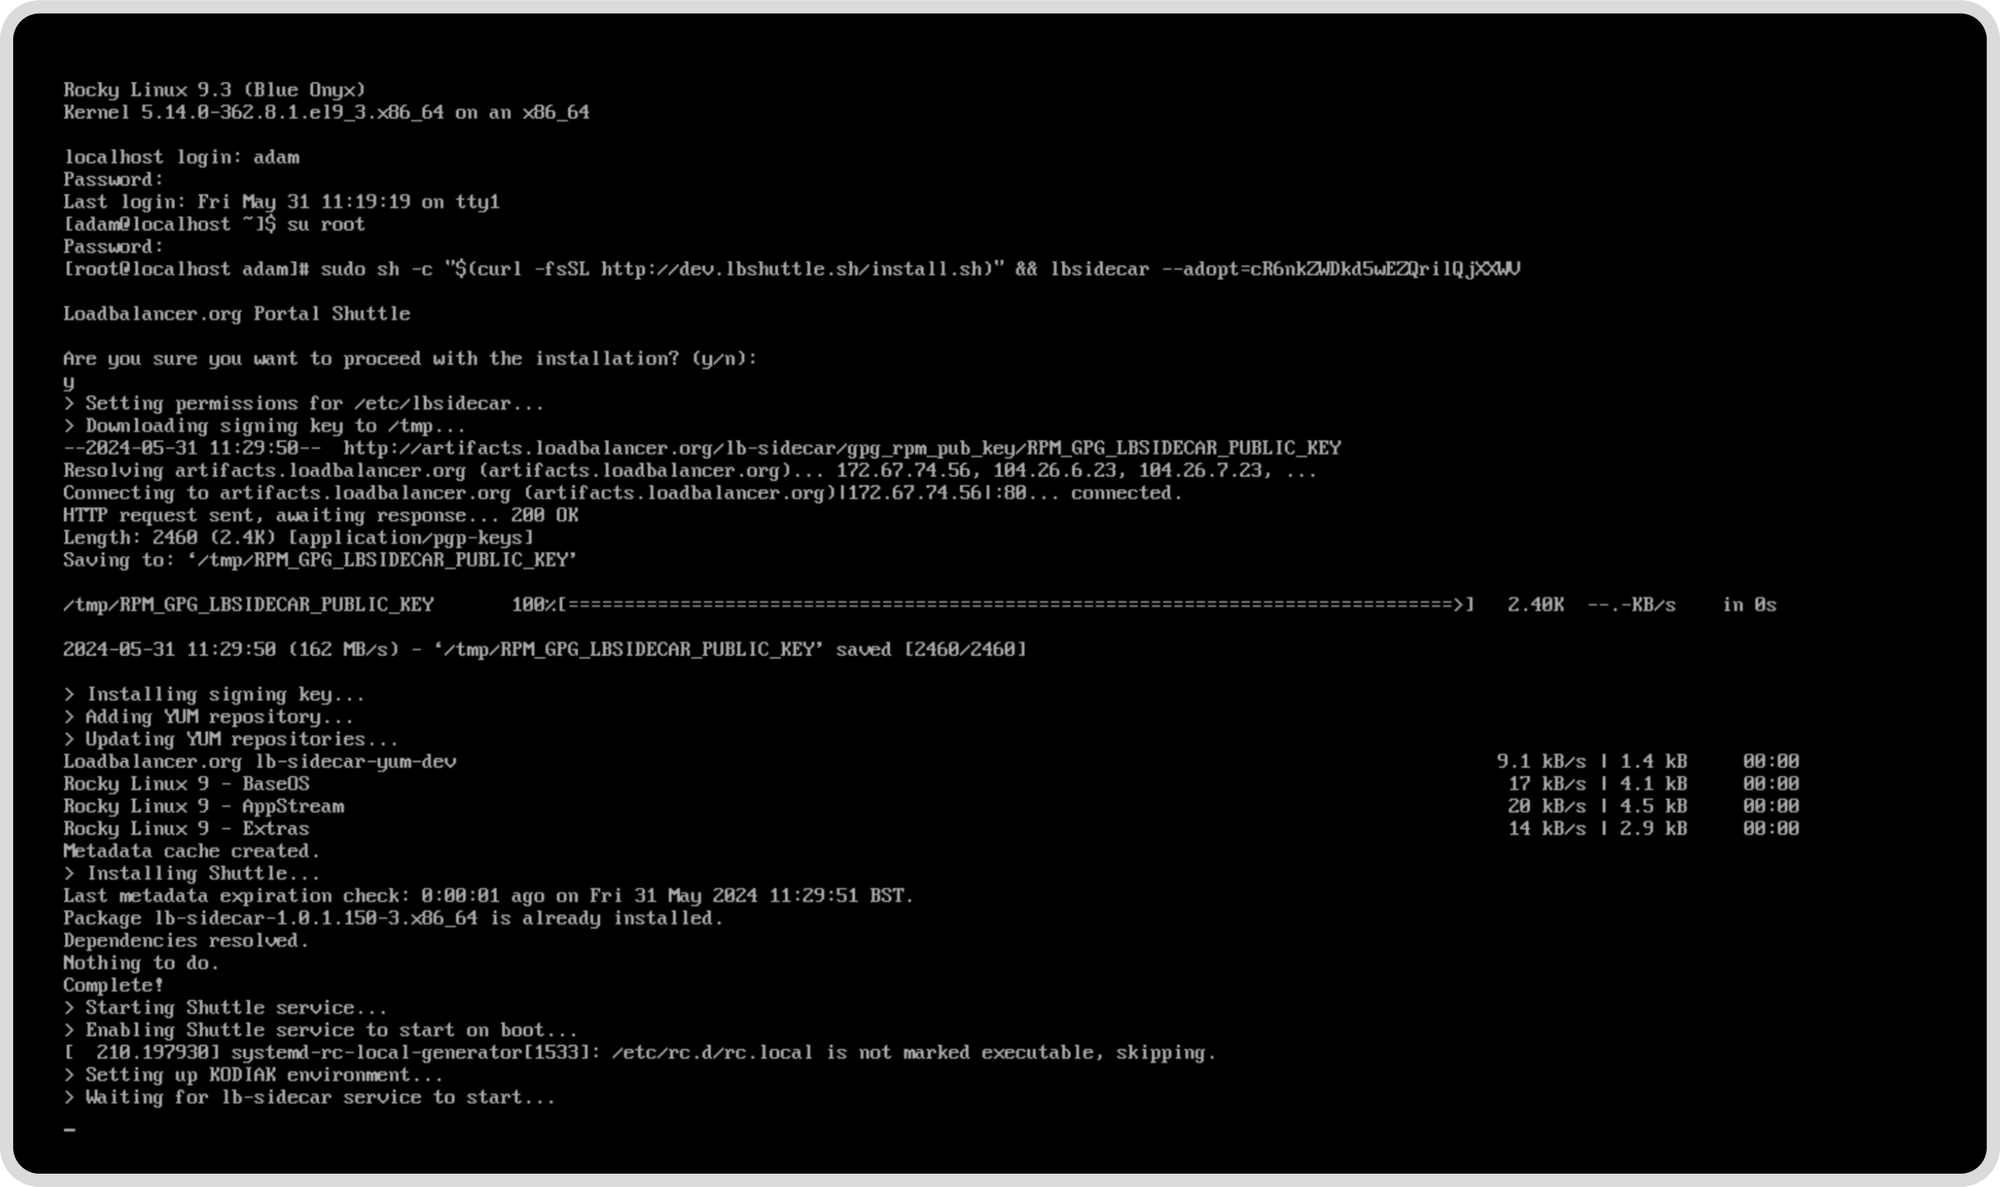
In order to install the shuttle it is simply a case of runing the copied command/token on the Linux instance via the console or an SSH session.
When the command completes successfully, the following message will be
displayed:
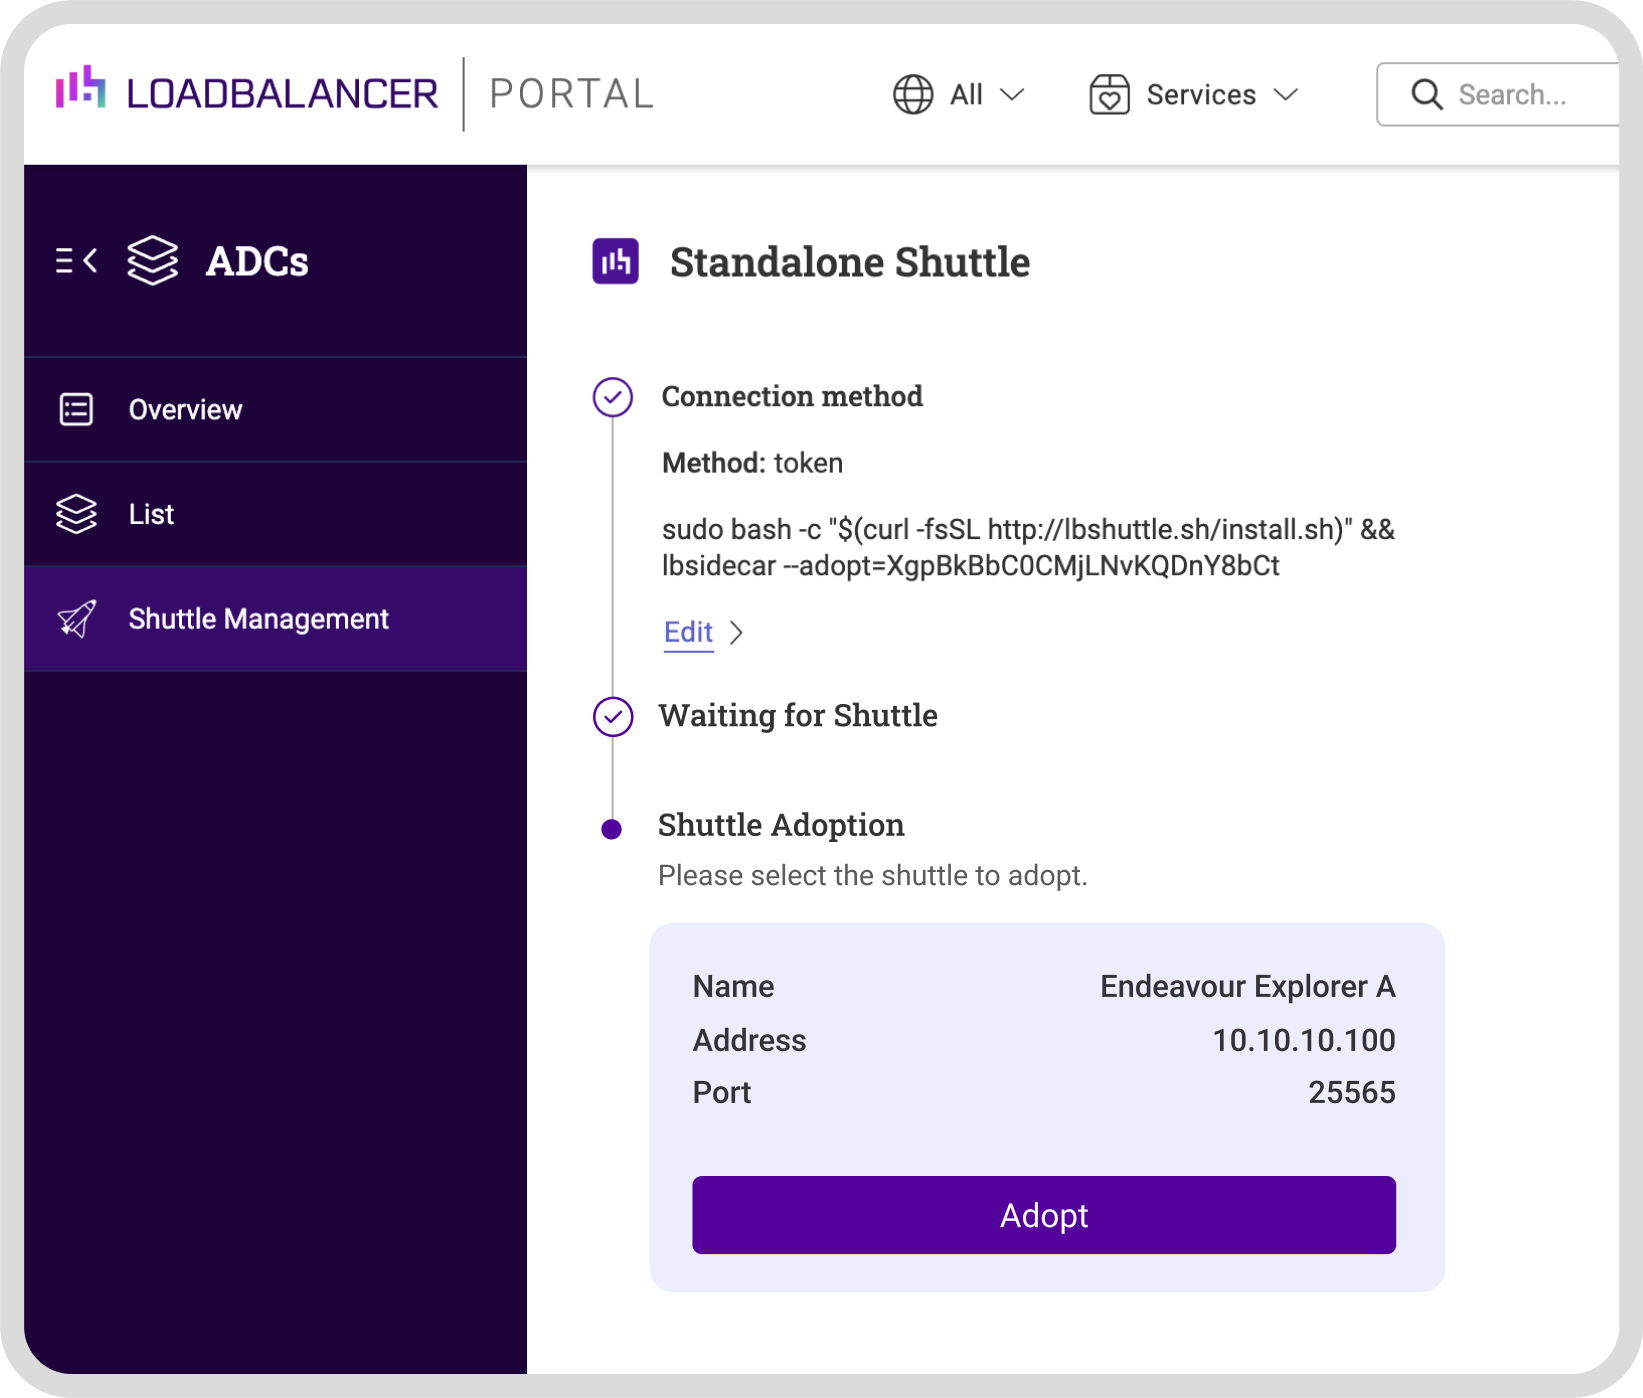
Adopt the Shuttle
In the Shuttle Management form, click the Adopt button for the new Shuttle to
complete the Shuttle adoption process:
2. Once adopted, the Shuttle name and other attributes can be changed if
required. For more information, please refer to Shuttle Actions Menu:
And now I have a shuttle, I can finally add my F5 BIG-IP...
No configuration changes are required from the F5 defaults. You will just need a user account that has enough API permissions to perform the desired actions. In my case I'm just using the default admin account.
- Click LOADBALANCER | PORTAL in the Portal’s main menu bar to view the
Dashboard. - Click the Add ADC button:
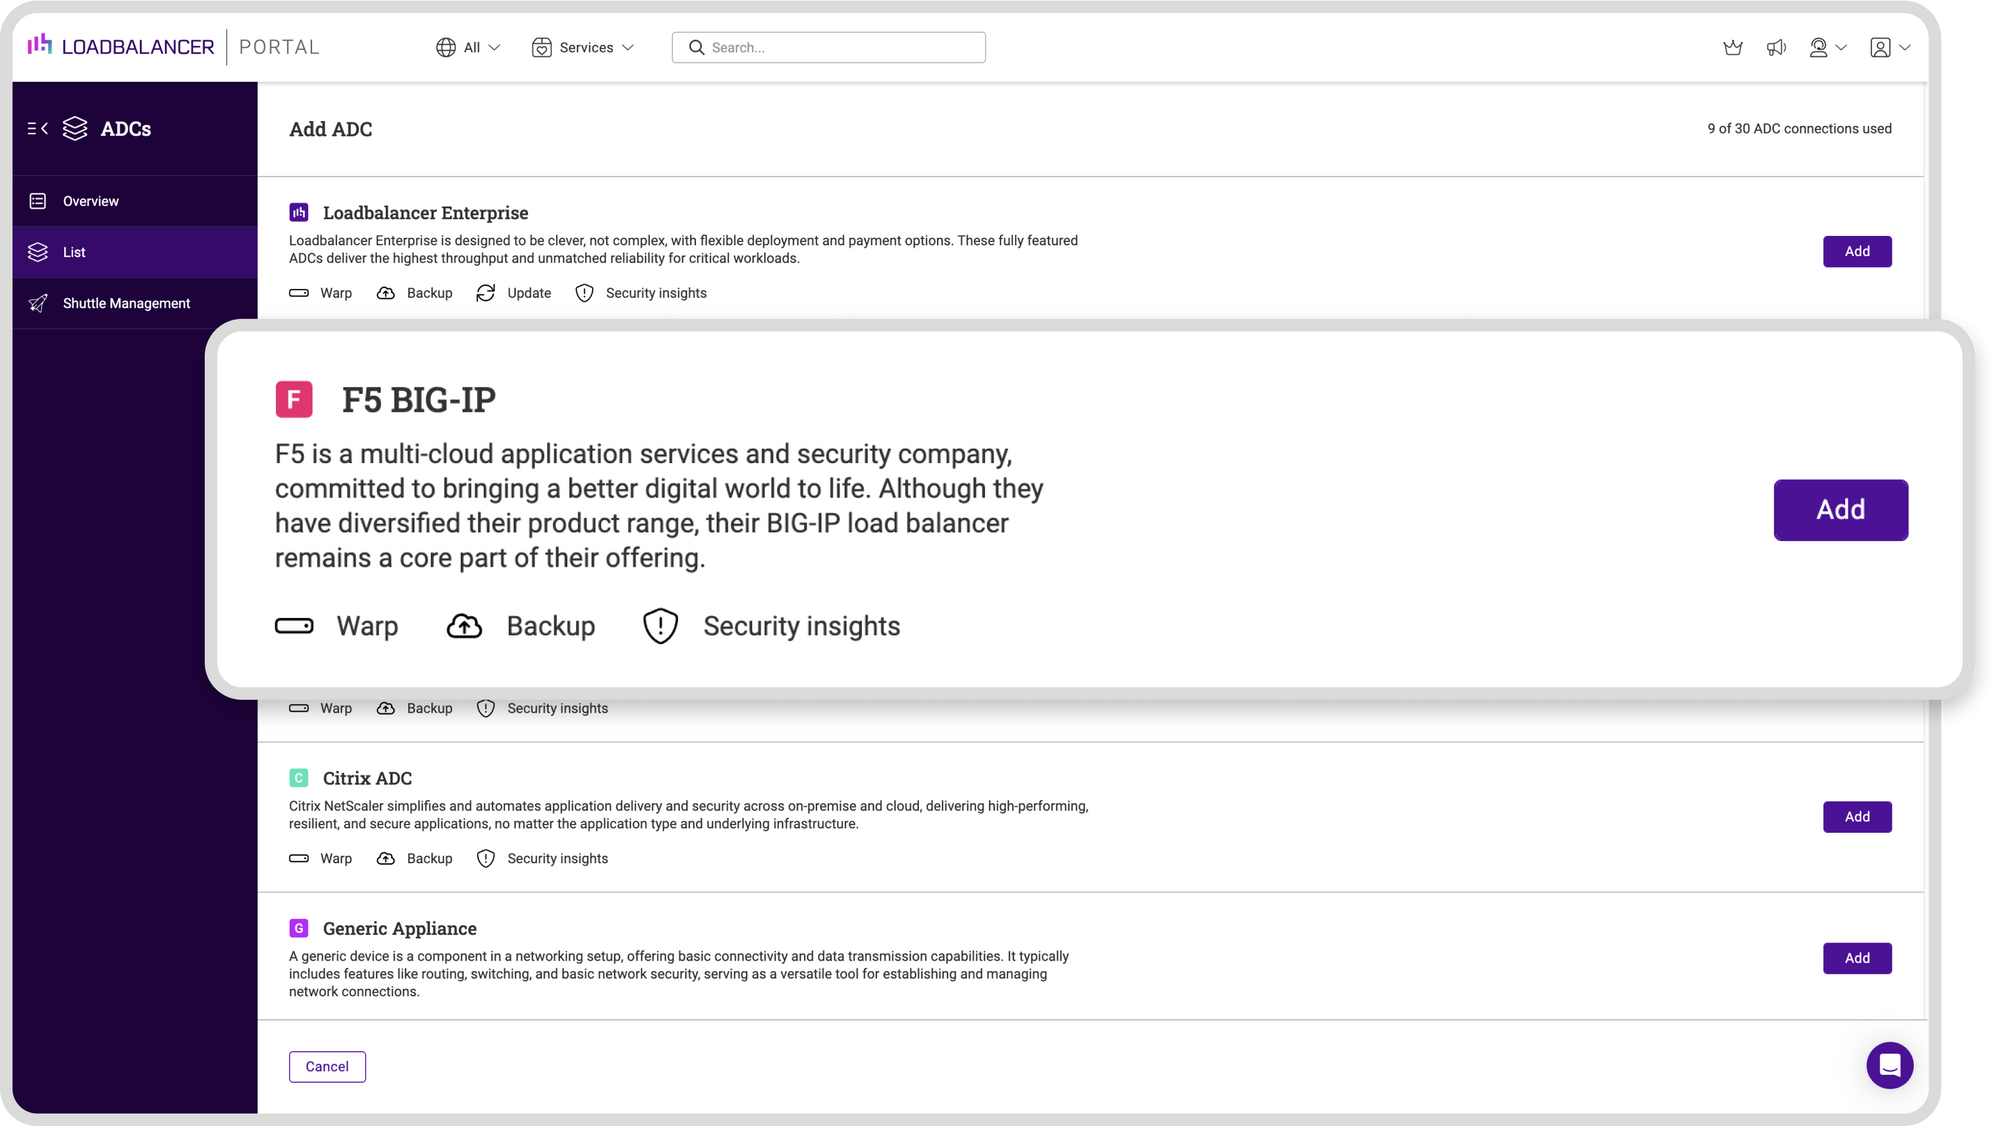
3. Click the Add button for the type of ADC to be added:
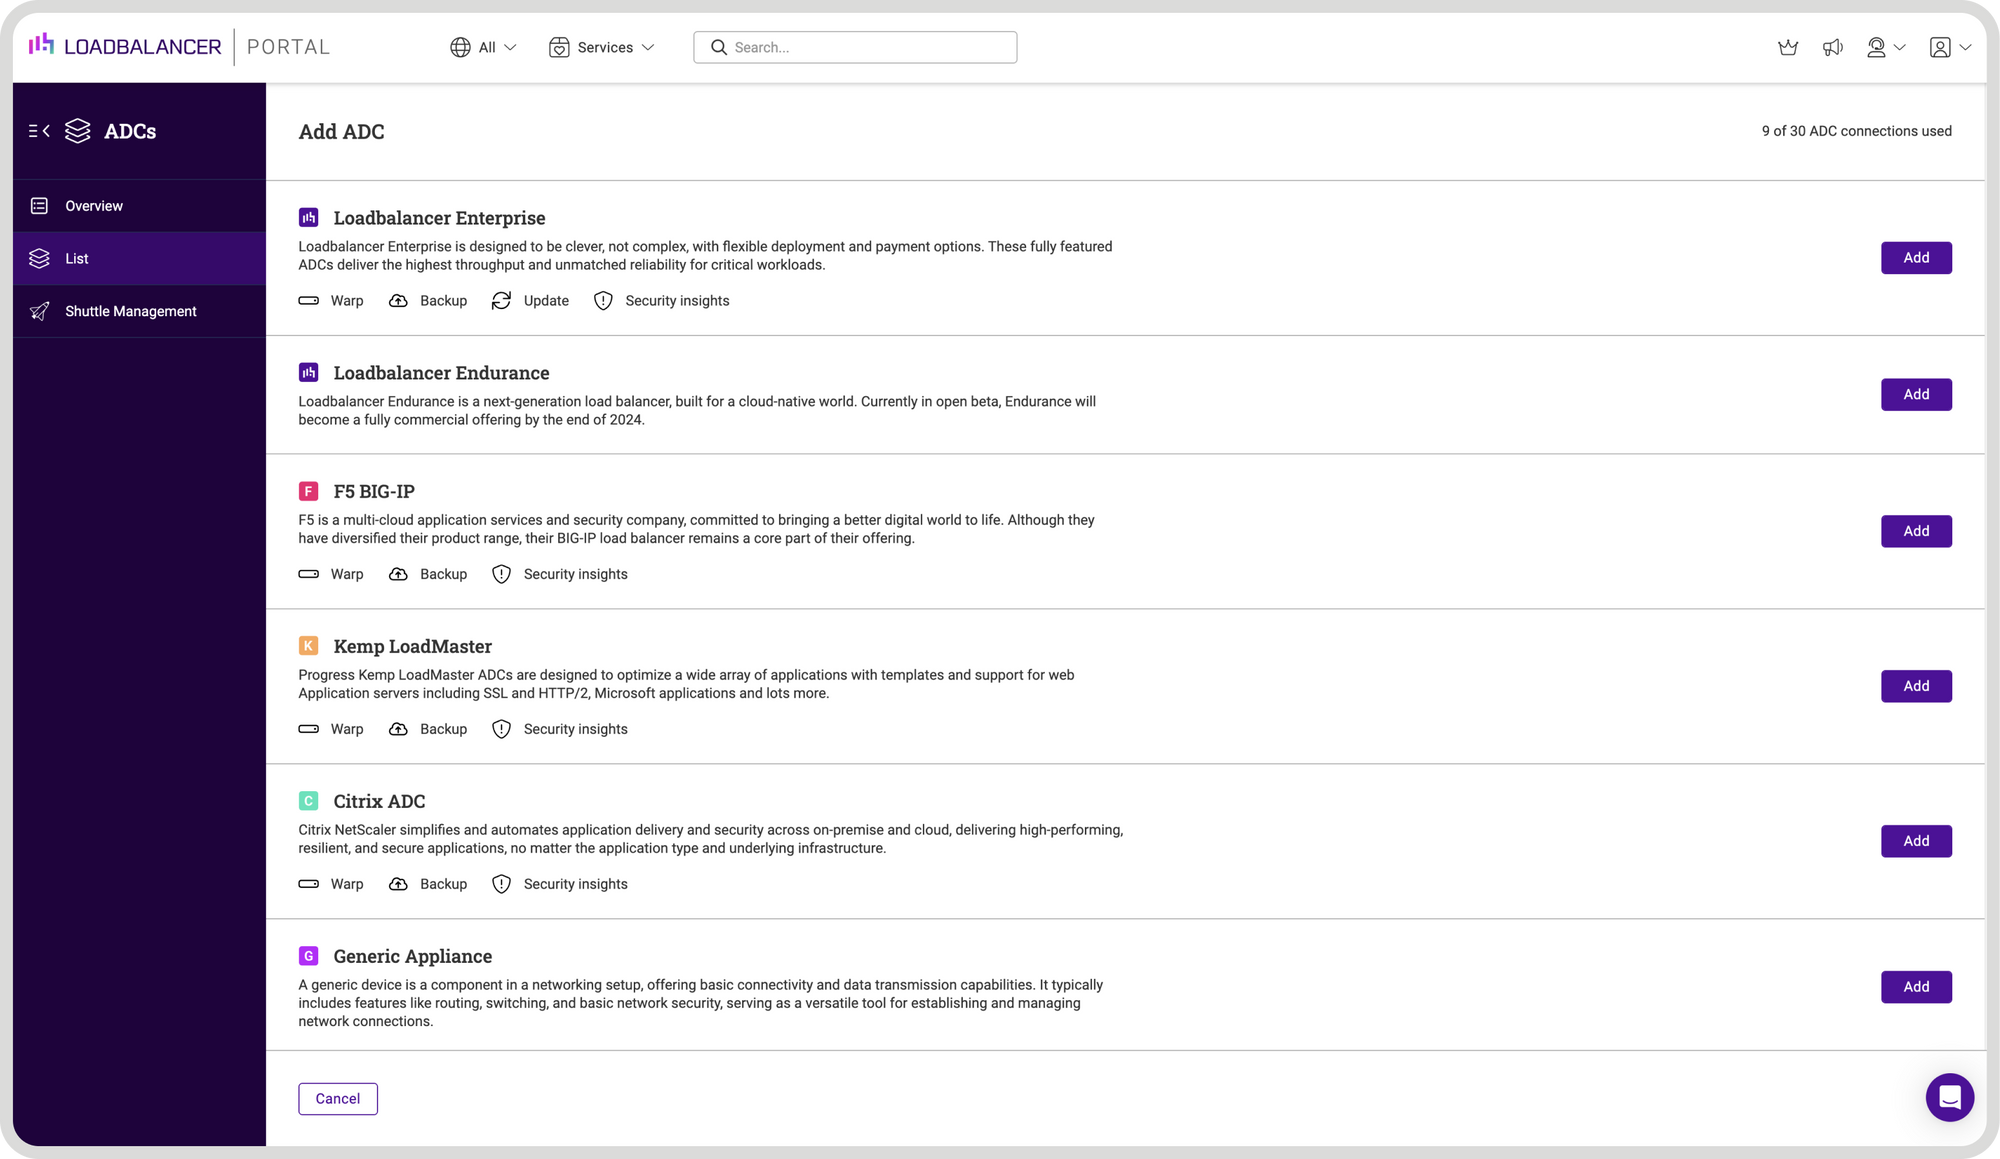
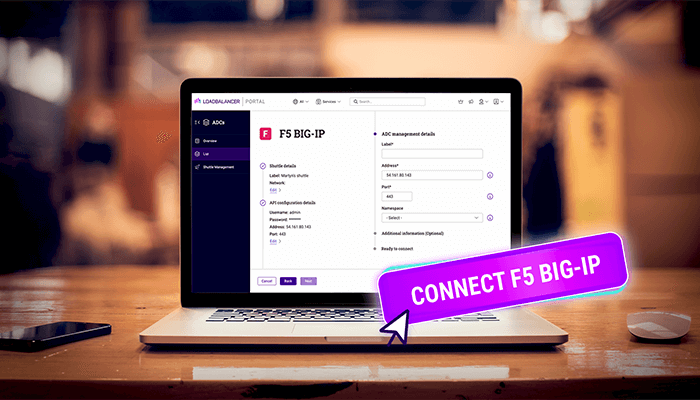
In our example, I select F5 BIG IP:
4. Using the Shuttle dropdown, select the required Shuttle:

5. Then click Next.
6. Enter the Username and Password for a user account that has permissions to
make API calls:
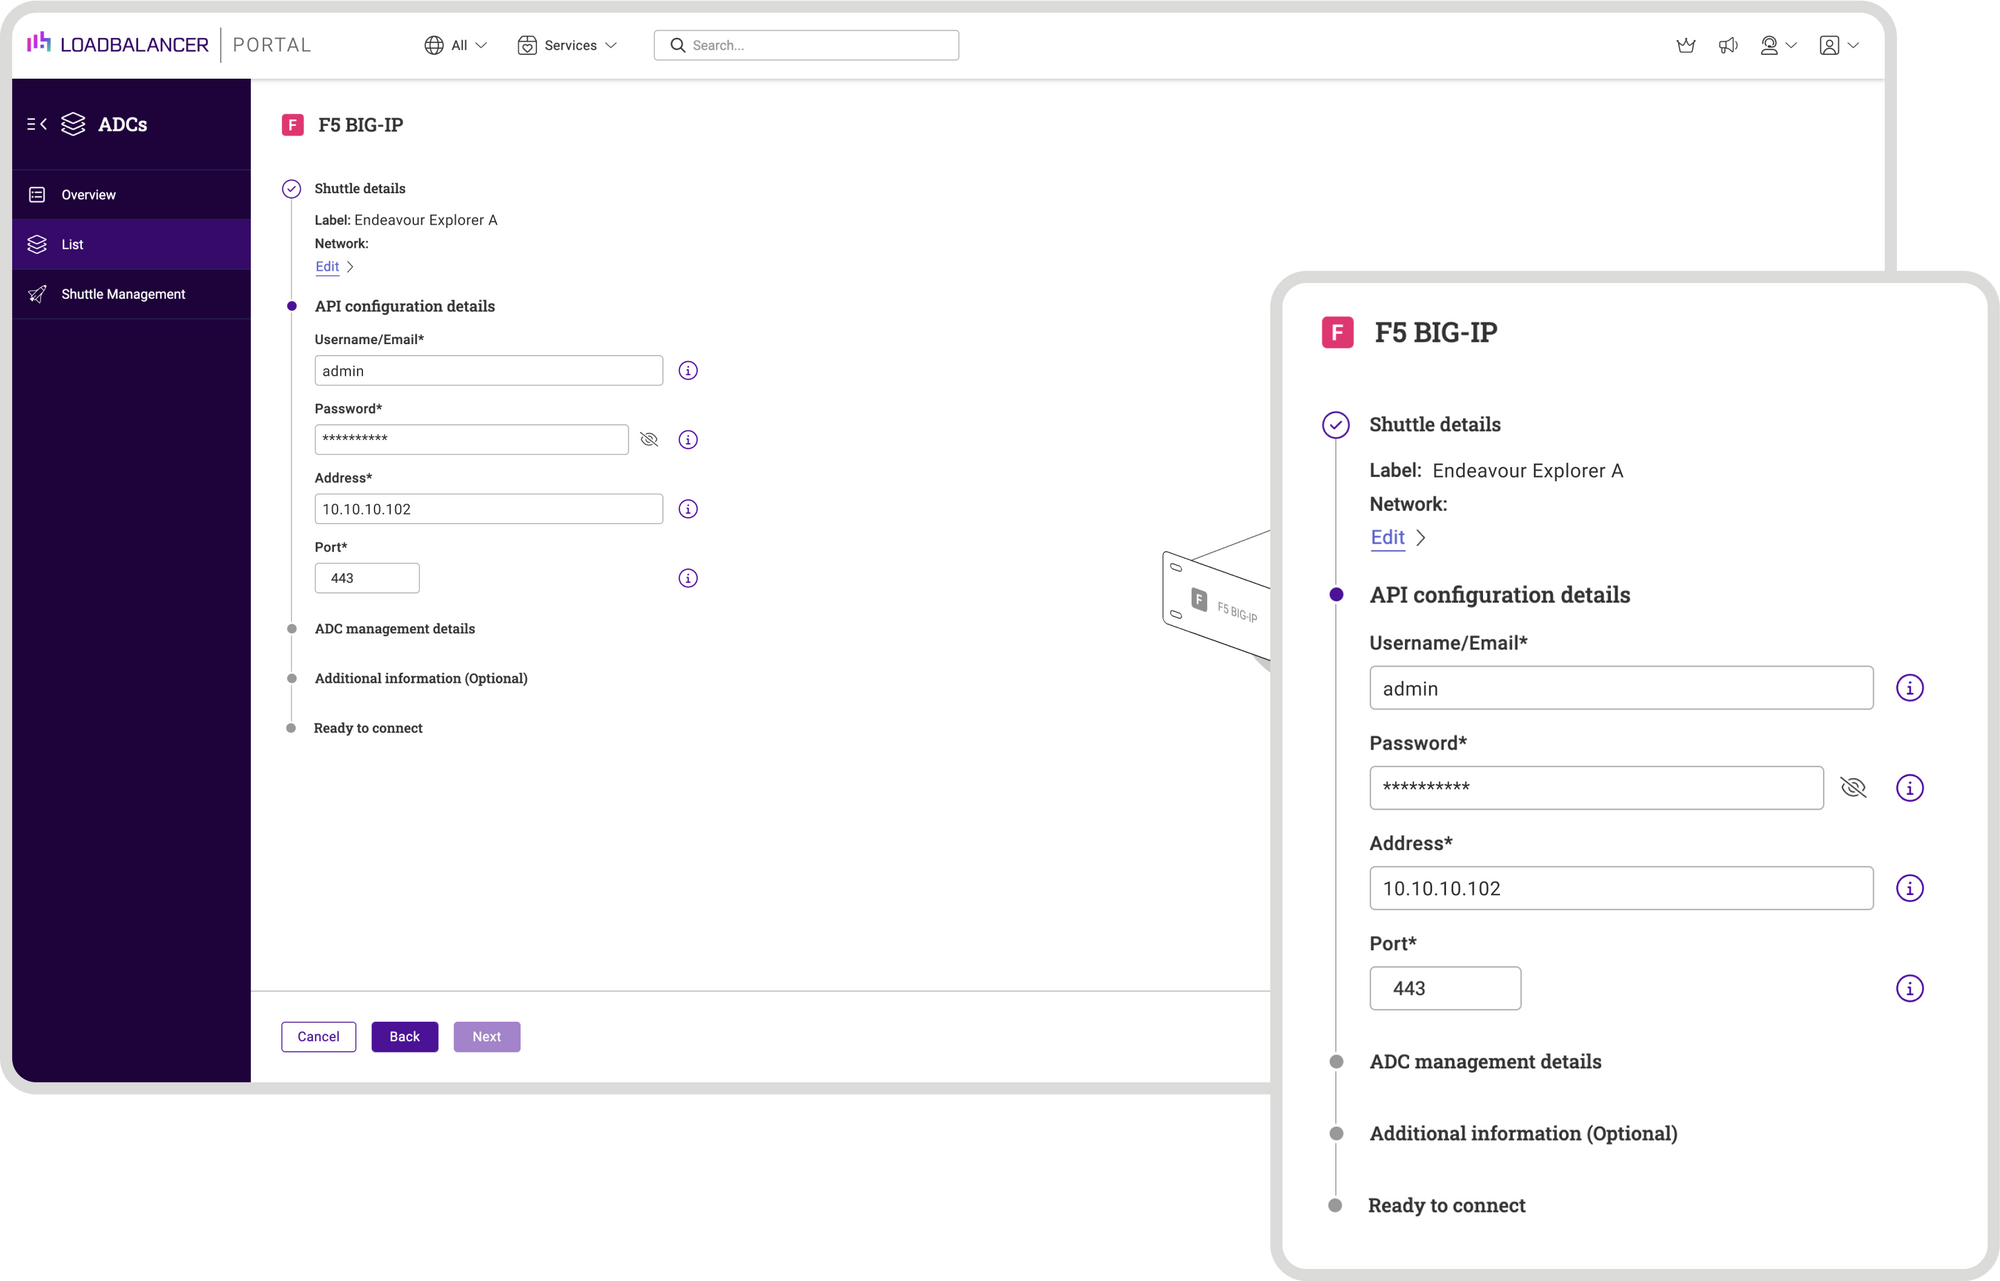
7. Enter the IP address of the appliance being added.
8. Leave the Port set to the default value.
9. Click Next.
10. Enter an appropriate Label (name) for the appliance:

11. Ensure that the IP Address is correct.
12. Leave the port set to the default value (9443).
13. Select the required Namespace.
14. Ensure that the IP Address is correct.
15. Leave the Port set to the default value (9443).
16. Select the required Namespace.
17. Click Next.
18. Enter any required Notes and Tags to describe the appliance, and click Next:
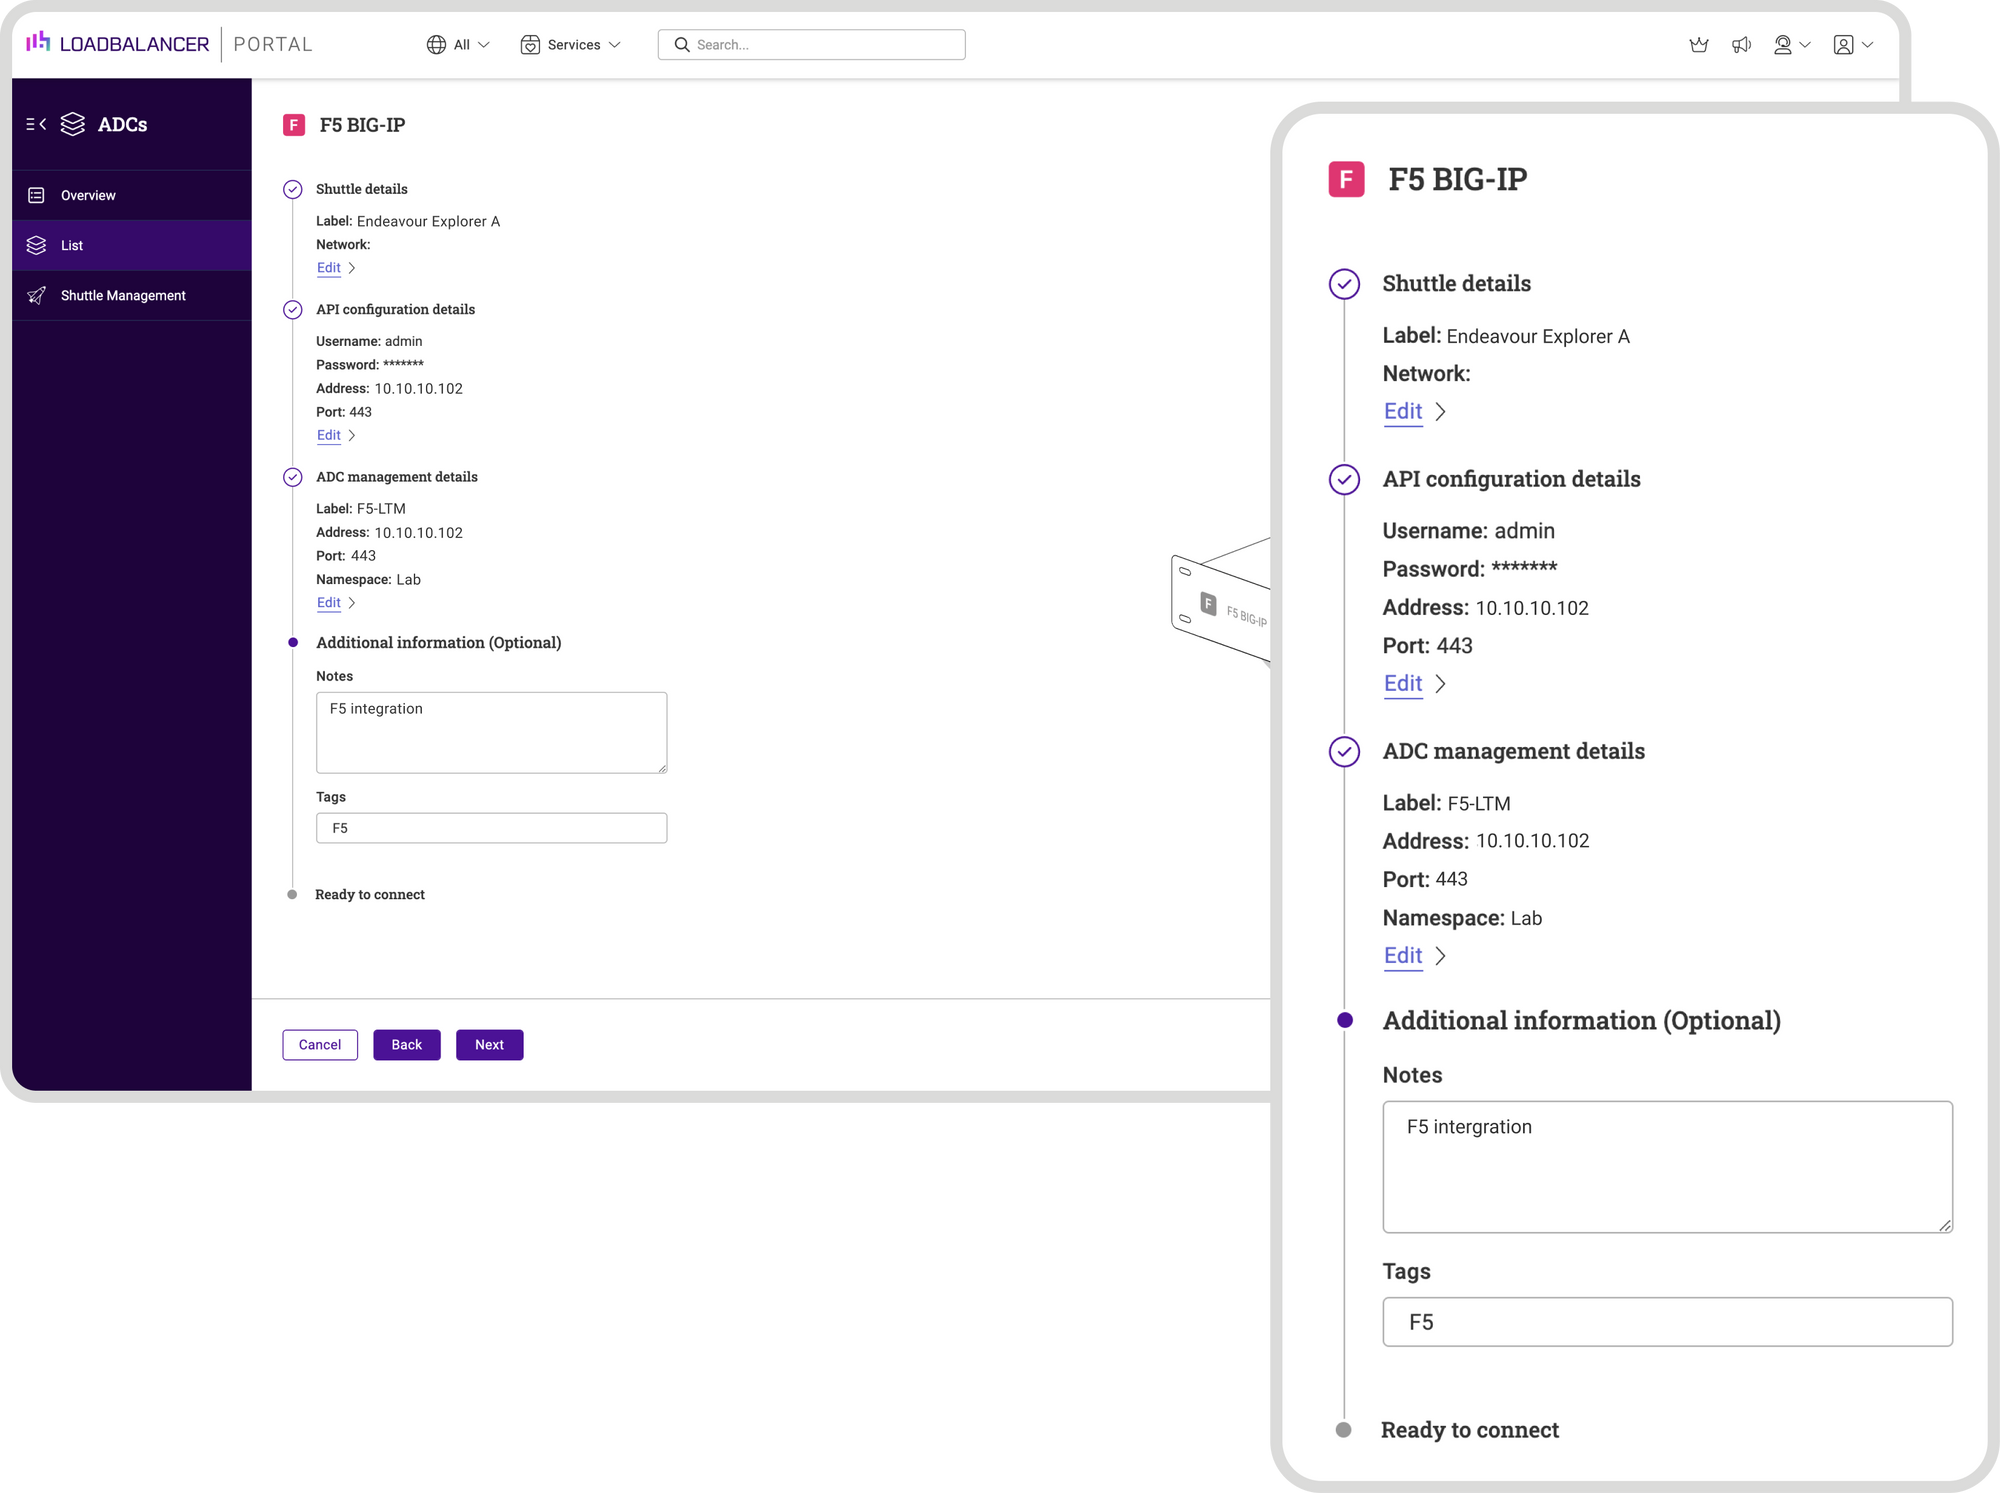
19. Verify all settings, these can be changed if needed using the
relevant Edit option.
20. Click Submit - if the details have been specified correctly, the adopted
appliance will appear in the list.
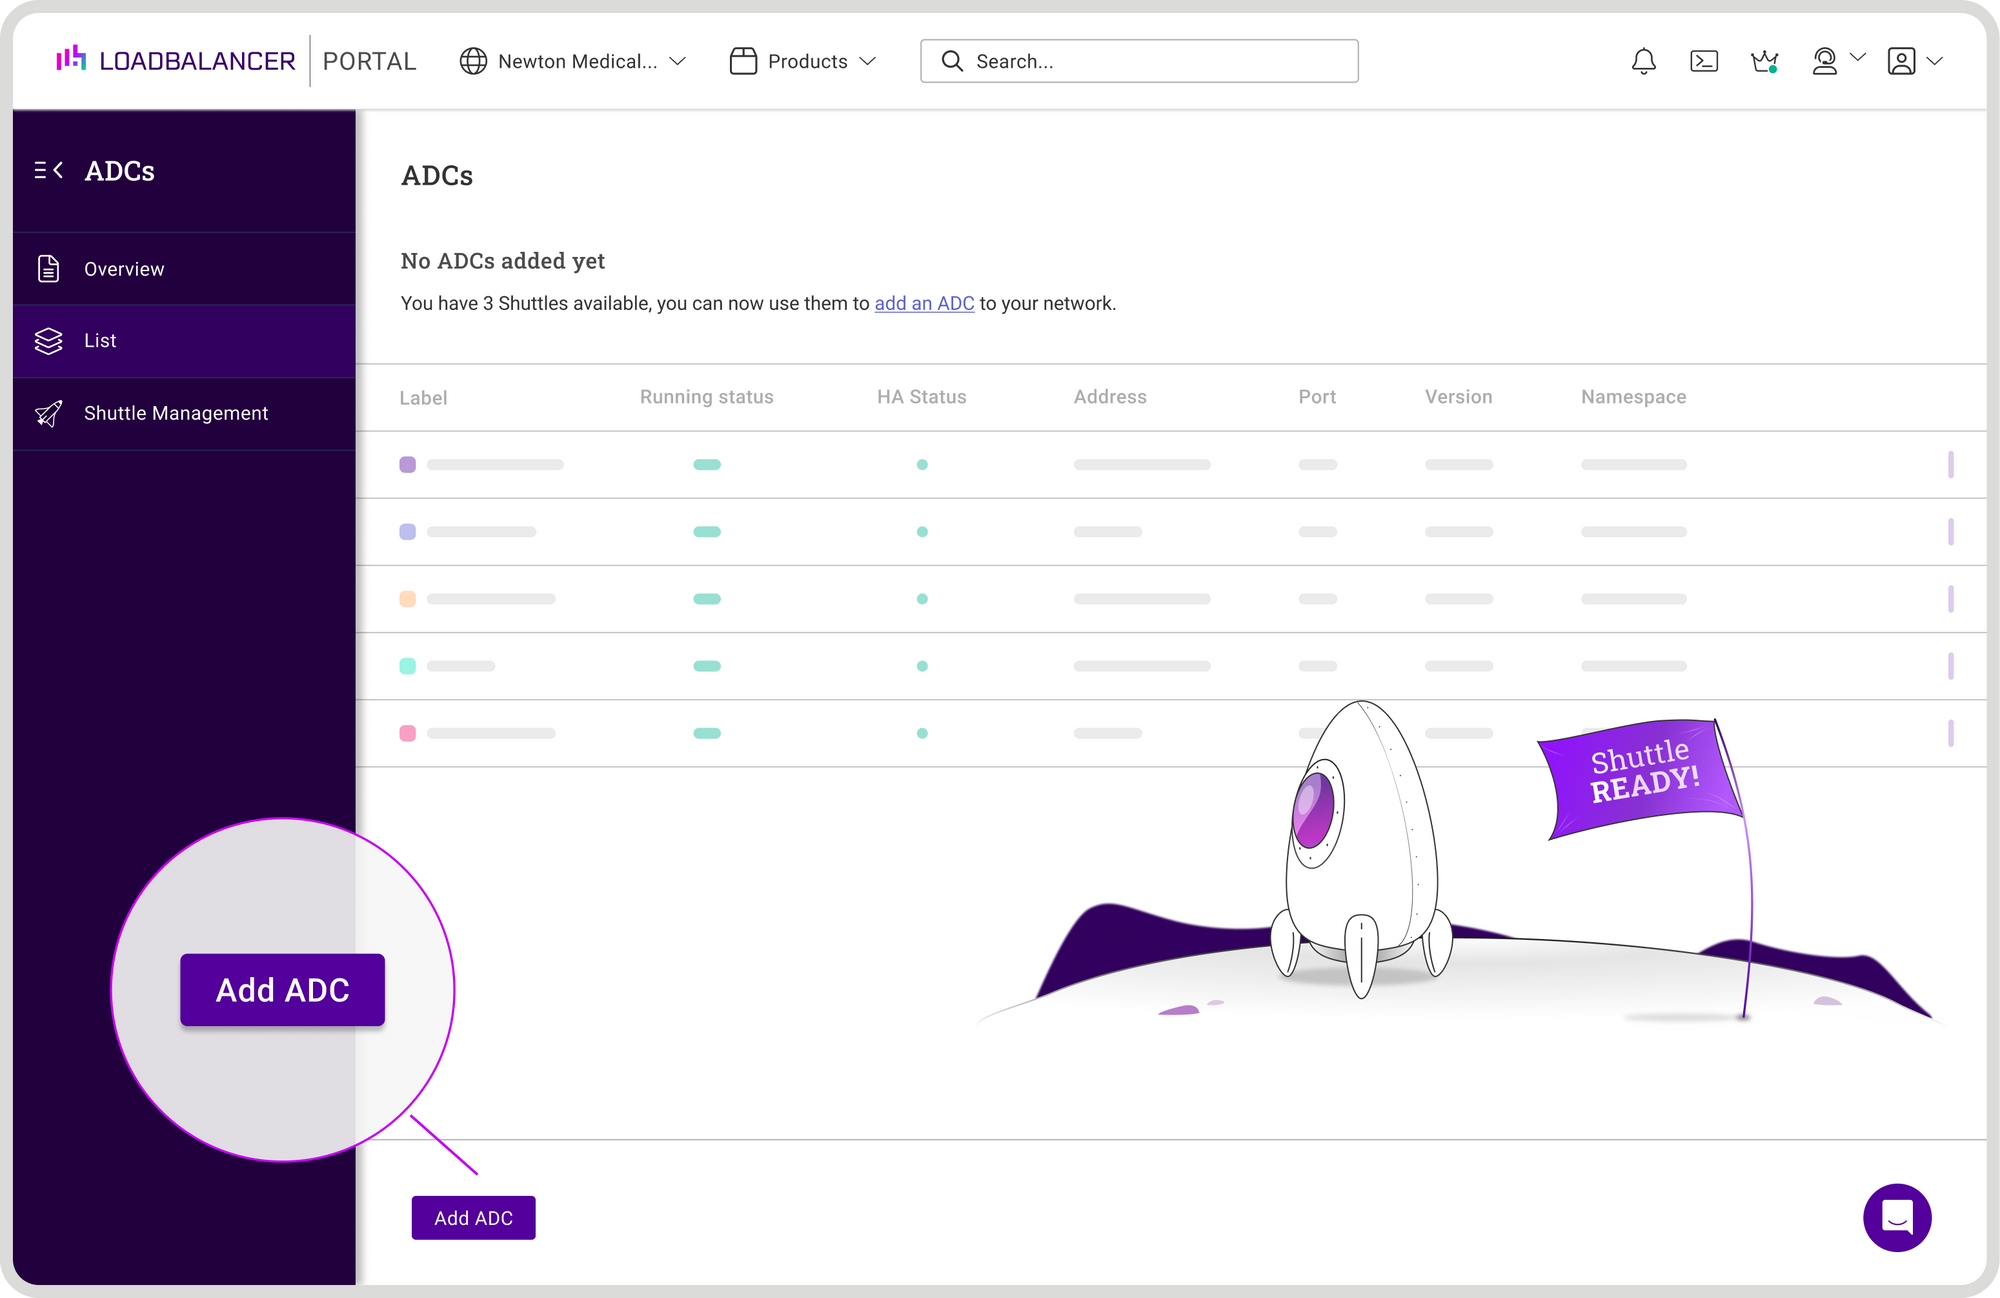
Step Three: Now I can manage my F5 Big-IP in the ADC Portal!
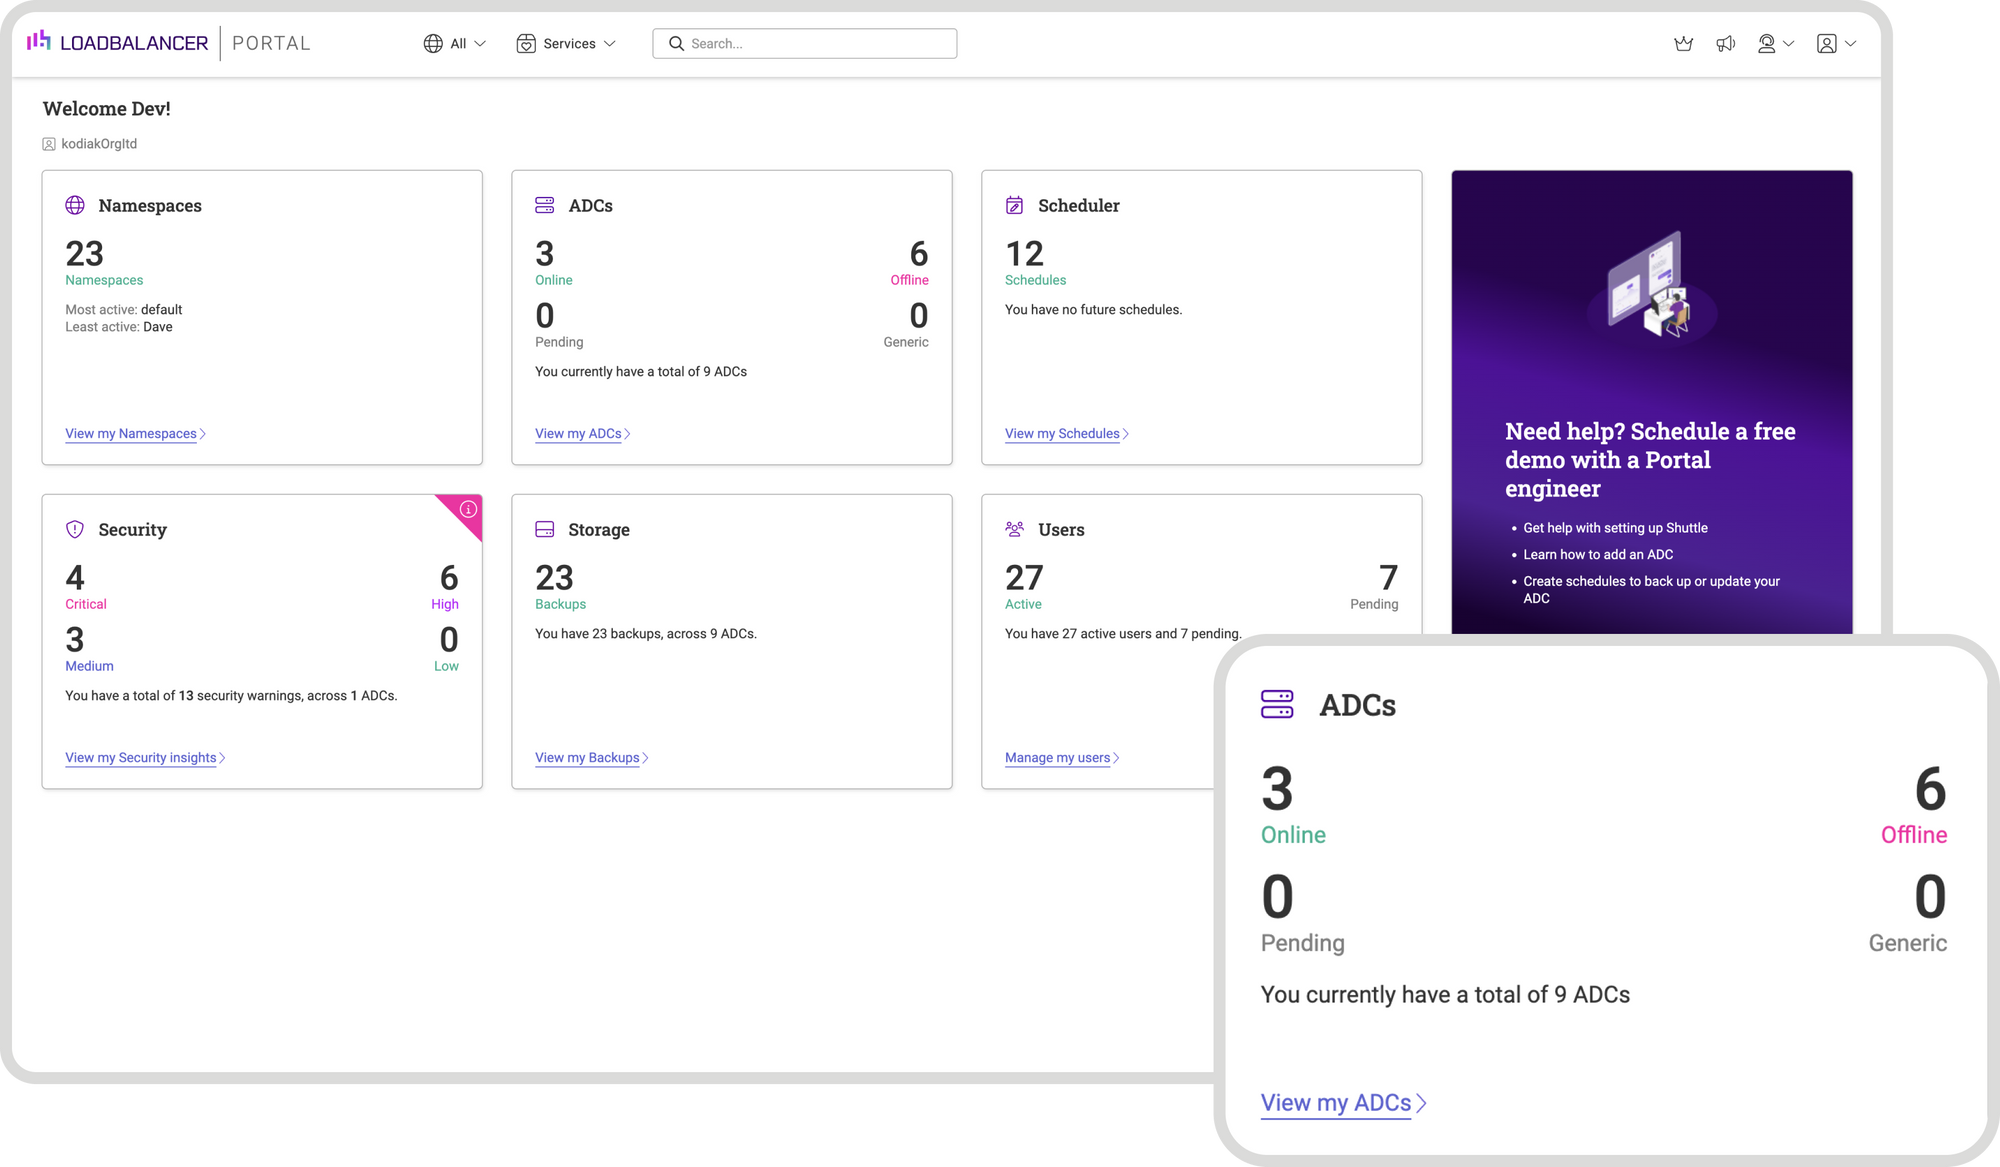
- Click LOADBALANCER | PORTAL in the main menu bar to view the
Dashboard. - A summary of the ADCs already added to the Portal will be displayed in
the ADCs panel:
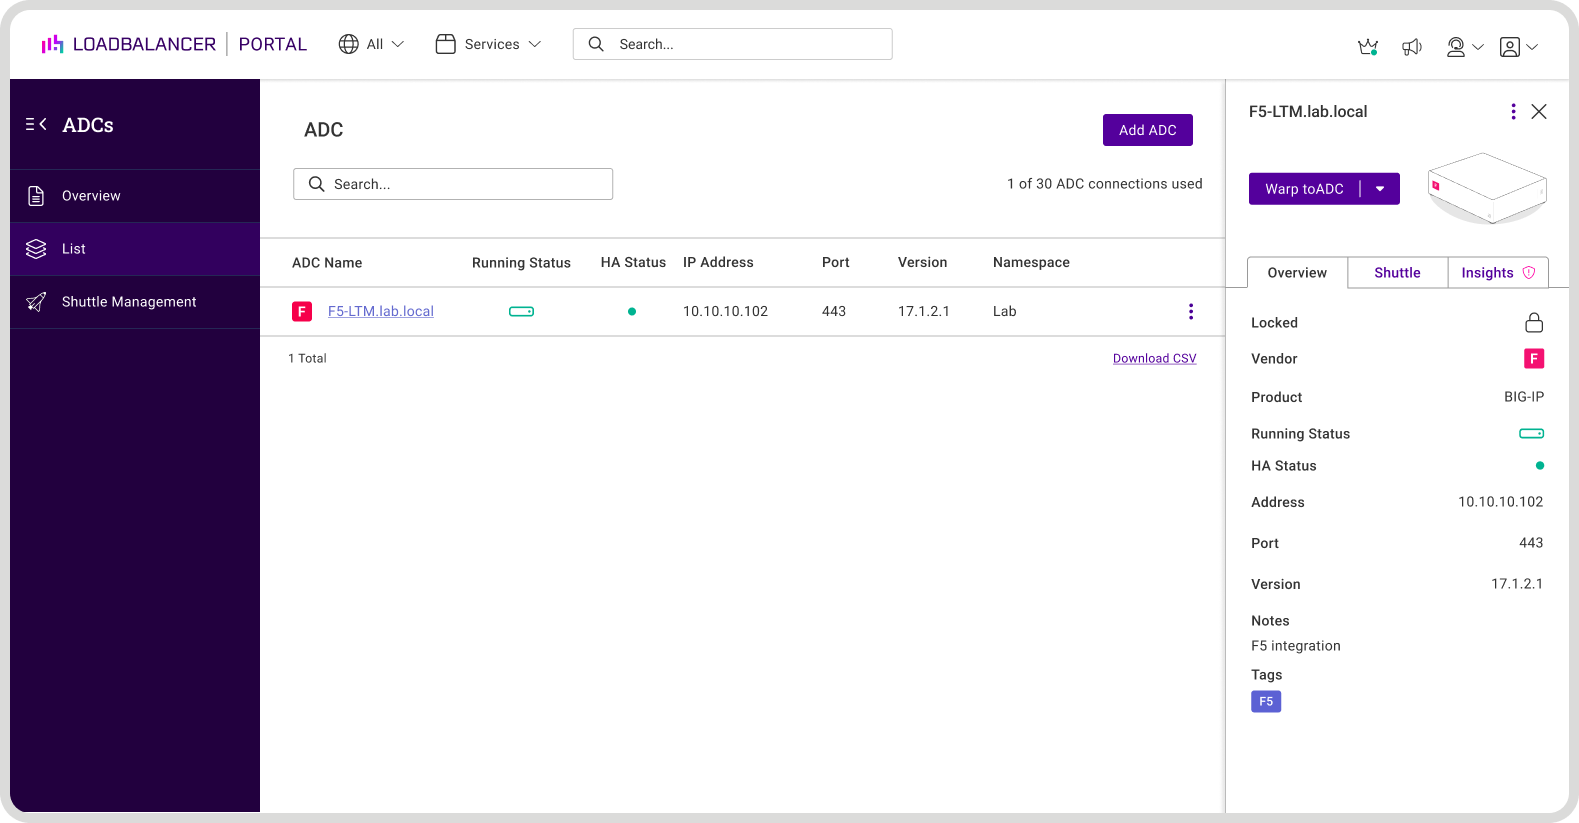
3. Click View my ADCs to see details of all ADCs:

4. All existing ADCs will be listed.
To view/manage a particular ADC
- Click the Label (name) of the ADC to be managed, a new information panel
will be displayed to the right:
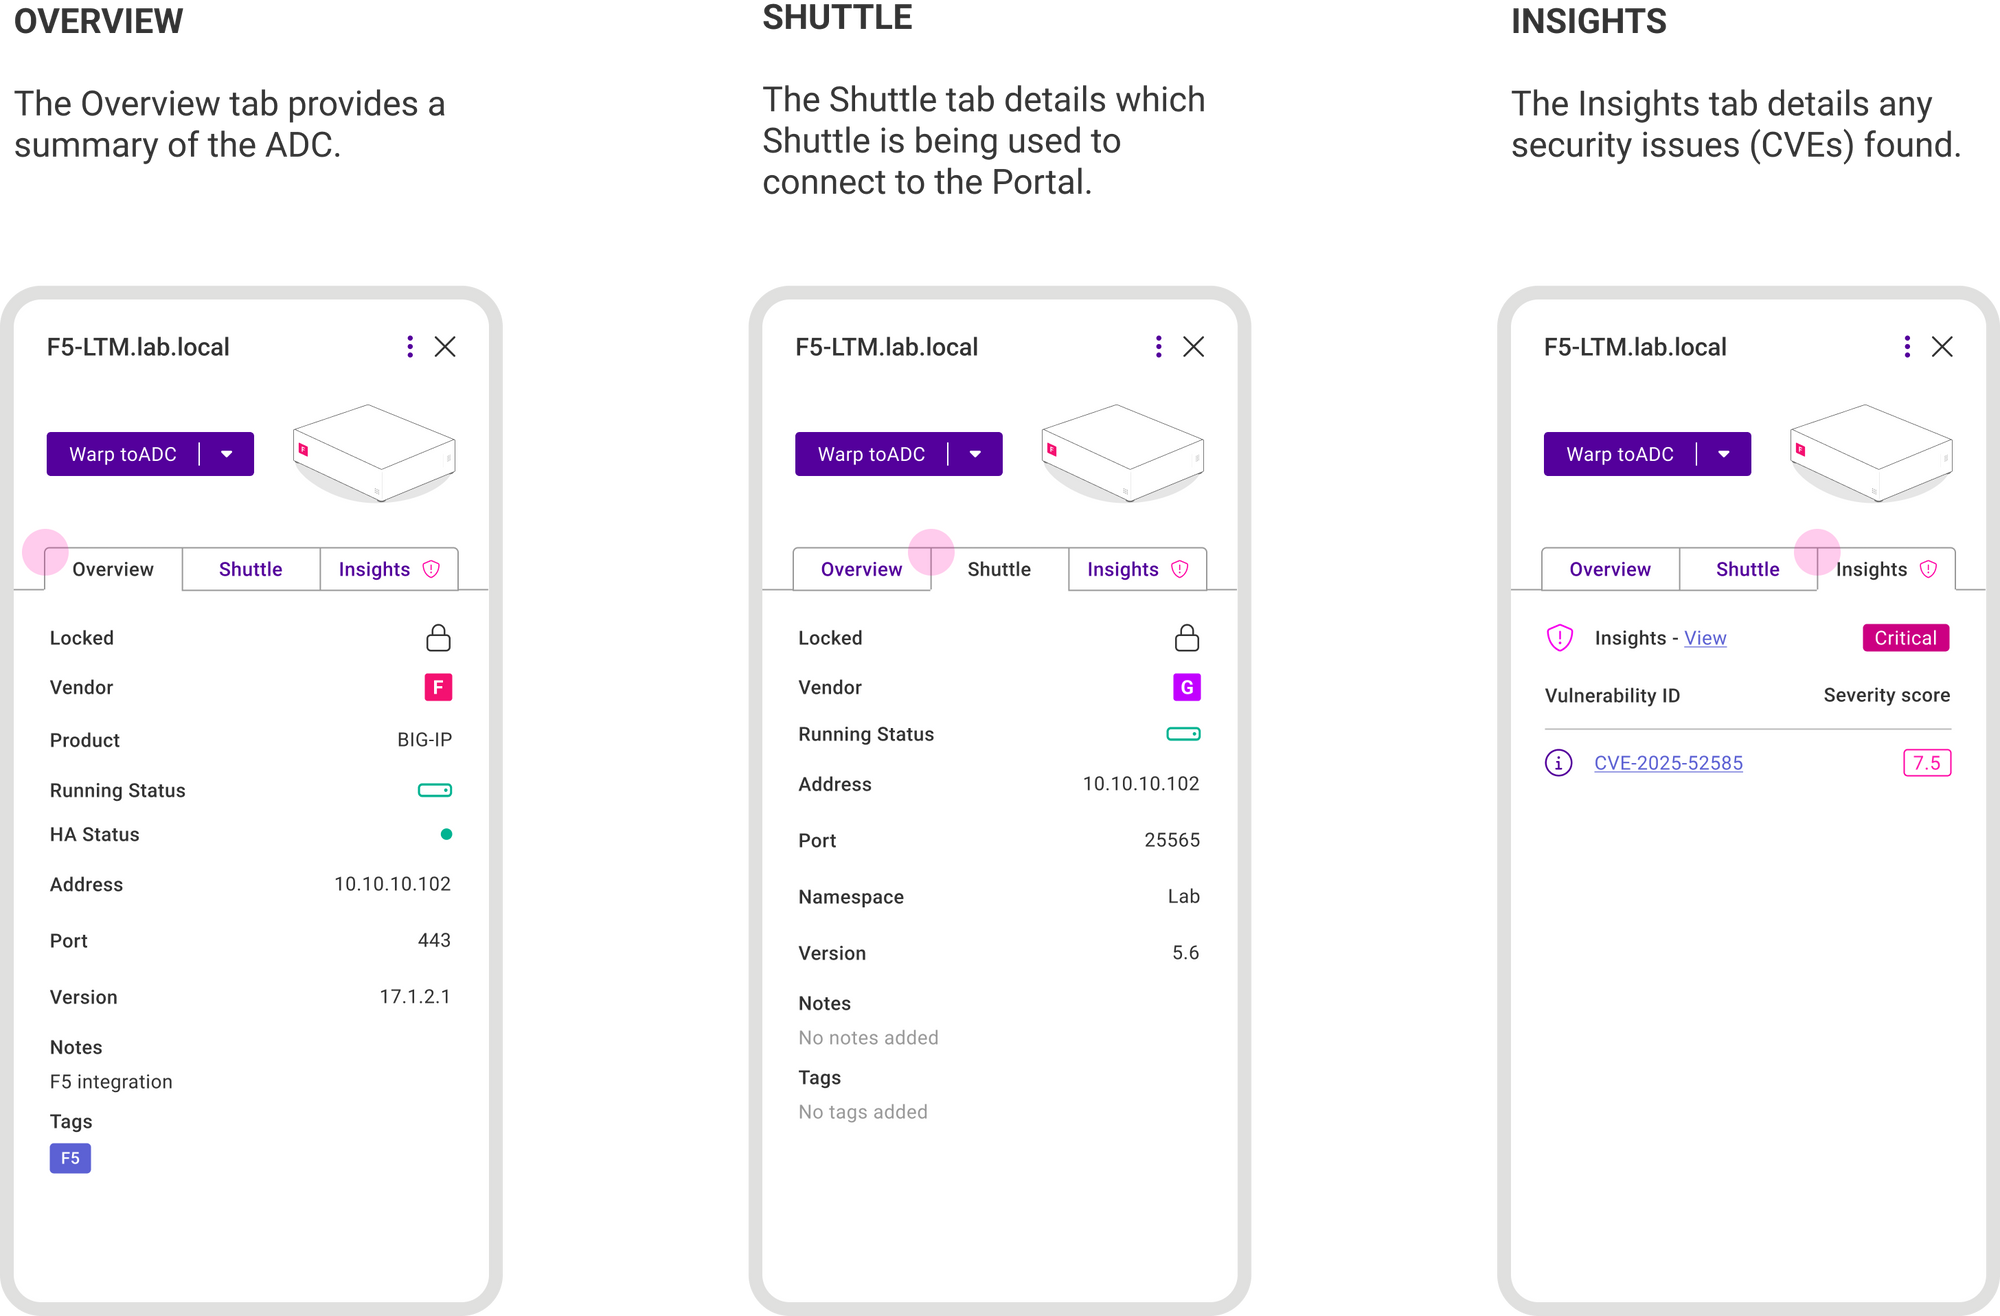
So how does this help me manage my F5 ADC?
First of all the ADC Portal enables instant, one-click access to any ADC’s web interface. If you already have network access to ADCs from your client via VPN etc. then direct access can be used, which is surprisingly useful when you can't remember the IP address for your ADCs.
For ADCs located in remote networks where you don't have direct access. Then you can use the innovative WARP. This is secure reverse proxy, so it uses very little bandwidth. And allows you to access and maintain your ADCs from anywhere in the world via your ADC Portal.
NB. WARP is not available with the Free Portal subscription level.
Using WARP for remote access is incredibly easy:
- Click the Label (name) of the ADC to be viewed, a new panel will be displayed
to the right. - Click Warp to ADC to securely connect to the ADC:
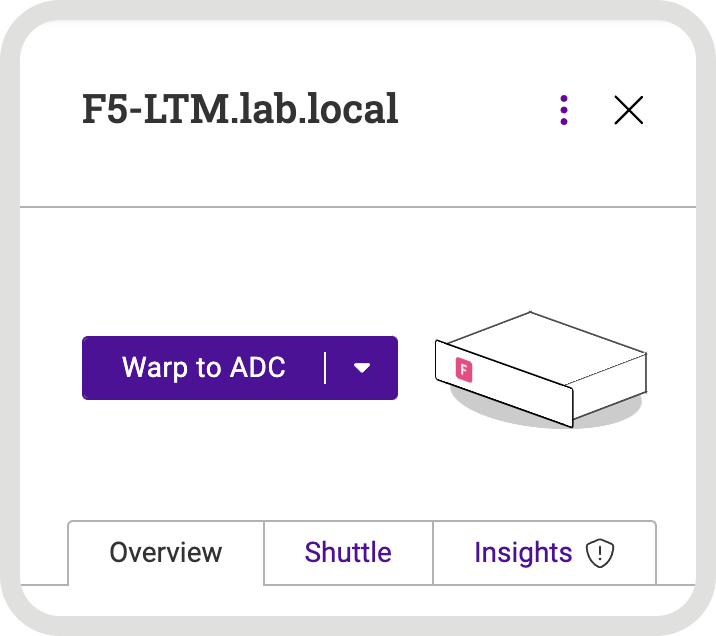
3. A new browser tab will open and display the WebUI.
While using Direct Access is also a handy backup:
- Click the Label (name) of the ADC to be viewed, a new panel will be displayed
to the right. - Click the down arrow on the Warp to ADC button and select Direct access:
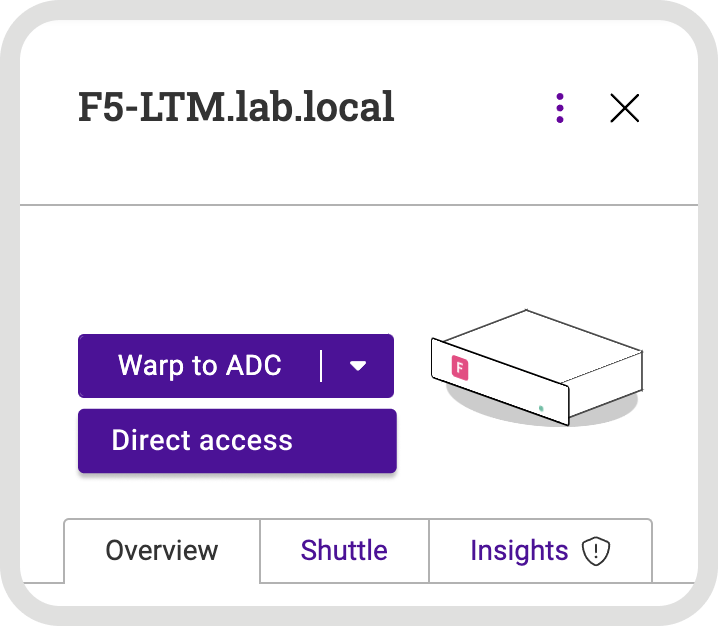
3. A new browser tab will open and display the WebUI.
So what else can I do?
Click the three dots on the right hand side of the ADC list, and the actions menu will be displayed:
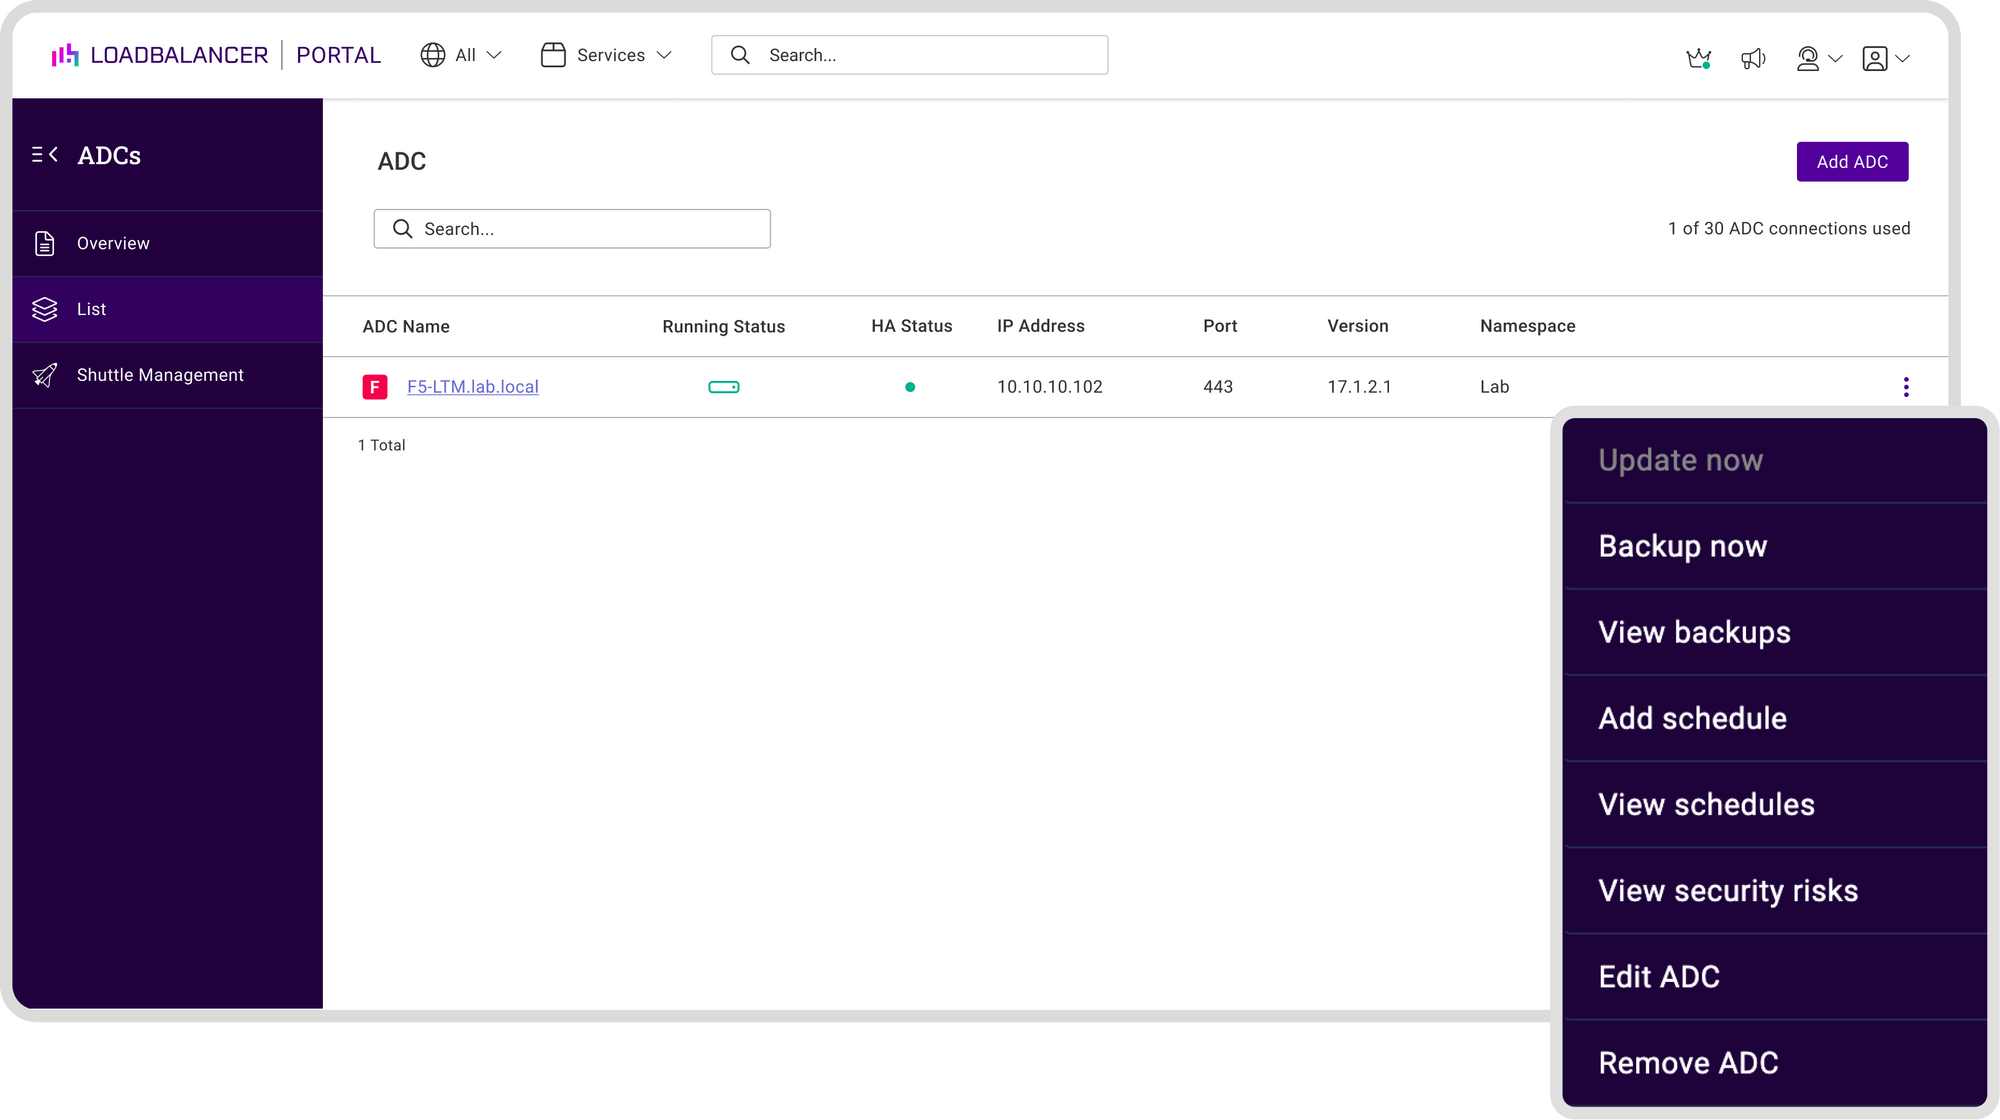
Then you can easily select the required action for that device. Your options are:
Backup now
- A backup of the ADC will be created.
View backups
- All backups for this ADC will be listed.
- To order by a particular column, click the column heading. The sort order (ascending or descending) is indicated by the arrow.
- Click the column heading again to change the sort order.
- To download a backup: Click the three dots menu to the right and click Download. Then Enter your password and click Submit.
- To delete a backup: Click the three dots menu to the right and click Delete,
then click Confirm to proceed.
Add a schedule
- The Create Schedule screen will be displayed.
- The Product Name is set to the name of the ADC and Schedule
Type is set to Backup. - Specify the required Date, Time and Occurrence and click Save
Schedule.
View schedules
- The Schedules screen will be displayed. Any schedules created for the
ADC will be listed.
View security risks
- The Security Insights screen will be displayed. Any CVEs for the ADC
will be listed.
Edit ADC
- The Edit ADC Details screen will be displayed. Update the settings as
required and click Submit to save.
Remove ADC
- Remove the ADC from the Portal. You’ll be prompted to confirm that
you want to proceed, click Confirm to remove the ADC.
You can also manage the secure storage of backups
Backups can be easily viewed and either restored, downloaded for storage
elsewhere, or deleted. All backups are encrypted, immutable and securely stored in the ADC Portal. And don't forget that because it's zero trust, you can be certain that you are the only one with access.
Access storage
- Click LOADBALANCER | PORTAL in the main menu bar to view the
Dashboard. - In the Storage panel:
- If there are currently no backups, click Create a backup.
The Create Schedule form will be displayed. - If backups already exist, click View my Backups.
3. Existing backups will be listed:
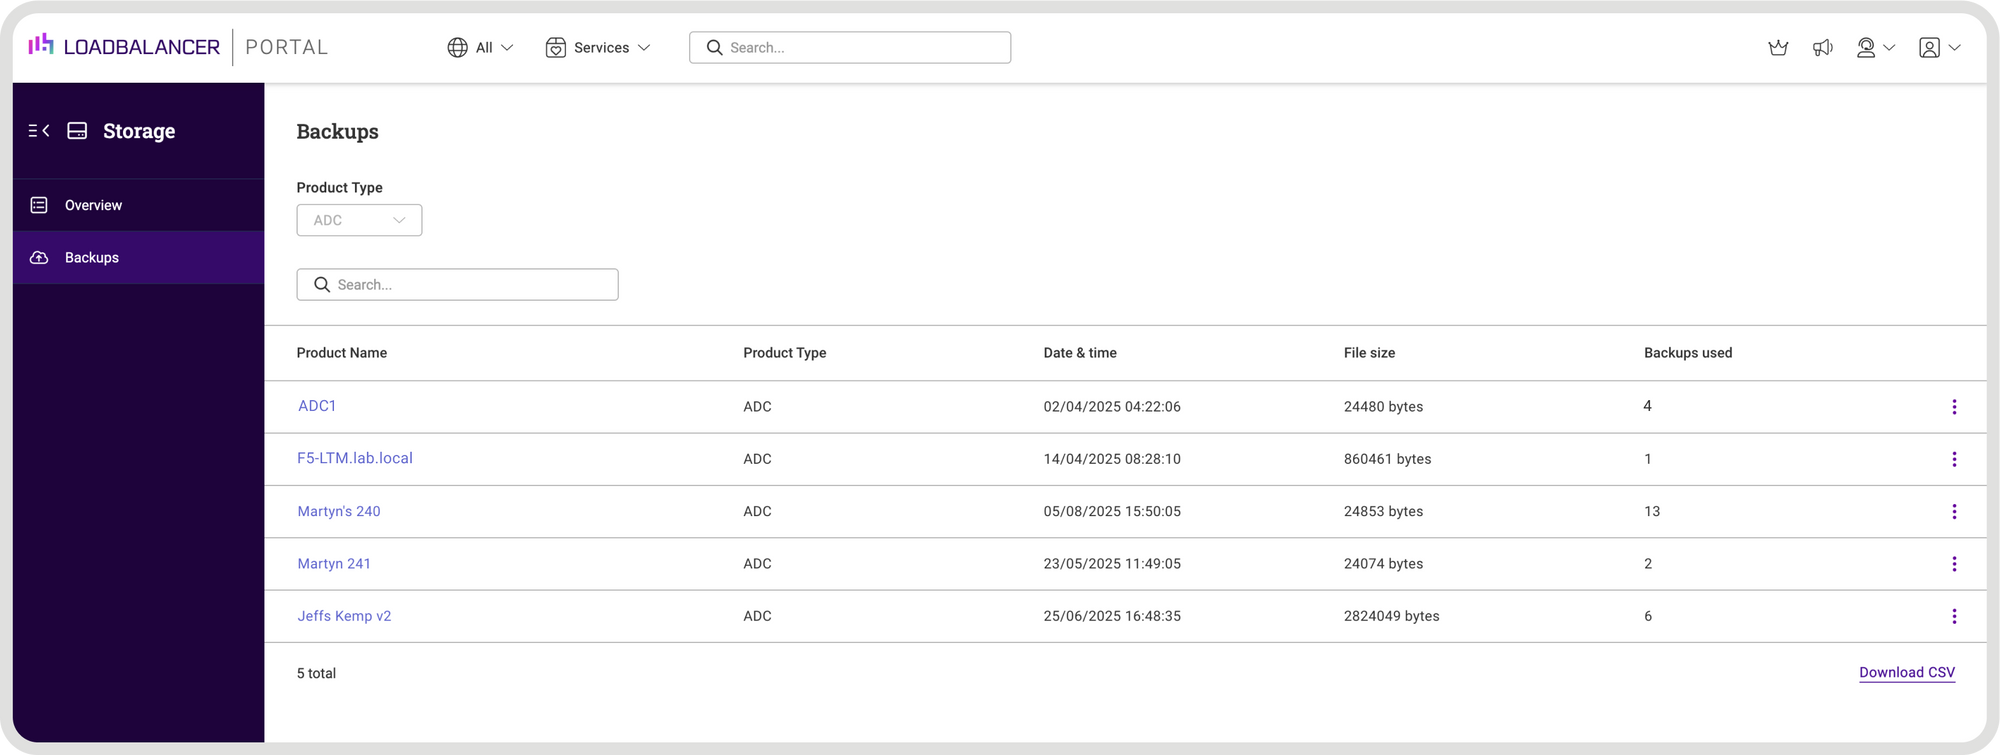
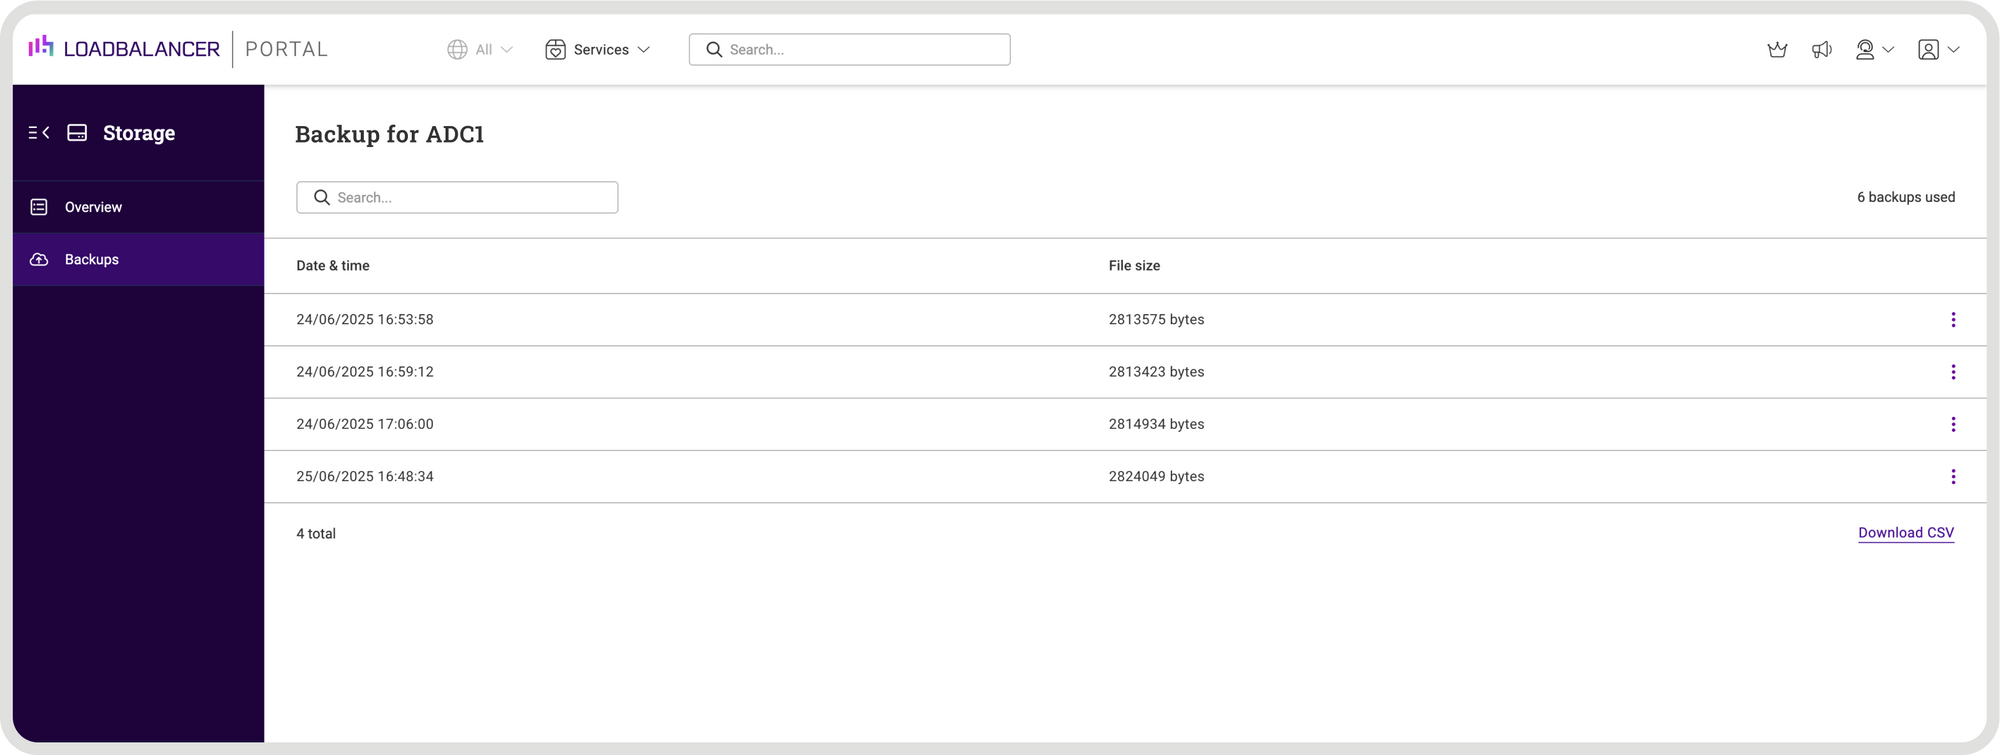
4. In this example, 4 backups have been created for ADC1.
5. To view all backups, click on the Product name, in this case ADC1.
6. Details of all backups will be displayed.
Download a backup
- Click the three dots menu next to the backup to be downloaded.
- Select Download.
- Enter your password in order to decrypt and download the backup and
click Submit. - Note the Backup Archive Password (ADC appliance ID) that is displayed on
screen. This is required as a password for the encrypted file.
Delete a backup
- Click the three dots menu next to the backup to be deleted.
- Click Delete then click Confirm to delete the backup.
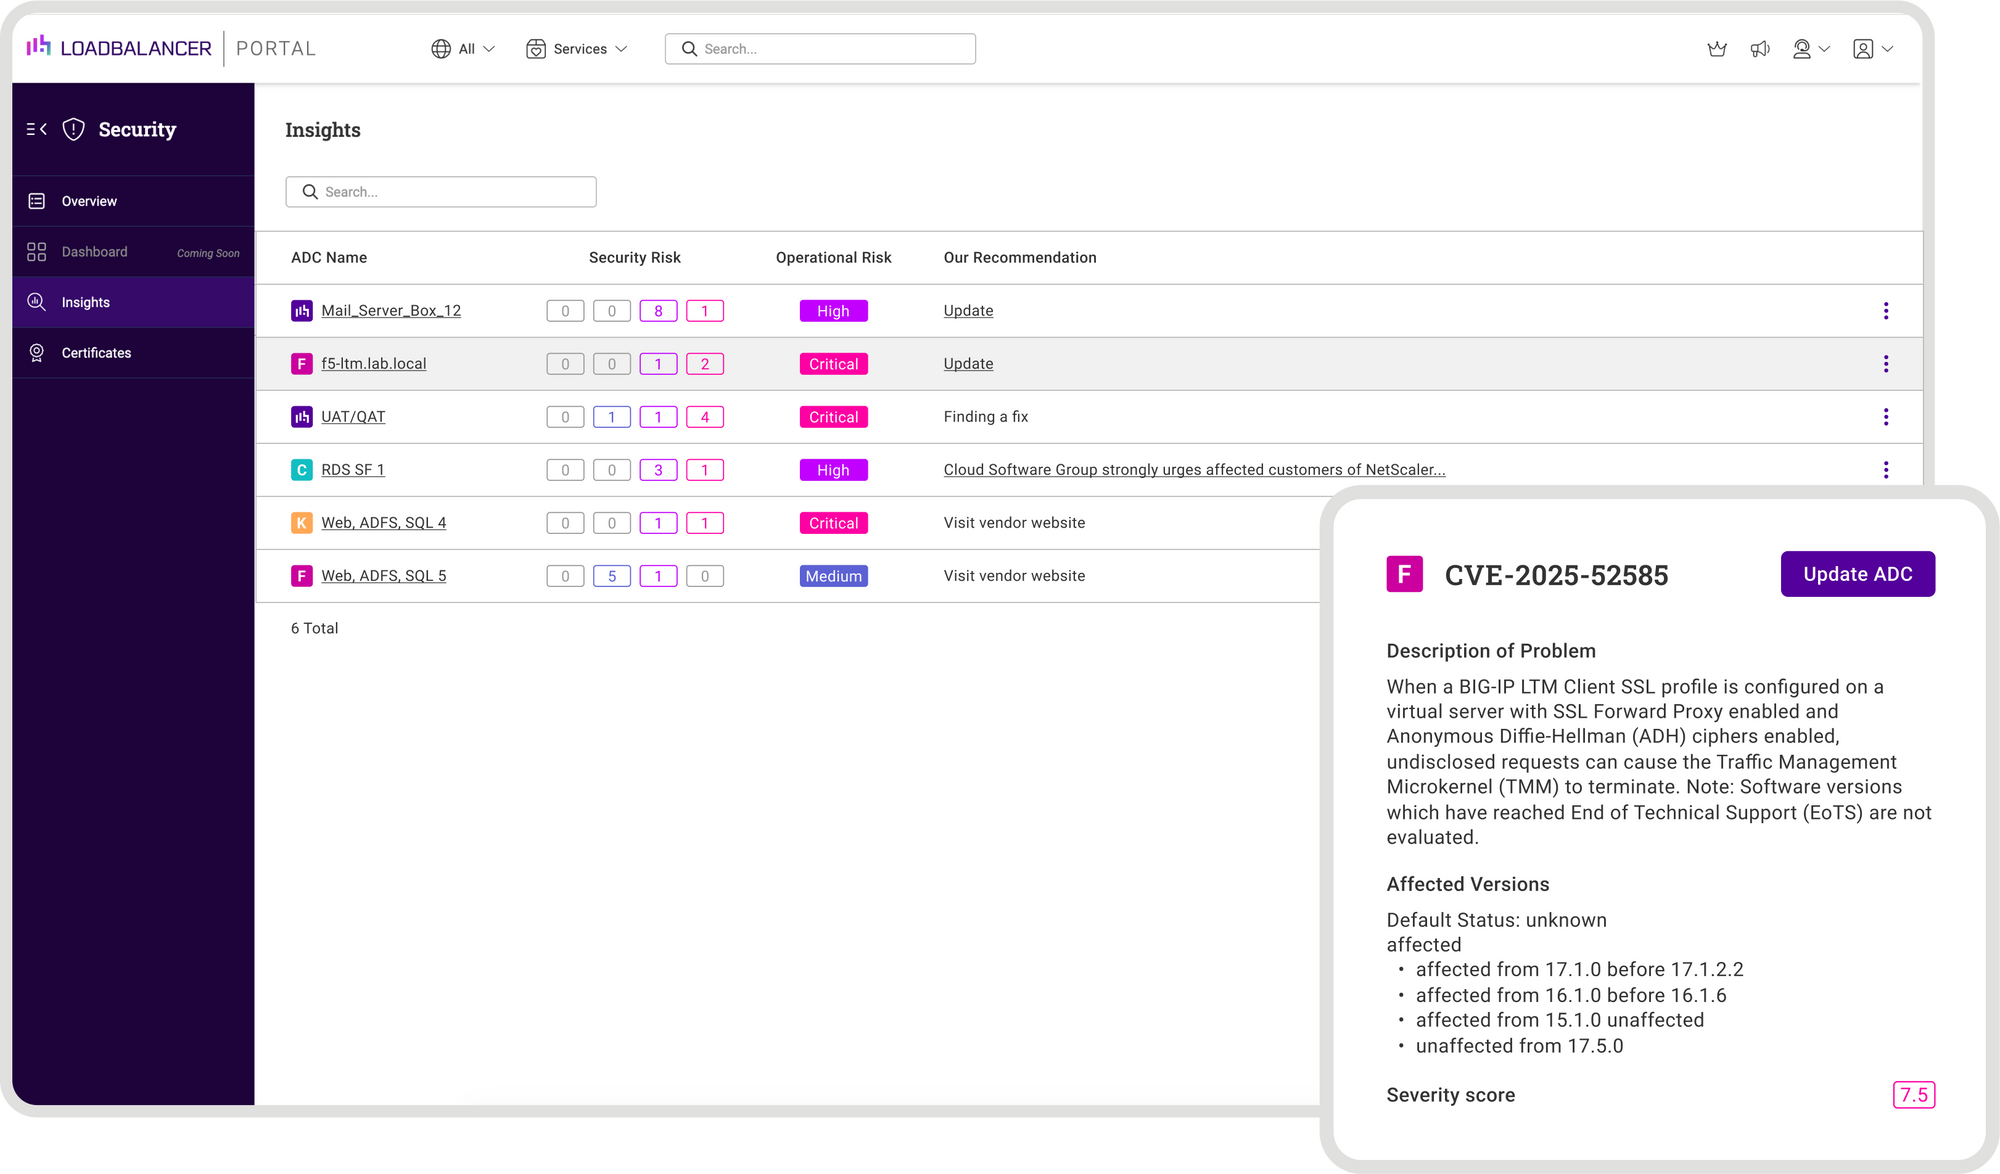
So how do I get security insights?
The ADC Portal provides continuous, real-time CVE (Common Vulnerabilities and
Exposure) monitoring of all ADCs and ensures that any issues found are highlighted so that swift action can be taken. This is incredibly important because in the last few years we've had a number of serious security vulnerabilities with F5 and Citrix in particular.
View CVE Security insights for all ADCs
- Click LOADBALANCER | PORTAL in the main menu bar to view the
Dashboard. - The number of risks detected is displayed in the Security Panel.
- Click View my Security insights to view details of any risks found.
My F5 appliances were all up to date but details of all CVEs complete with a recommendation of what action should be taken would be displayed as shown in the example below, according to the product documentation:
View CVE security insights for a particular ADC
- Click LOADBALANCER | PORTAL in the main menu bar to view the
Dashboard. - In the ADCs panel, click View my ADCs.
- Click the three dots menu next to the ADC to be viewed and select View
security risks.
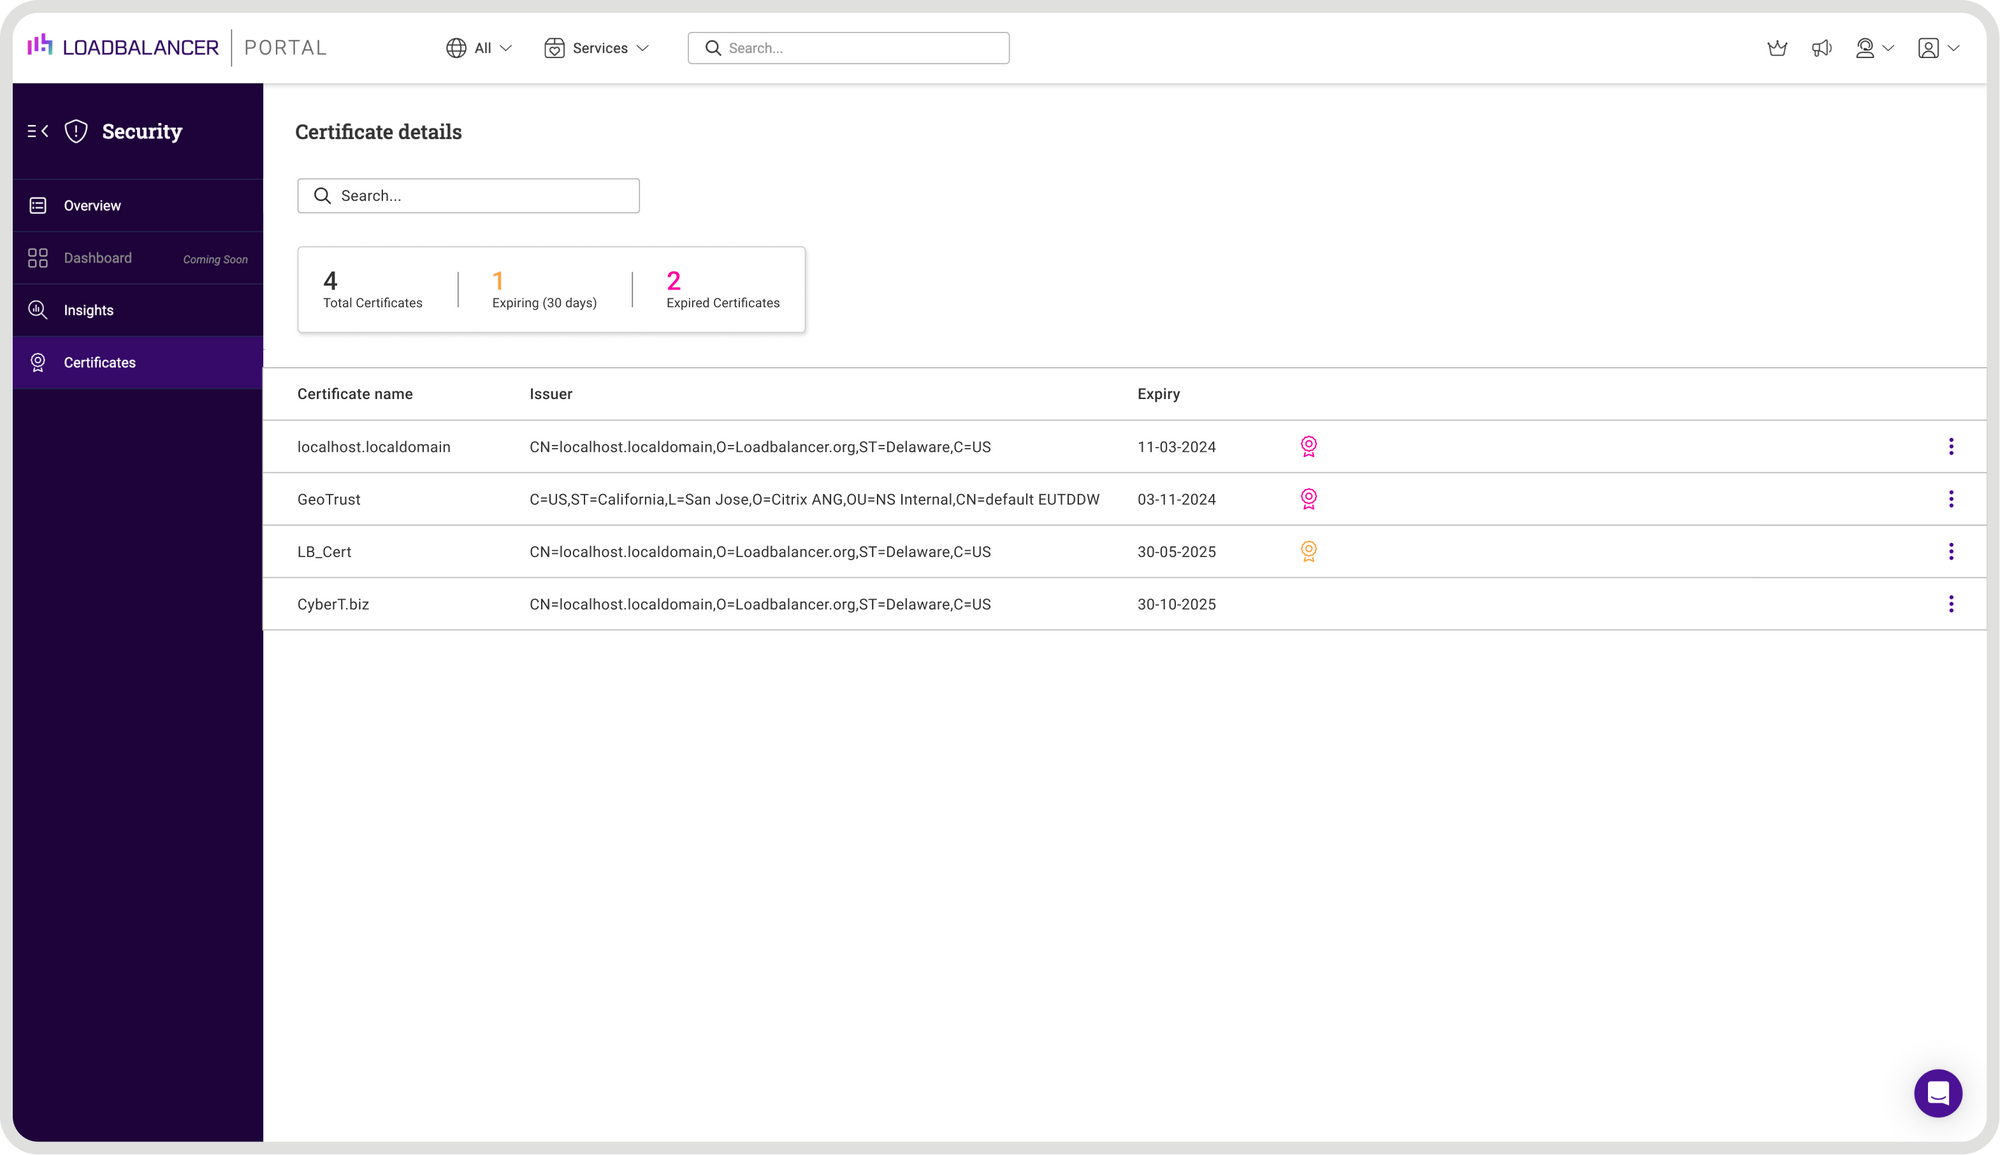
And checking SSL certificate expiry dates is important:
All SSL/TLS certificates installed in each ADC can be viewed from the Portal (not
available with the Free Portal subscription level). It gives you a nice early warning when certificates are due to expire. This enables proactive monitoring to help ensure that expiring certificates are renewed or replaced on time. Again a nice feature to have, as I've personally come across the emergency certificate replacement after expiry a few times...
To view all certificates for a particular ADC
- Click LOADBALANCER | PORTAL in the main menu bar to view the
Dashboard. - In the Security panel, click View my Security insights.
- In the menu to the left, select Certificates.
- Select the ADC you’d like to view.
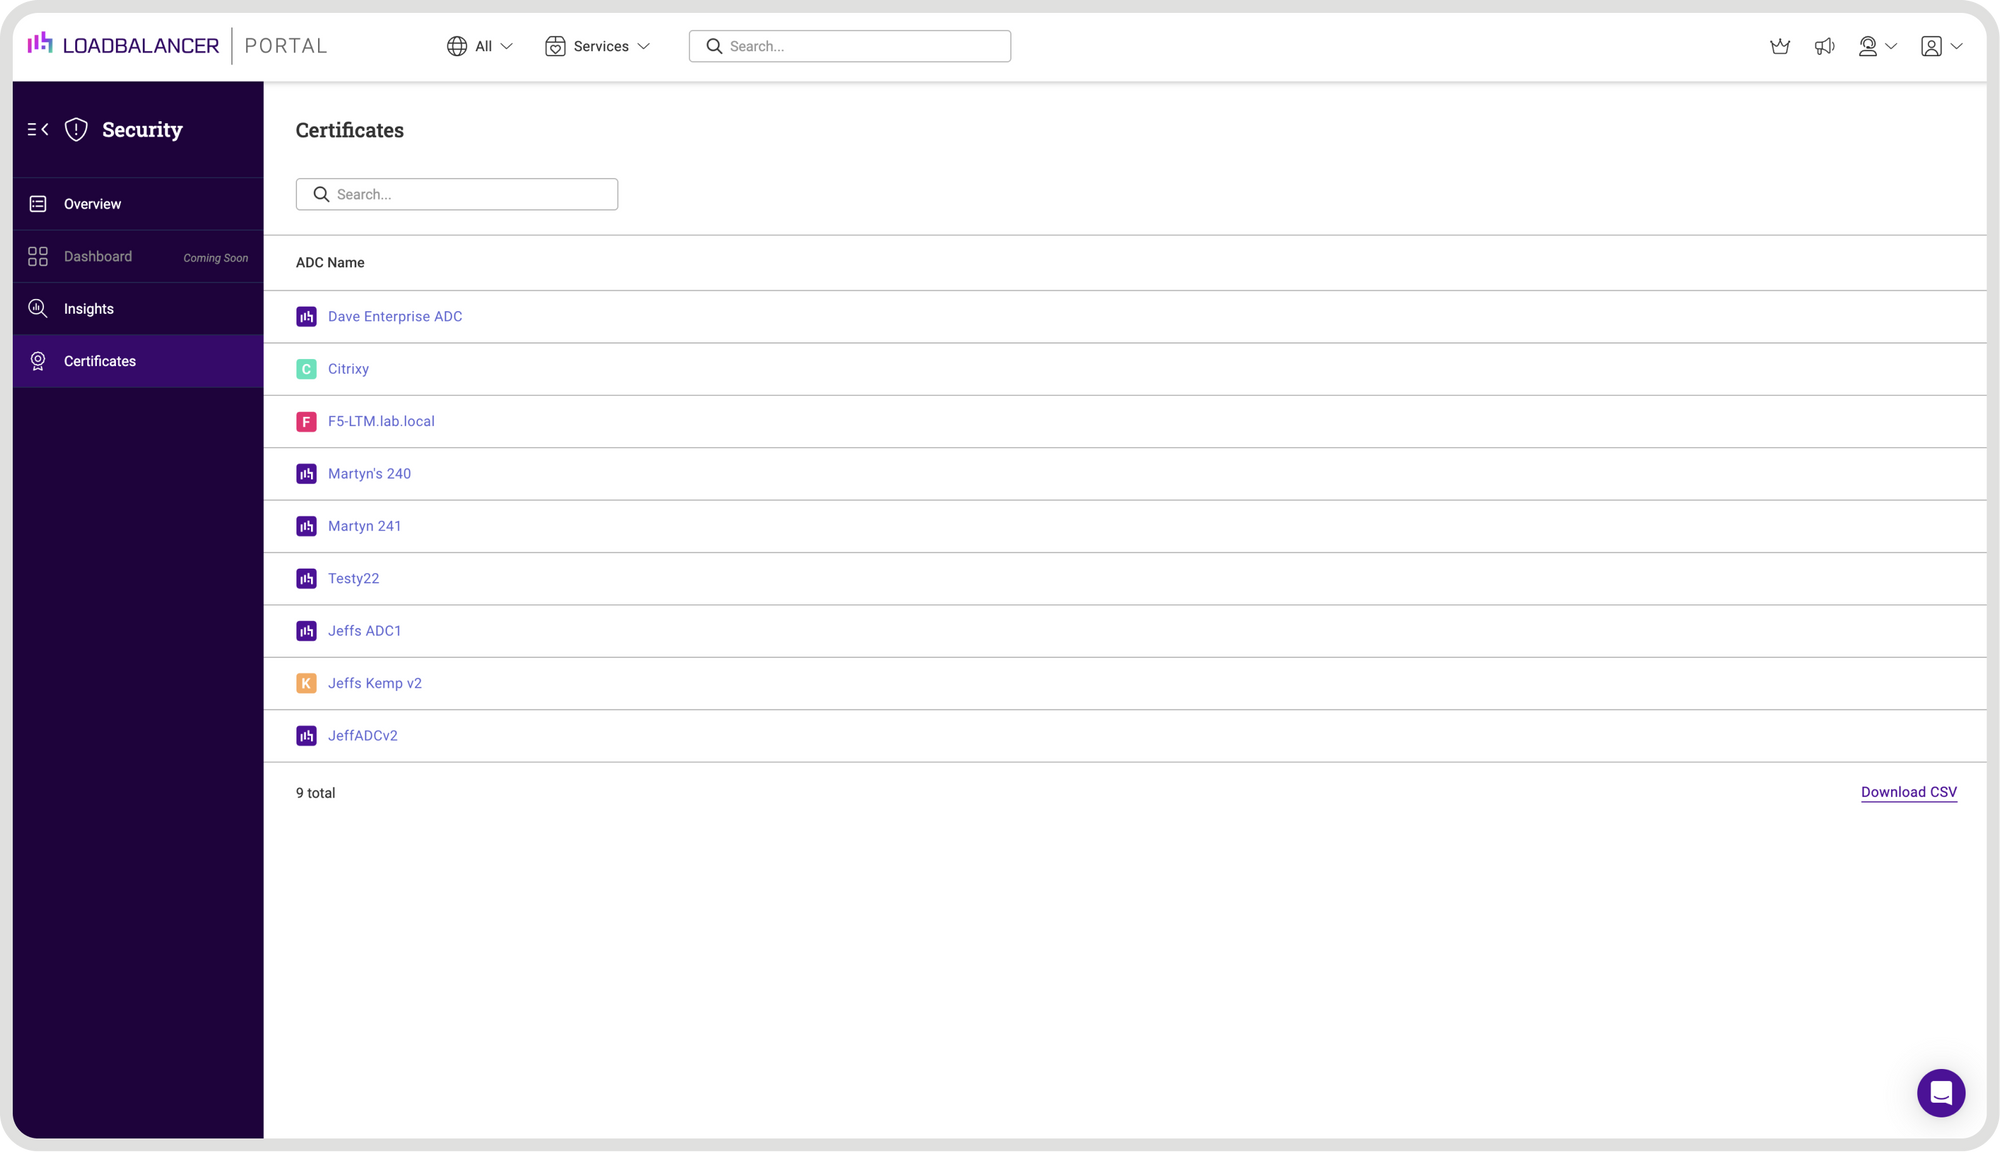
A summary of all installed certificates is displayed at the top and full details of each is displayed below as shown in the example below:
My closing thoughts
For what it's worth, as an F5 engineer, managing multiple appliances, the centralized visibility offered by the ADC Portal is likely to benefit anyone weary of having to log in and out of multiple load balancer interfaces.
First and foremost, it's highly secure, which is a must for me in my line of work.
Secondly, it has the potential to save me massive amounts of time by simplifying and accelerating daily management of my appliances. I get a unified dashboard showing me all my load balancing devices, with key data like system status and software version at my fingertips, prompting me to take action when necessary.
Thirdly, beyond just visibility, the ADC Portal also has the potential to help me boost my security posture by continuously scanning for known vulnerabilities (CVE monitoring) and tracking SSL certificate health, which will save me massive amounts of time having to manually check for expired certificates.
So, while it can't do as much as F5's BIG-IQ, if you have more than one ADC appliance, the ADC Portal might be worth a look.