


In modern cloud-native environments, HashiCorp Vault is the definitive source of truth for secrets, identity, and encryption. However, placing Vault at the center of your stack introduces a critical paradox: your security solution then becomes your most significant single point of failure!
When a standalone Vault instance hangs or goes offline, the blast radius is total. CI/CD pipelines fail to authenticate, microservices crash during boot because they cannot lease database credentials, and automated rotation scripts stall. In a production environment, Vault downtime isn't just a security risk — it’s a total operational hard-stop.
To move beyond a lab-grade setup, engineers must implement High Availability (HA) architecture using Raft integrated storage and intelligent traffic management. This guide breaks down how to deploy a resilient, 5-node Vault cluster behind an enterprise-grade load balancer.
I’ll focus on ensuring seamless leader election, automated health monitoring via the /v1/sys/health endpoint, and maintaining TLS integrity across the entire request path.
Table of contents
- Bare metal specs for this lab configuration
- Pre-requisites for HashiCorp Vault
- Installing HashiCorp Vault
- Initializing the Vault cluster
- The load balancer appliance configuration
What is HashiCorp Vault?
HashiCorp Vault is an identity-based secrets management tool designed to secure, store, and tightly control access to sensitive credentials, such as API keys, passwords, and certificates. Unlike a static key-value store, Vault functions as a centralized Encryption as a Service platform that automates the entire lifecycle of sensitive data.
Think of HashiCorp Vault as the ultimate air-gapped logic for your credentials. In the networking world, we’re used to managing static service accounts or SSH keys tucked away in config files. Vault kills that practice.
It’s an open-source powerhouse that treats every 'secret' — whether that’s an API key, a database password, or a TLS certificate — with the same level of scrutiny you'd give a core switch login.
Why it’s different from a standard KV store:
- Identity, not just keys: It doesn't just hand out data. It hooks into your existing sources of truth (like LDAP, AWS IAM, or K8s) to verify exactly who's asking before it opens the door.
- Encryption as a Service: You can offload the heavy lifting of encrypting data-at-rest to Vault via its API, so your apps never actually handle the raw keys.
- Automated Lifecycle: It acts like an automated Certificate Authority, handling the generation, rotation, and revocation of certificates so you aren't the one getting paged when a certificate expires at 3:00 AM...
Essentially, Vault moves you away from static security to a programmable, API-driven workflow that covers your entire infrastructure. Pretty awesome, huh?
Why a production-ready Vault environment needs a load balancer
The scenario: Vault as the central nervous system
In a modern GitOps or IaC-driven environment, Vault isn't just a static password manager — it’s a mission-critical infrastructure component. It handles dynamic secret generation, ephemeral database credentials, and just-in-time cloud access across your entire CI/CD lifecycle.
The problem: The secret bottleneck
Running a standalone Vault instance in production is a recipe for a cascading failure event. If that single node hits a network partition, a disk I/O hang, or a memory leak, your entire stack goes dark (eek!!), resulting in:
- Pipeline gridlock: CI/CD runners can't pull secrets, effectively freezing all code deployments.
- Microservice boot failure: New pods fail their readiness probes because they can’t retrieve their initial database leases.
- Monitoring blackout: Automated backup and observability scripts lose the credentials needed to function, leaving you blind during an outage.
The solution: HA architecture with load balancing
Transitioning to a multi-node raft-integrated storage cluster solves the state problem, but the load balancer solves the traffic problem.
By fronting your cluster with a load balancer, you move from a fragile setup to a hardened security service, with:
- Active-standby coordination: While Vault nodes manage their own leader elections, the load balancer ensures that clients only ever talk to the node that can actually process requests.
- Intelligent health probing: The load balancer continuously polls the
/v1/sys/healthendpoint. It automatically distinguishes between an Active Leader (200 OK) and a Standby Node (429 Too Many Requests), ensuring zero-latency failover. - Easy lifecycle management: Need to patch the OS or upgrade Vault? No problem. You can cycle nodes one by one, while the load balancer proactively diverts traffic away from draining nodes, preventing the dreaded
504 Gateway Timeoutin your application logs.
The result? Zero trust reliability
By decoupling the client from the specific node IP, you create a security layer that is as reliable as the power grid. Security stops being a bottleneck for velocity and becomes a robust foundation for 24/7 global operations.
How to load balance HashiCorp Vault
Now, let's look at the reference architecture and load balancer configuration.
Bare metal specs for this lab configuration
| Component | vCPU | vRAM | O/S Disk | Networking |
|---|---|---|---|---|
| Vault Node 1 | 2 | 4GB | 50GB | 1Gbps |
| Vault Node 2 | 2 | 4GB | 50GB | 1Gbps |
| Vault Node 3 | 2 | 4GB | 50GB | 1Gbps |
| Vault Node 4 | 2 | 4GB | 50GB | 1Gbps |
| Vault Node 5 | 2 | 4GB | 50GB | 1Gbps |
Recommend Operating System
Ubuntu 24.04 LTS: These are the gold standards for Vault. They have excellent support, modern kernels, and the official HashiCorp repositories are always up-to-date.
RHEL/AlmaLinux 9: A solid choice if your organization requires an enterprise-grade RedHat-based environment.
Cluster size
- 3 Nodes (Minimum): Provides High Availability (HA). The cluster can survive 1 node failure.
- 5 Nodes (Recommended for Production): Provides better quorum stability. The cluster can survive 2 node failures.
Hardware specs (per node) for production
| Resource | Small to Medium Load | Large Load |
|---|---|---|
| CPU | 2 Cores | 4-8 Cores |
| RAM | 4GB | 16GB+ |
| Disk | 50GB SSD Preferred | 100GB+ NVMe/SSD |
| Networking | 1 Gbps | 10 Gbps |
And the final part before we get started...
We need to make sure that each node has a static IP address with a resolvable hostname, so you might need some DNS changes.
We are also going to either need a SSL cert for each node or a wild card cert (I'll be using my wildcard cert *.digiscout.uk for this blog).
And finally we need a shared FQDN that points at your floating IP (I'll be using vault.digiscout.uk).

Pre-requisites for HashiCorp Vault
Before we do anything else, we need to make sure that each of the servers that will be used to host vault have had the following checks done...
Make sure they are all up-to-date on system patches:
sudo apt update && sudo apt upgrade -y Ensure each node has a reachable FQDN, configured by a root user within the local hosts file.
Be sure to update the line that points to 127.0.1.1 (or your static IP) so it looks like this:
127.0.1.1 vault-01.<doamin> vault-01
After you add the FQDN you can also test it with the following, where you should see both the hostname and the FQDN in the output:
hostname && hostname -fMake sure each has a local copy of the certificate:
sudo mkdir /vault_files
cd /vault_files
sudo mkdir certificates
cd certificates
Then use a tool like SCP to transfer your Certificate (note, Vault cannot use a single .pem file if it contains both the certificate and the private key together):
# 1. Extract the Private Key

sudo openssl pkey -in /path/to/your/original.pem -out /vault_files/certificates/vault.key

# 2. Extract the Certificate(s) # This gets the wildcard cert + any intermediate/CA certs in the file

sudo openssl crl2pkcs7 -nocrl -certfile /path/to/your/original.pem | sudo openssl pkcs7 -print_certs -out /vault_files/certificates/vault.crt

Installing HashiCorp Vault
Now we need to add the HashiCorp gpg key and repo to the server:
wget -O- https://apt.releases.hashicorp.com/gpg | sudo gpg --dearmor -o /usr/share/keyrings/hashicorp-archive-keyring.gpg
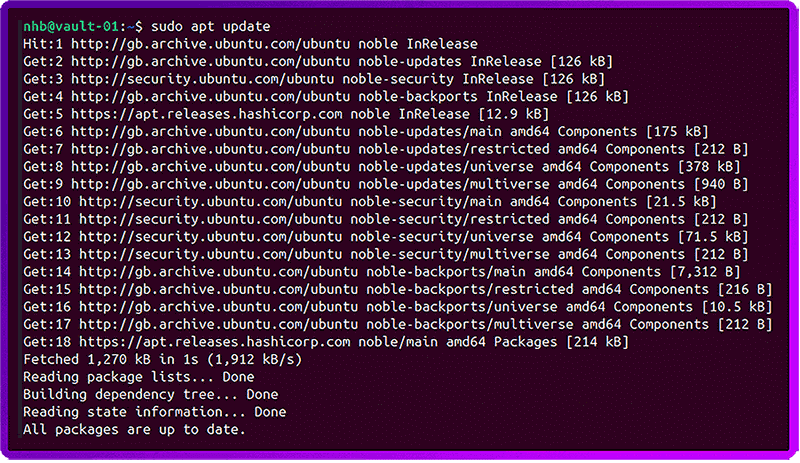
echo "deb [signed-by=/usr/share/keyrings/hashicorp-archive-keyring.gpg] https://apt.releases.hashicorp.com $(lsb_release -cs) main" | sudo tee /etc/apt/sources.list.d/hashicorp.list Then we can update the package list:
sudo apt update And you should see apt.releases.hashicorp.com in the output:
Now we can install Vault:
sudo apt install vaultWe then need to set the permissions on our Certificate and key so that only Vault can use them (note, we couldn’t do this earlier as the required user and group hadn't been created yet!):
sudo chown -R vault:vault /vault_files/certificates
sudo chmod 600 /vault_files/certificates/vault.key
sudo chmod 644 /vault_files/certificates/vault.crt
Now we need to configure the system permissions (Vault needs to lock its memory to prevent sensitive data from being swapped to disk):
sudo setcap cap_ipc_lock=+ep /usr/bin/vaultNext, we need to create a HashiCorp Vaults config file. But first we need to back up the one provided by the install:
sudo mv /etc/vault.d/vault.hcl /etc/vault.d/vault.hcl.oldNow we create a new configuration file:
sudo nano /etc/vault.d/vault.hclHere is a template for the configuration file for node 1 of a 5 node cluster:
storage "raft" {
  path    = "/opt/vault/data"
  node_id = "vault-node-01" # Update this per node (01, 02, 03, etc.)

  # All nodes should list the other 4 nodes here
  retry_join { leader_api_addr = "https://vault-01.digiscout.uk:8200" }
  retry_join { leader_api_addr = "https://vault-02.digiscout.uk:8200" }
  retry_join { leader_api_addr = "https://vault-03.digiscout.uk:8200" }
  retry_join { leader_api_addr = "https://vault-04.digiscout.uk:8200" }
  retry_join { leader_api_addr = "https://vault-05.digiscout.uk:8200" }
}

listener "tcp" {
  address            = "0.0.0.0:8200"
  cluster_address    = "0.0.0.0:8201"

  # Using your new path
  tls_disable        = "false"
  tls_cert_file      = "/vault_files/certificates/vault.crt"
  tls_key_file       = "/vault_files/certificates/vault.key"

  # Since you're using a wildcard, Vault needs to know which name to expect
  tls_min_version = "tls12"
  tls_prefer_server_cipher_suites = "true"
}

# The address clients (and other nodes) use to reach THIS specific node
api_addr      = "https://vault-01.digiscout.uk:8200"
cluster_addr  = "https://vault-01.digiscout.uk:8201"
ui            = true
Lastly, verify that the Vault storage directory exists and has the appropriate permissions configured:
sudo mkdir -p /opt/vault/data
sudo chown -R vault:vault /opt/vault/data
Initializing the Vault cluster
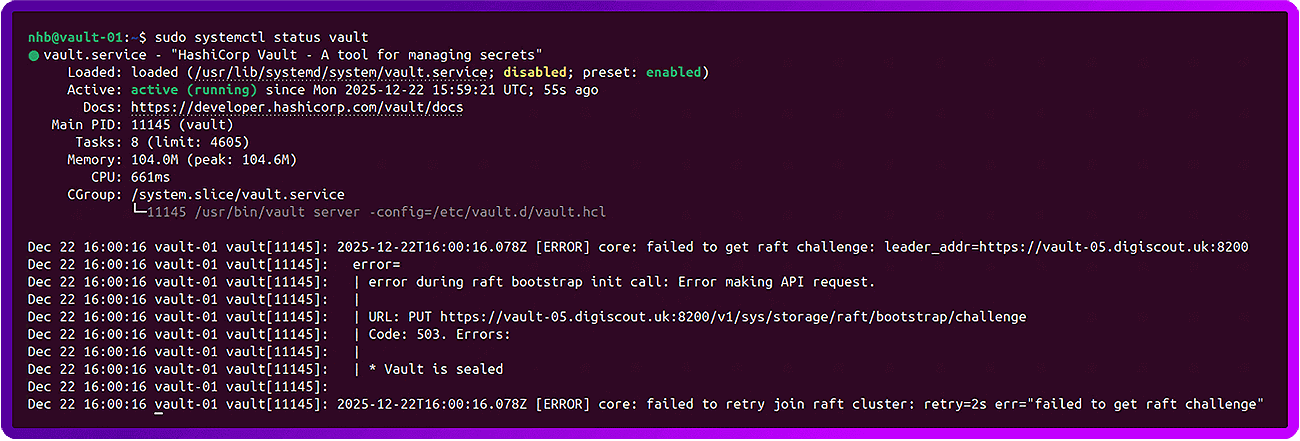
On each node, start the Vault Service:
sudo systemctl start vault
sudo systemctl status vault
This is this the normal and expected output:
To start, we need to initialize the Vault on node 1 only:
export VAULT_ADDR='https://vault-01.digiscout.uk:8200'
vault operator init
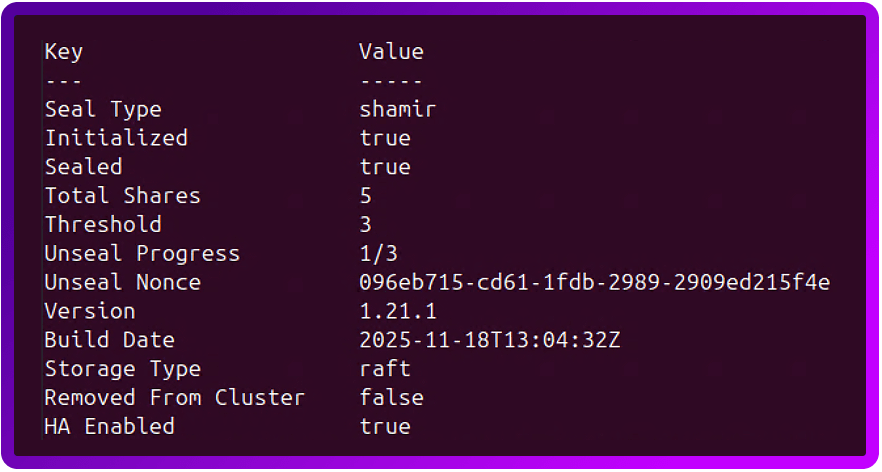
Now, unseal the first node using 3 of the keys provided:
vault operator unseal <key1>
vault operator unseal <key2>
vault operator unseal <key3>
After you enter the first key, the output will show:
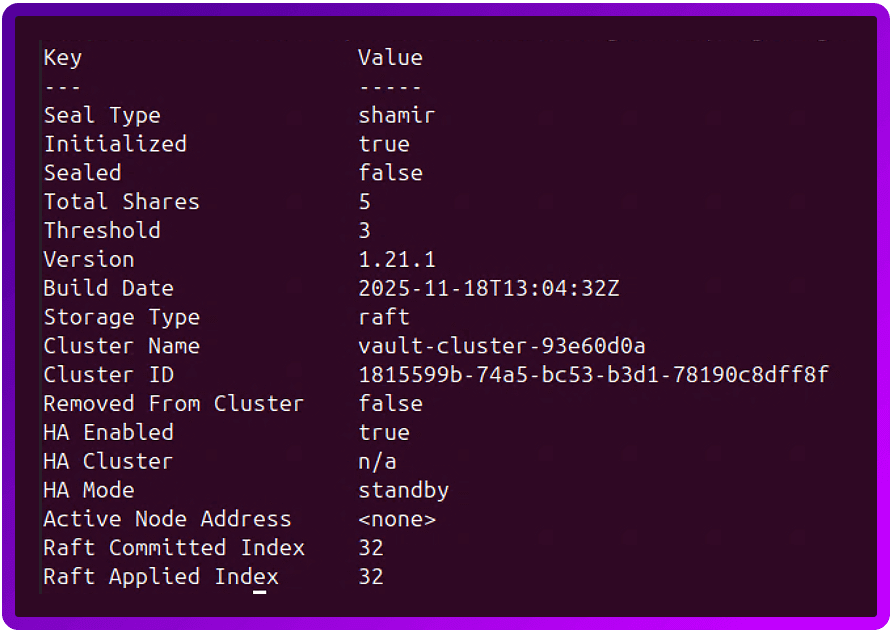
And once you have entered 3 keys, you should see it change:
Now we need to unseal the other nodes in the cluster.
First, we need to make each node use their FQDN:
export VAULT_ADDR='https://vault-<number>.<domain>:8200'N.B. To avoid typing this every time you log in, you might want to add this to your user profile....
Open your bash profile: nano ~/.bashrc

Scroll to the bottom and add: export VAULT_ADDR='https://vault-01.digiscout.uk:8200'

Save and exit (Ctrl+O, Enter, Ctrl+X).

Apply it: source ~/.bashrc
Remember to do this on every node, replacing the 01 with the correct node number for that specific server.
Now, enter 3 of the unseal keys, like you did on node 1:
vault operator unseal <key1>
vault operator unseal <key2>
vault operator unseal <key3>
Check the vault status and make sure each node has unsealed:
vault statusLook for these specific lines in the output:
- Initialized: Must be true.
- Sealed: If true, it still needs keys.
- Storage Type: Should be Raft.
- HA Mode: Should be standby (on node 2) or active (on node 1).
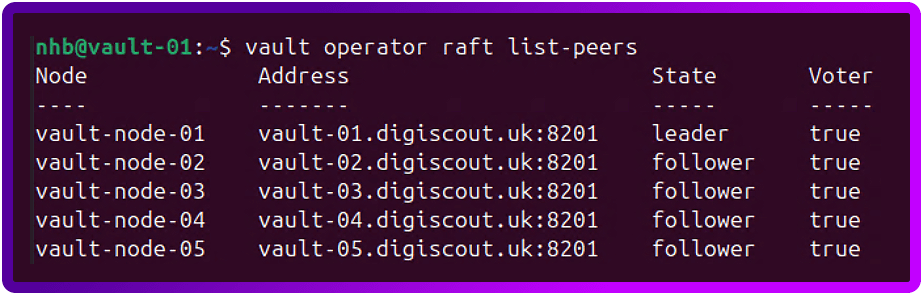
The final test is to run the following on the leader node (in our case node 1), this will cause the Vault to tell you which of the other nodes have joined the cluster.
To do this...
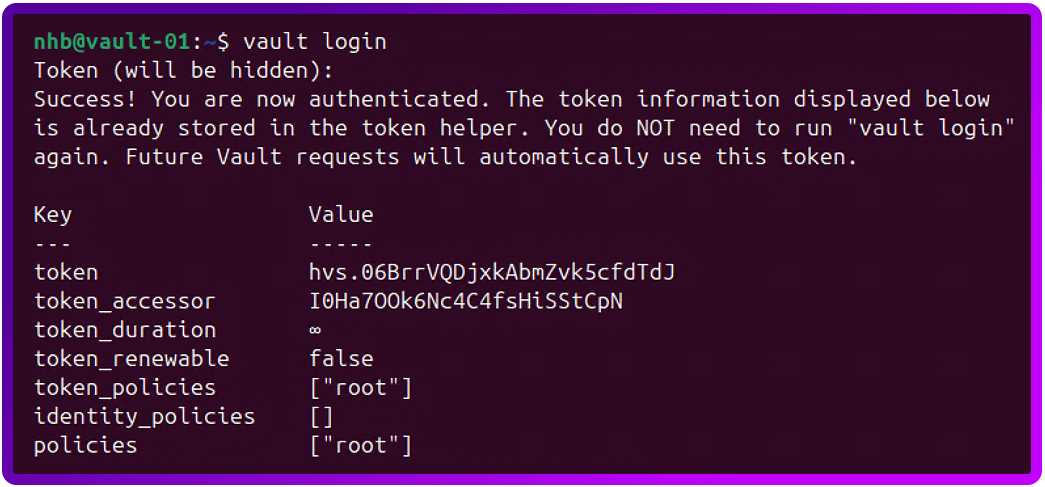
First we need to Authenticate to the vault:
vault loginWhen prompted, enter the initial root token that was created at the same time as the unseal keys.
This should return something like the following:
Now we can test the cluster:
vault operator raft list-peersAnd if the cluster is healthy, it should return something like the following:
One last test we can do is to access the WebUI of Vault. To do this, open your favourite web browser and go to the address of your first node -> https://vault-01.<domain>:8200/ui
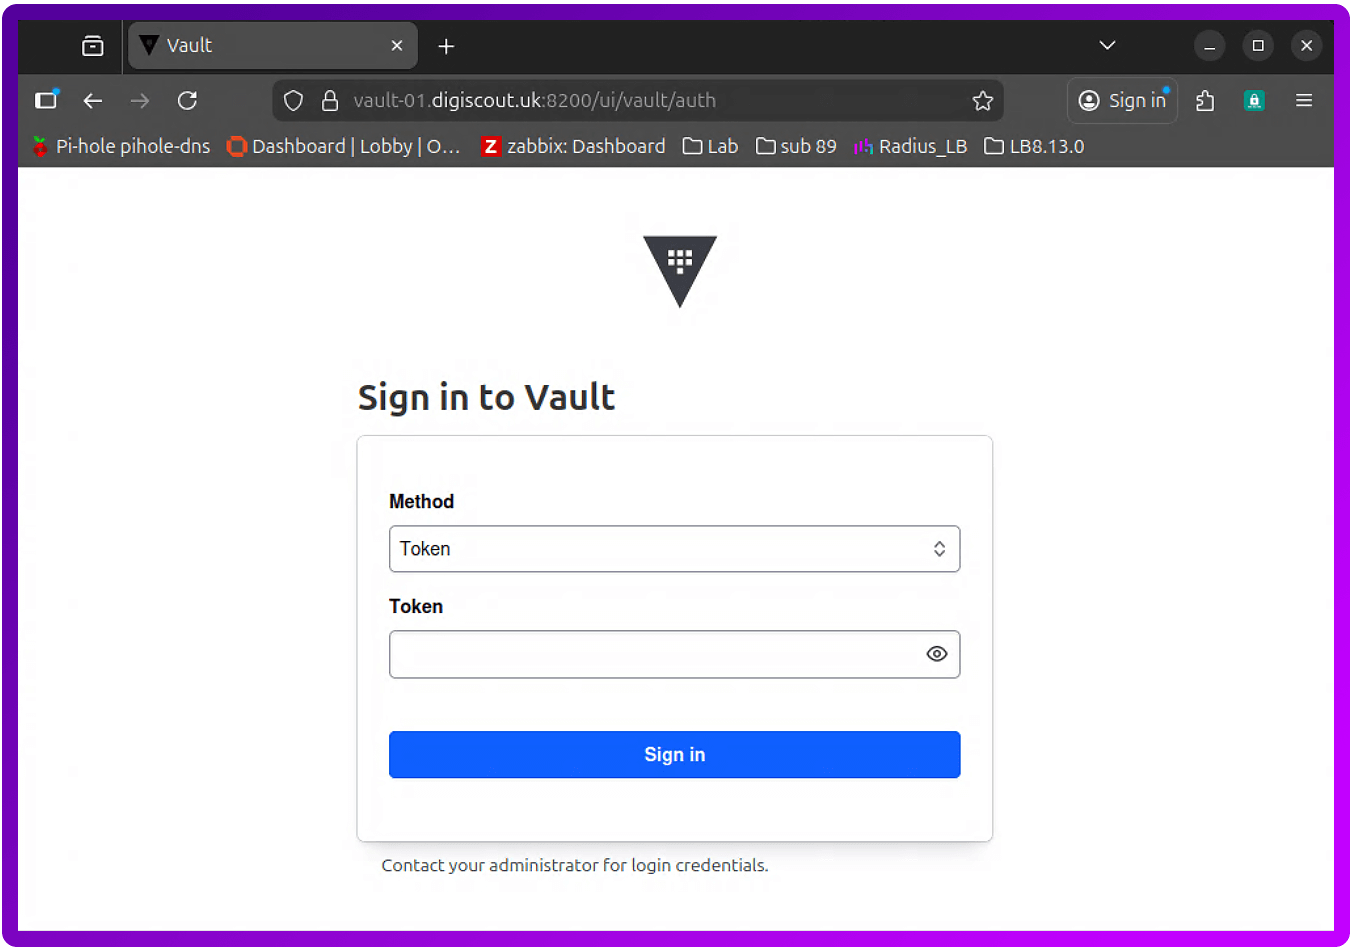
For now, let's leave it set to 'Token' for the method and use the initial root token.

The load balancer appliance configuration
Now let's move on to configuring the load balancer for use with the HashiCorp Vault cluster. For illustrative purposes, I'll use a Loadbalancer.org appliance.
Custom health checks
The first thing we are going to do is create a custom health check script for the cluster:
1. Login to your Primary Loadbalancer and navigate to:
Cluster Configuration > Health Check Scripts
2. Click 'Add New Health Check'
3. Fill in the following:
- Name: HashiCorp_Vault_Health_Check
- Type: Virtual Service
- Template: Example
- Primary Node Health Check Content:
#!/bin/bash
PATH=/usr/local/sbin:/usr/local/bin:/sbin:/bin:/usr/sbin:/usr/bin:/root/bin:/root/

## Vault Health Check Script
## By: Nick Hawkins-Booth - Loadbalancer.org Technical Support Engineer
## Version: 1.0 - Initial Script

_RIP=$3
_PORT=$4
_TIMEOUT=5

# We check the standard Vault health endpoint
_CHECK_URL="v1/sys/health"

# Perform the test to get the HTTP response code
# -s: Silent
# -k: Insecure (ignores self-signed certs on Vault nodes)
# -o /dev/null: Discard the body
# -w: Output only the status code
_HTTP_STATUS=$(curl -m $_TIMEOUT -s -k -o /dev/null -w "%{http_code}" https://$_RIP:$_PORT/$_CHECK_URL)

# Vault Status Code Logic:
# 200 = Active Leader
# 429 = Standby (Healthy, but not the leader)
# 503 = Sealed or Uninitialized (Not ready for traffic)

if [[ "$_HTTP_STATUS" == "200" ]] || [[ "$_HTTP_STATUS" == "429" ]]
then
    # Node is initialized and unsealed.
    _EC=0
else
    # Node is sealed, uninitialized, or down.
    _EC=1
fi

exit $_EC
- Secondary Node Health Check Content: Un-tick this
4. Click Update
Virtual Service creation
Now that our Loadbalancer can better understand what the Vault cluster is telling it, let's create a Virtual Server for the cluster. This is a standard Layer 7 VIP just using the External Script with our new Health check script and port 8300.
Let's start by building out the Virtual Service for the Vault Cluster. Go to:
1. Cluster Configuration > Layer 7 - Virtual Services
2. Click 'Add a new Virtual Service'
3. Fill in the following details
- Label: VIP_Vault_Cluster -> or something meaningful
- IP Address: The Floating IP for this service
- Ports: 8200
- Layer 7 Protocol: TCP Mode
- Click Update
4. Click 'Modify' on your new VIP
5. Scroll down to the health check section and make the following changes:
- Health Checks: External script
- Check Script: HashiCorp_Vault_Health_Check
Real Server configuration
Now with have a Virtual Service set up, let's add the Real Server.
1. Cluster Configuration > Layer 7 - Real Servers
2. Click 'Add a new Real Server'
3. Fill in the following details:
- Label: HashiCorp_Vault_Node_1 > or something meaningful
- Real Server IP Address: The IP address relevant to the node in the cluster
- Real Server Port: 8200
- Re-Encrypt to Backend: unticked
- Weight: 100
4. Click Update
Repeat this for each node.
Once your done, remember to reload the HAProxy service.
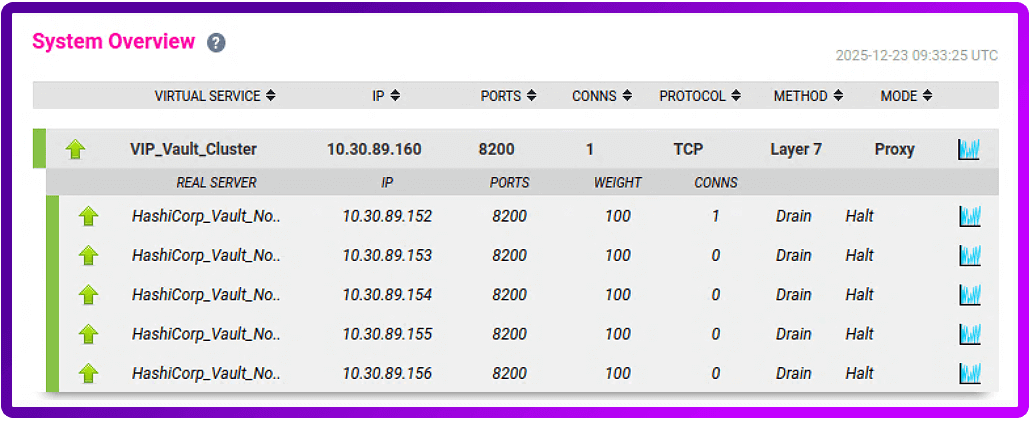
And if we go back to the 'System Overview' you'll see that that's it!
But what if you don't want to go to the load balancer WebUI to run a test?!
No problem! To test the WebUI just open your favourite web browser and point it at: https://vault.<domain>:8200/ui.
Or, if you want to create a Key Vault and add a Test Secret via the command line, here's how...
1. Enable the KV secrets engine
Since we're working with curl from your workstation, we can enable a KV version 2 engine (the recommended version) at the secret/ path with this command:
curl -k -H "X-Vault-Token: YOUR_TOKEN" \
     -X POST \
     -d '{"type":"kv-v2"}' \
     https://vault.<domain>:8200/v1/sys/mounts/secret
Wait for an HTTP 204 response (Success or No Content).
2. Write a test secret
Now that the 'handler' (the KV engine) exists at that route, we will need to create the test secret:
curl -k -H "X-Vault-Token: YOUR_TOKEN" \
     -X POST \
     -d '{"data": {"password": "mypassword"}}' \
     https://vault.<domain>:8200/v1/secret/data/test
3. Now, read the secret back from the Vault:
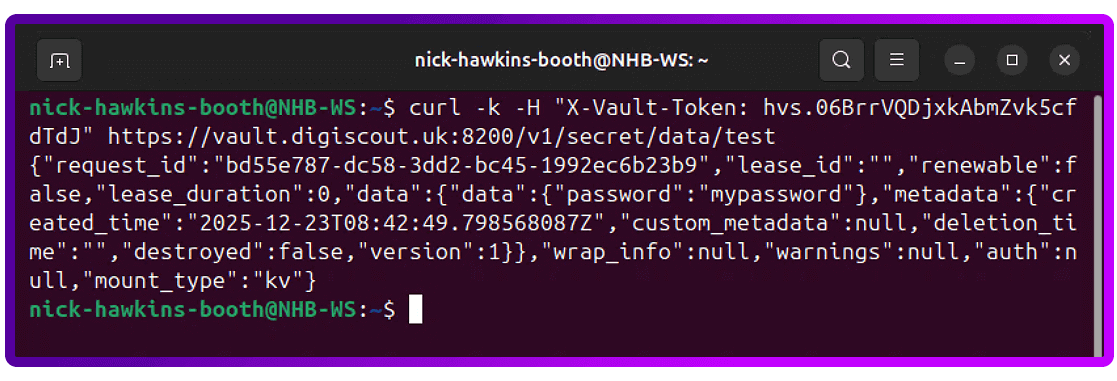
curl -k -H "X-Vault-Token: YOUR_TOKEN" \
     https://vault.<domain>:8200/v1/secret/data/test
This should return a JSON object that contains your test data:
4. Finally, let's clean up and delete the test data, but leave the KV version 2 engine:
curl -k -H "X-Vault-Token: YOUR_TOKEN" \
     -X DELETE \
     https://vault.<domain>:8200/v1/secret/metadata/test
And that should be your testing completed.
Conclusion: Production-ready sensitive data management
Deploying this 5-node HashiCorp Vault cluster transitions your infrastructure from fragmented secret management to a centralized, High Availability (HA) identity provider.
By moving beyond the initial install, you’ve hardened the environment against both infrastructure failure and lateral movement, and achieved the following architectural outcomes:
- Operational autonomy: Utilizing Raft Integrated Storage (FSM-based consensus) removes the "hidden" overhead of managing external Consul clusters or cloud-native backends, simplifying the failure domain.
- Cryptographic integrity: Custom mTLS ensures end-to-end encryption in transit, while Least Privilege ACLs enforce a zero-trust model even for privileged operators.
- High Availability (HA): The 5-node quorum ensures the cluster remains operational and maintains a leader even during a two-node concurrent failure.
But a production-grade foundation is likely only the beginning.
Your ultimate objective will be to reach a zero-static state, so you'll need to implement dynamic secrets.
Instead of rotating long-lived passwords, you'll need to configure Vault to interface directly with your database and cloud IAM engines. This allows Vault to generate on-demand, time-bound credentials that expire automatically, effectively eliminating the risk of credential leakage and manual rotation cycles.
Further reading
- How to configure a Vault cluster with integrated storage
- What is Raft Integrated Storage
- Audit logging
- What Secrets can Vault keep
- MySQL/MariaDB database secrets engine
- Redis database secrets engine