
How to update a Citrix NetScaler, and problems to watch out for
How-Tos Published on •9 mins Last updated
If you want to know how to update a Citrix NetScaler* appliance for the first time, let me save you some stress, and highlight some common problems to watch out for, based on my own experience. And if you're wondering why on earth Loadbalancer.org's talking about Citrix, check out this blog: How to manage all your load balancers from one platform.
Know which Citrix NetScaler upgrade you're going to attempt
There are TWO ways to upgrade a NetScaler, via the CLI, and via the GUI, both of which I'll cover here. You can use this guide for both upgrading and downgraded firmware versions. The procedure is the same.
💡 PRO TIP
I strongly recommend using CLI-based upgrades, as these are less prone to error!
In this blog, I will also explain how to update a NetScaler HA (High Availability) pair.
Before we get started, there are a couple of important things to be aware of during an upgrade.
💡 PRO TIP
Read this bit before you get started!
I'll go through each of these in detail in due course, but in the meantime, here's the shortlist to keep in mind!
- Jump one major release at a time
- Run a backup before you get started
- Disable HA Sync/Prop and set the respective HA mode on the clustered NetScaler appliances
- Make sure to upgrade your classic policies first if you upgrade from an old version
- Make sure to have 4500MB of free space on /var/ (clean old firmware versions if needed, but never the current one!).
Remember to backup your NetScaler
Regardless of the CLI or the GUI upgrade, you need to start with a Backup.
If you're not familiar with creating backups, please refer to this blog: "The pitfalls of backing up and restoring a Citrix NetScaler, and how to overcome them."
How to configure a Citrix NetScaler HA GUI update
N.B. You can skip this part if you are NOT using High Availability!
💡 PRO TIP
An important caveat on failover!
BEFORE you get started, check that your failover is working correctly!
Once you've completed your initial health checks, start by upgrading the SECONDARY node.
Note, HA synchronization will not work if you only upgrade one Node and leave the other on the old firmware version, however manual HA failovers will work.
Keep in mind also that if you have MPX (physical) appliances, the reboot can take up to 45 minutes.
If you've not done an update for a while, resist temptation, and make sure you only update to each adjacent major release e.g. 11.1 -> 12.0 -> 12.1 > 13. DON'T do 11.1 > 13, as this will probably break your firmware. Others take a different view on this, but this is definitely the safest option. And we all love a safe option!
Ready to get started? Ok, here we go...
1. Run health checks
- Login on your primary Citrix ADC appliance.
- Make sure your running configuration is saved.
- Browse to Configuration -> System -> High Availability.
This is what an unhealthy HA setup looks like:
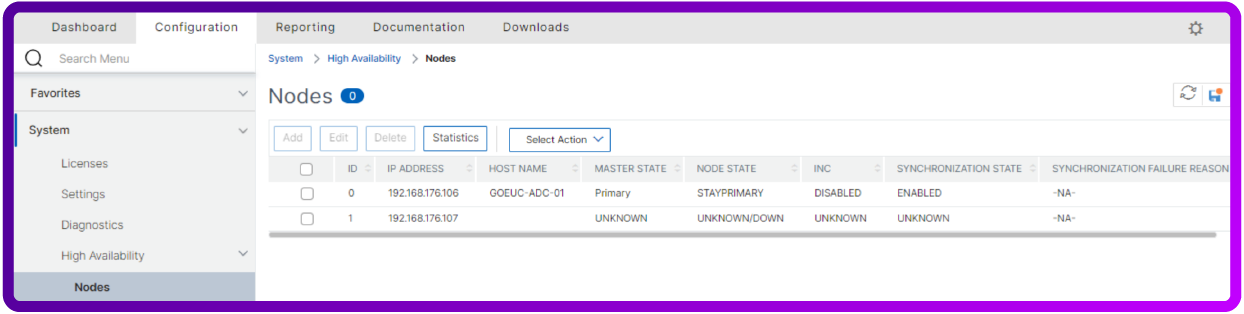
Note the UNKNOWN master state and UNKNOWN synchronization state of the second device.
This is what a healthy HA setup looks like:
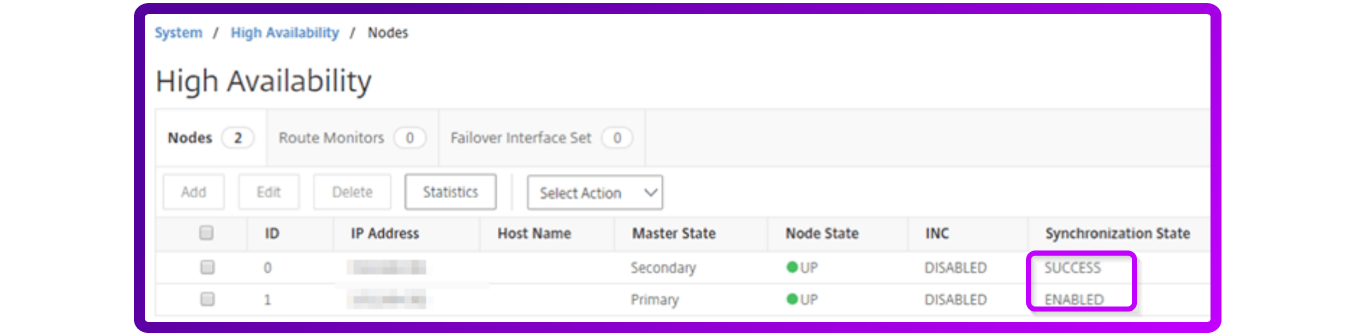
Hopefully, this is what your setup looks like!
Now what we want to do is upgrade the secondary node, and then do a failover.
Why? Because this allows us to test the new firmware first, and fallback to the old primary node if any issues arise. If everything is OK, we can go ahead and continue with upgrading the old primary node while it’s in secondary mode.
2. Set the HA status of each appliance
💡 PRO TIP
You can only edit the node you're currently logged into.
- First, click on 'Disable Synchronization'
- Click on 'Propogation'
- Determine the High Availability Status of the node you're working on:
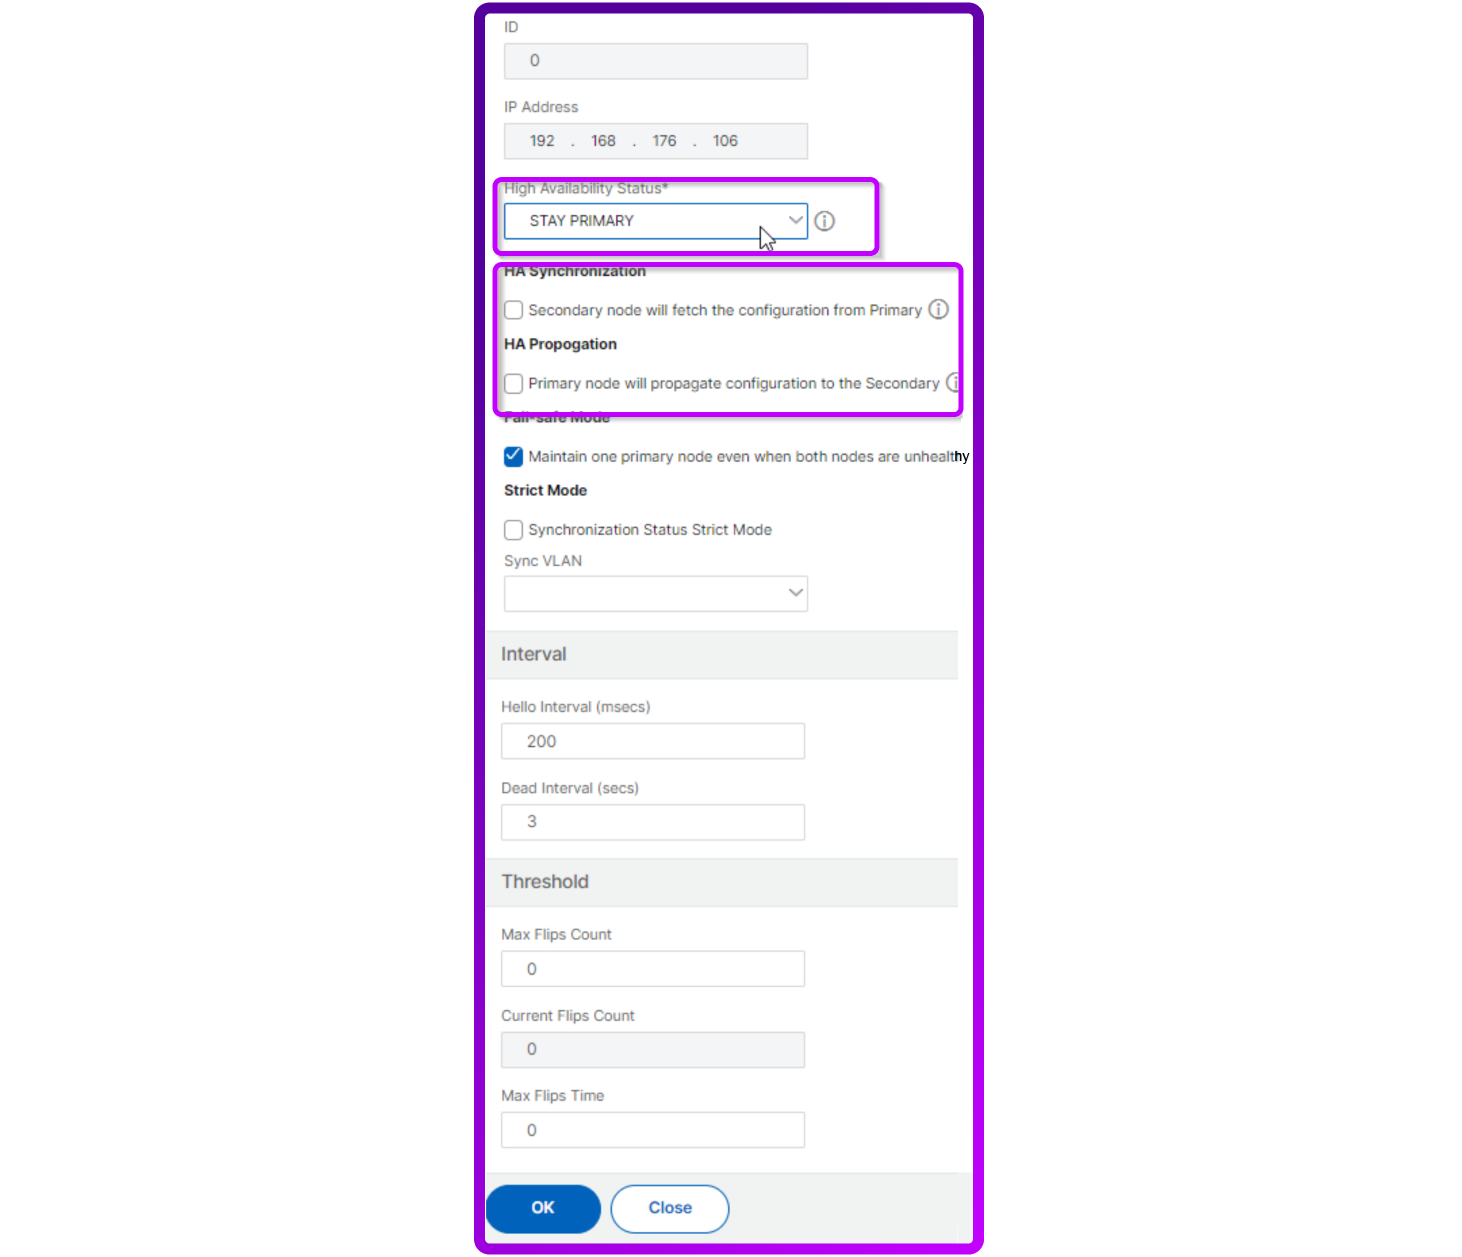
- Set the primary node to ‘STAY PRIMARY’ and set the secondary node to ‘STAY SECONDARY’. Note, you need to login to the secondary node to be able to set its value.
💡 PRO TIP
Remember to set the HA status back to 'ENABLED' for both nodes.
If you want to failover the NetScaler, you need to set the High Availability status back to ‘ENABLED’ for both nodes, as this is a setting we disable to prevent failovers during our upgrade.
The synchronization and ‘Propogation’ setting should be disabled by default, but I encourage you not to take the risk and make sure you do this yourself for the NetScaler anyway.
So please bear in mind that if this setting is not subsequently ‘ENABLED’ the HA failover will not work!
Now we can get started with the upgrade itself.
3. Upgrade your secondary node
To upgrade the secondary node, FIRST follow the steps outlined in the ‘How to configure a single ADC GUI update’ section, below. I'm going to assume you've done that.
THEN, come back here, switch the nodes to their other state, and upgrade the new secondary node too.
💡 PRO TIP
The confusing bit! Take note!
This can get confusing, so let me say this a different way. The order in which you need to make changes is as follows (you can also copy paste this into your change forms):
- Set your primary node to stay primary
- Set your secondary node to stay secondary
- Disable synchronization and propogation
Upgrade the secondary node:
- Set your primary node to enabled
- Set your secondary node to enabled
- Select 'Failover NetScalers'
- Set your new Primary node to stay primary
- Set your new Secondary node to stay secondary
Then, upgrade the (new) secondary node:
- Set your Primary node to enabled
- Set your Secondary node to enabled
- Enable synchronization and propogation
- Select 'Failover NetScalers'
- And that it, you're done!
How to configure a Citrix NetScaler single ADC GUI update
💡 PRO TIP
NOT the recommended way of upgrading, please consider using the CLI.
Here's how to run a GUI upgrade for a single NetScaler appliance.
1. Download the proper firmware version you require on the Citrix Website. Make sure your appliance is compatible with the firmware version.
2. Currently on a version lower than Citrix ADC 12.0 build 56.20? Then make sure you upgrade your classic policies first; this is a complex topic and will not be covered in this blog.
3. Go to Configuration > System upgrade.
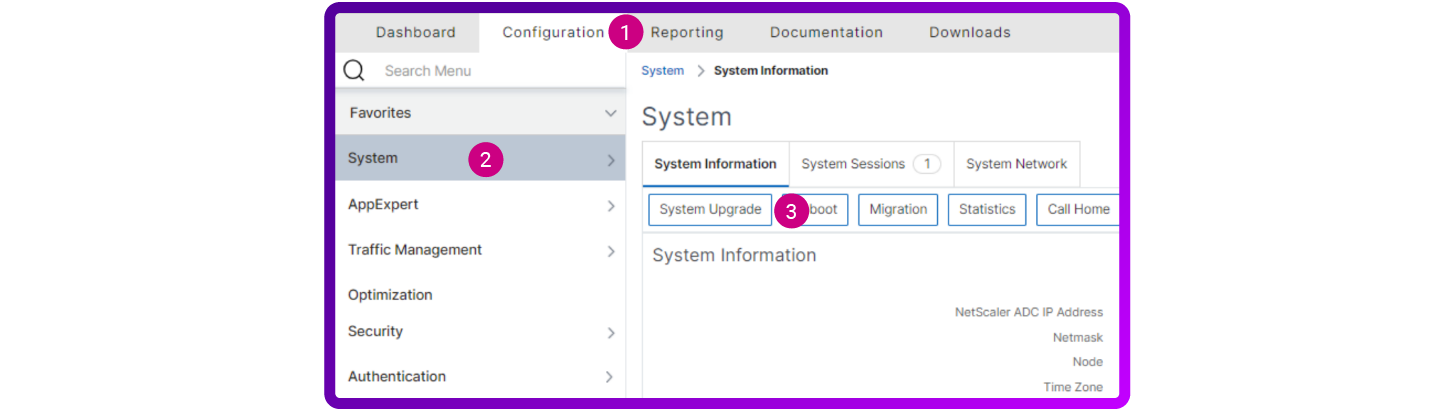
- Click 'Configuration'
- Select 'System'
- Press the 'System Upgrade' button
4. Upload the firmware you downloaded:
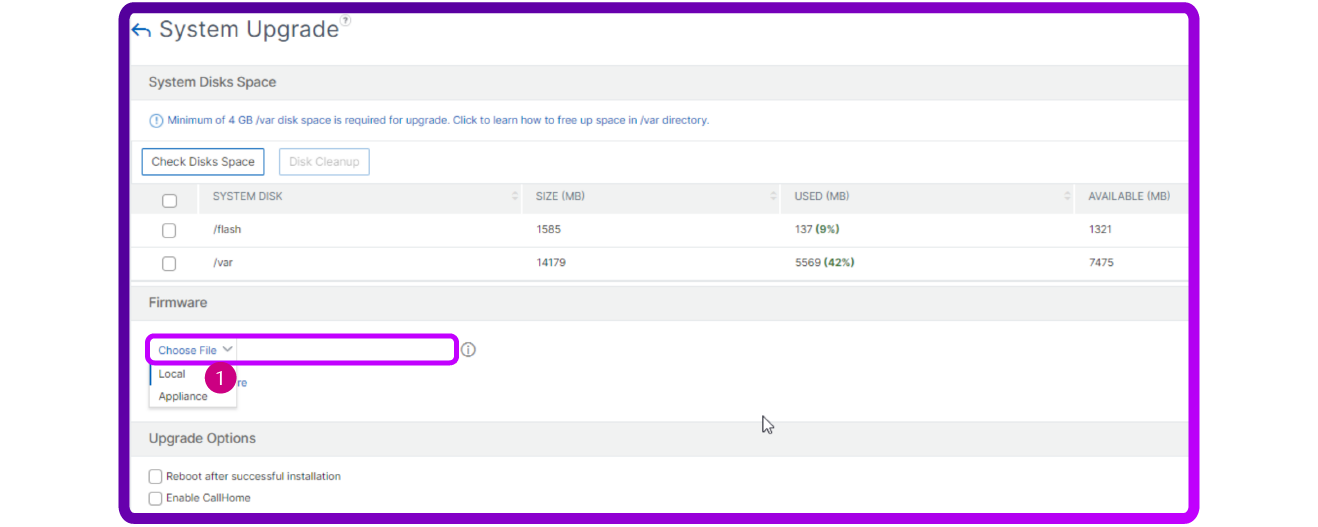
- In the Firmware section, select 'Appliance'
💡 PRO TIP
Make sure you check you have enough diskspace *before* the upgrade:

Most upgrades require 4500MB. You can delete old firmware versions in /var/nsinstall if required. Never delete the current version!!!
5. Check the additional 'Upgrade Options', then press ‘Upgrade’:
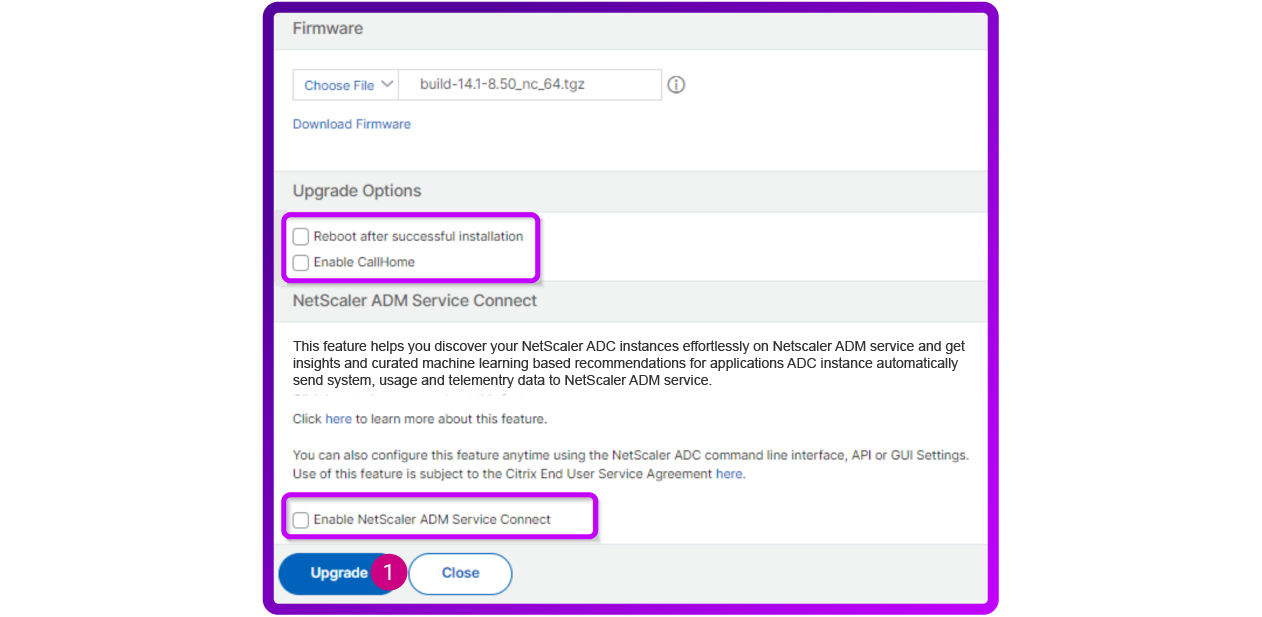
6. The following screen will pop-up:
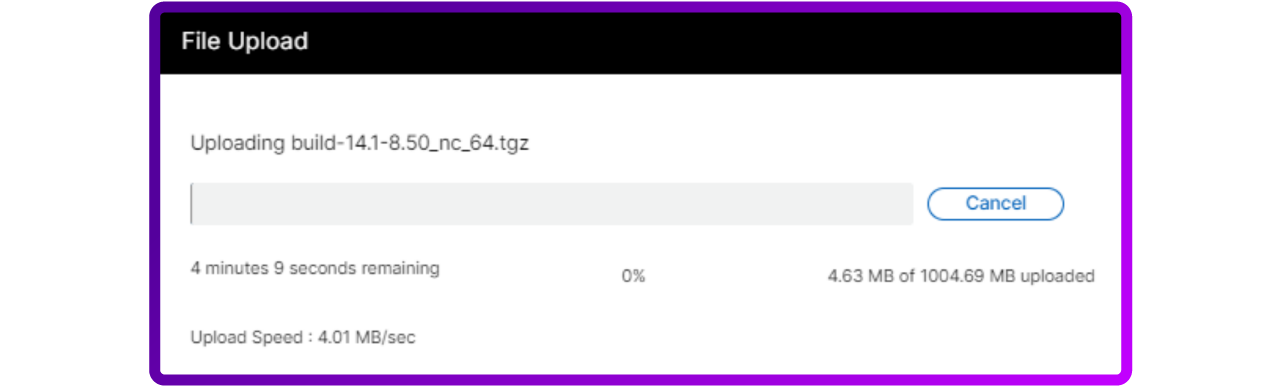
Wait for the upload bar to finish.
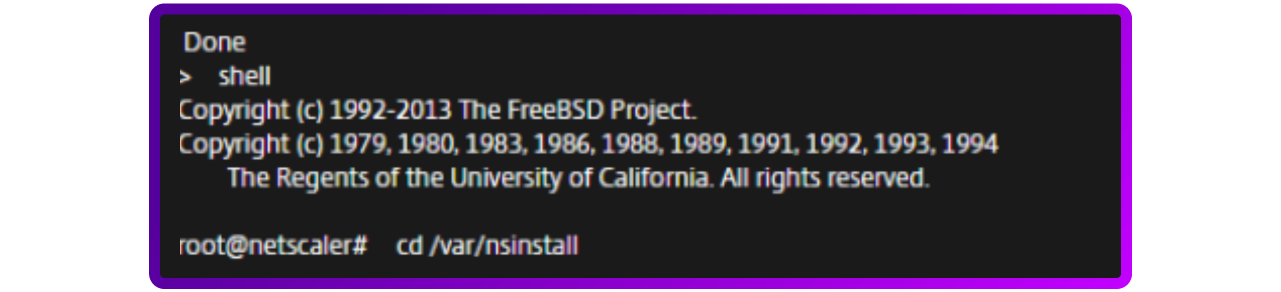
7. Once done, a console will open after the upload, tracking the installation progress. Please mind that the console screen tends to bug out / disconnect leaving you with little information on the stage of upgrade!
8. If not done automatically, reboot the NetScaler after the upgrade.
9. You should now be upgraded!
Refer back to "3.Upgrade your secondary node" in the "How to configure an HA GUI update" section of this blog, above.
How to configure a Citrix NetScaler HA CLI update
Note, you can skip this part if you are not using High Availability.
💡 PRO TIP
Important checklist for those using HA!
Before you begin your CLI update, I strongly advise you to read through this checklist!
Check if your failover is working properly before starting
Upgrade the secondary node first
HA synchronization will not work if you only upgrade one node and leave the other on the old firmware version. Manual HA failovers will work.
Keep in mind that if you have MPX (physical) appliances, the reboot can take up to 45 minutes.
Does your appliance need to run more than one update? Make sure you only update one adjacent major release at a time e.g. 11.1 -> 12.0 -> 12.1 > 13. DON'T do 11.1 > 13, this will probably break your firmware.
Ready? Ok, let's get started!
1. Run health checks
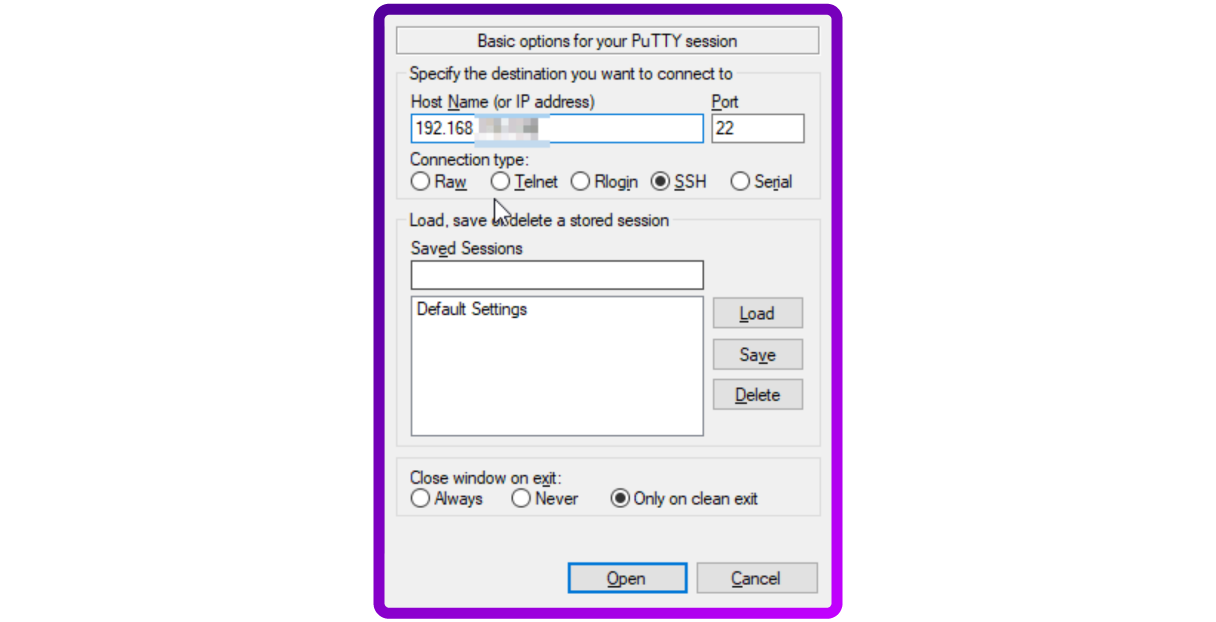
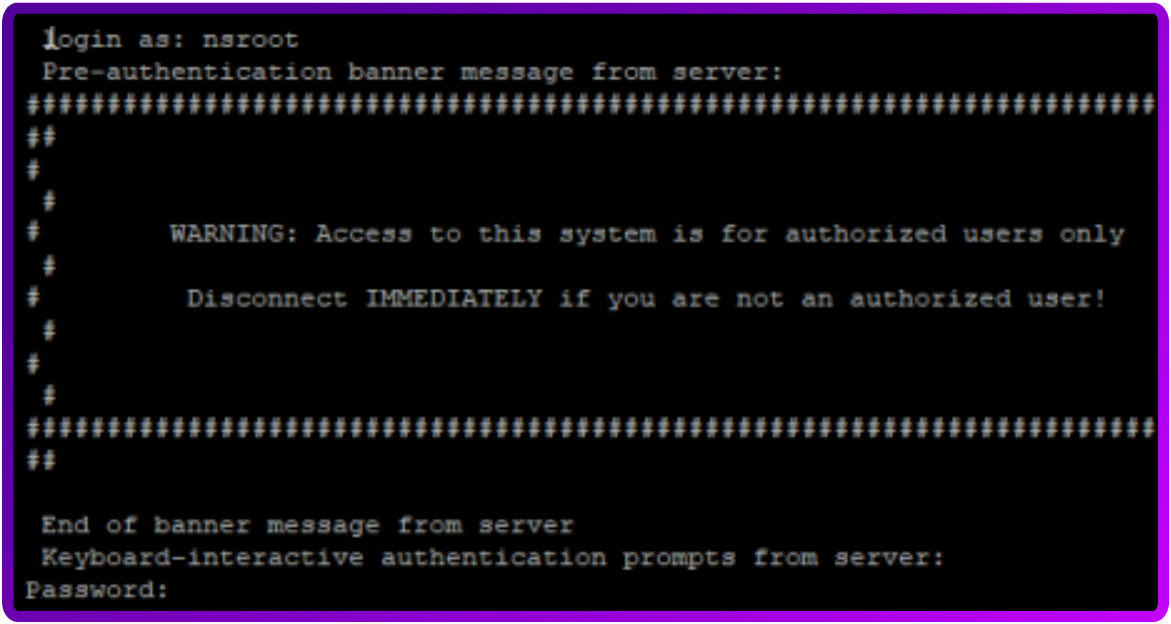
- Login on your primary Citrix ADC appliance with any SSH tool. I will be using Putty:
- Save your running configuration with the following command:
save nsconfig
In my case, the running configuration hadn't changed, so a save was not required.
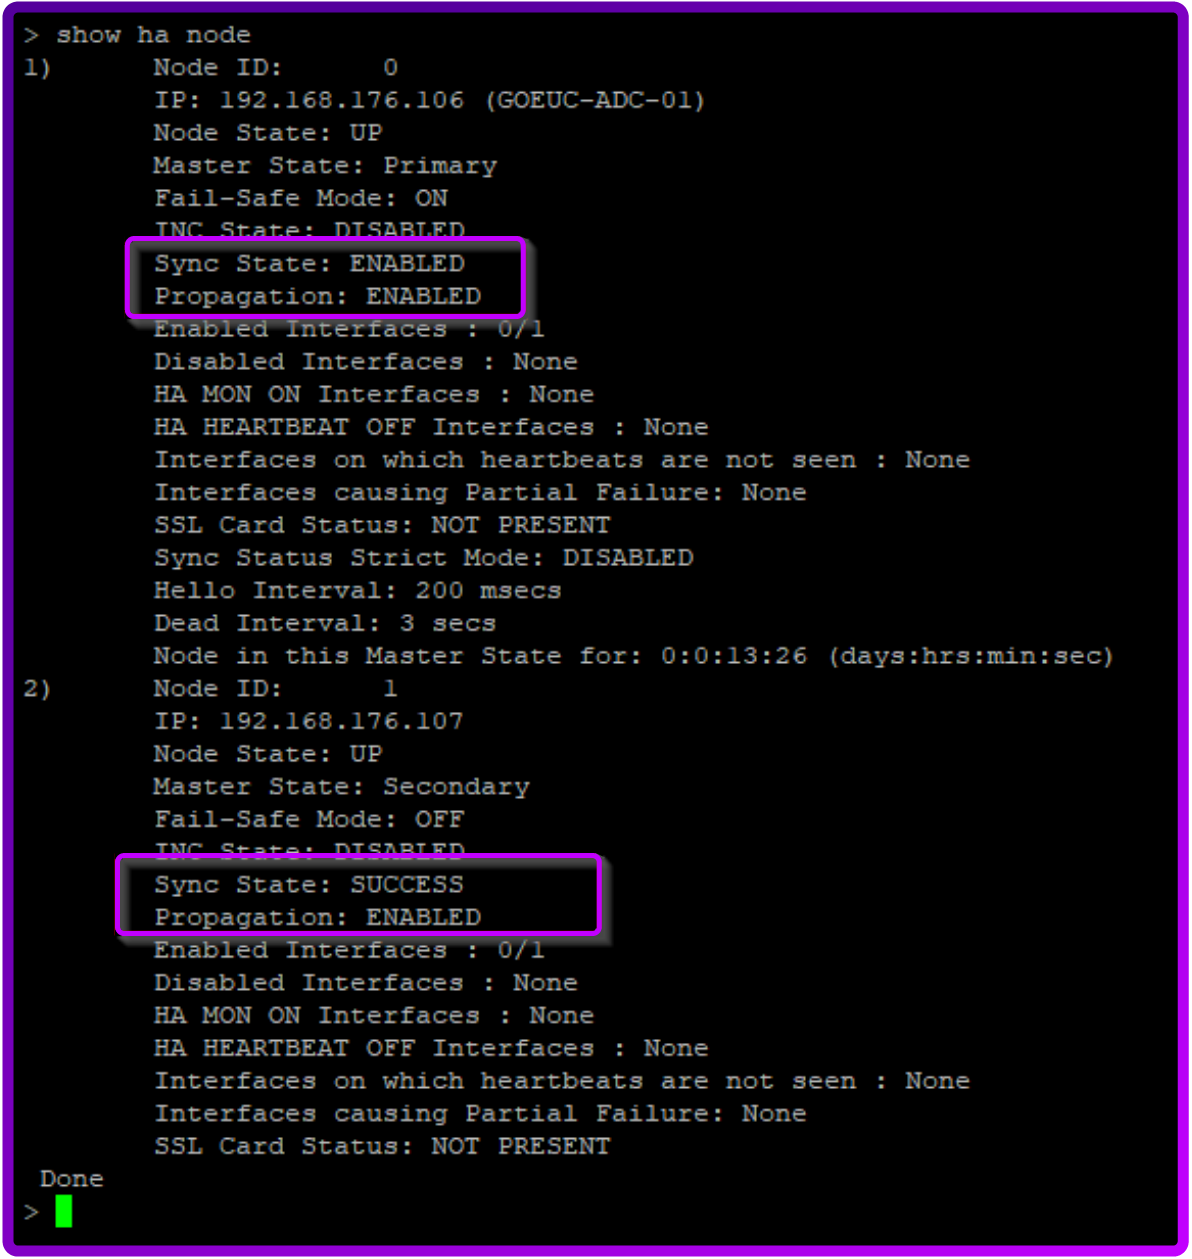
- Check the HA health with the following command:
Shelldf-h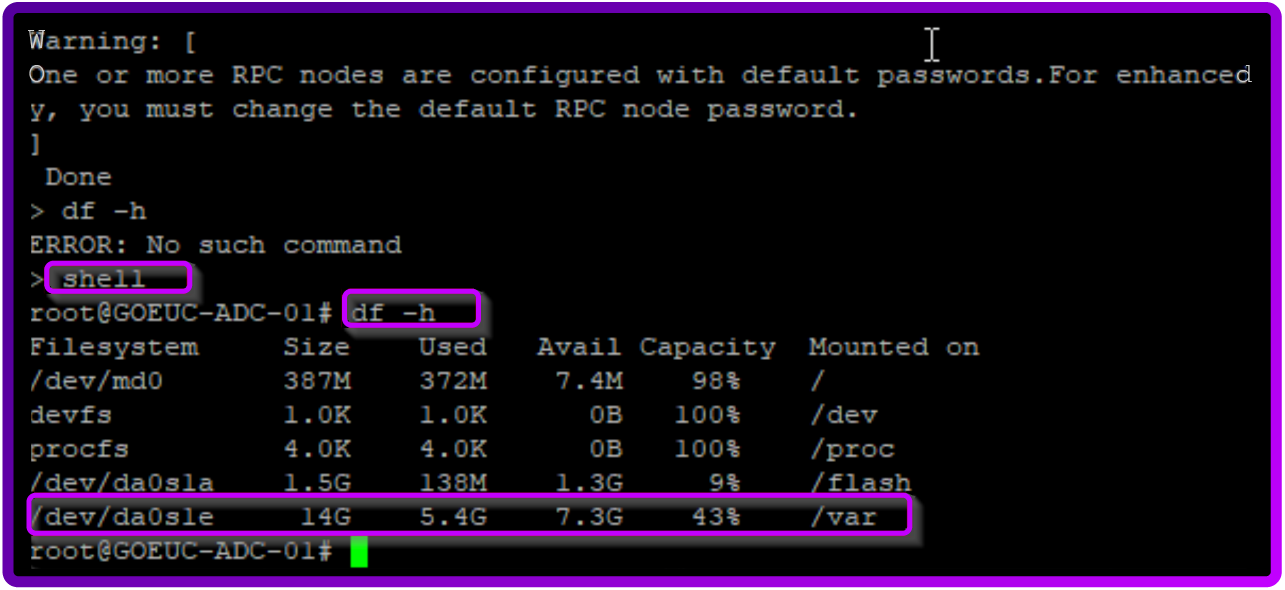
💡 PRO TIP
Check the diskspace on /var/ to make sure you have at least 4500MB.
You can clean old firmware versions if required from /var/nsinstall, but never the current firmware version!
2. Set the HA status of each appliance
- Set the primary node to ‘STAY PRIMARY’ and set the secondary node to ‘STAY SECONDARY’. You need to login to the secondary node to be able to set its value.
- If you want to failover the NetScaler, you need to set the High Availability status back to ‘ENABLED’ for both nodes.
- Please mind that if this setting is not ‘ENABLED’ the HA failover will not work. We enforce this setting to prevent failovers during our upgrade. The synchronization and ‘propogation’ setting should be disabled by default, but I don’t like risk, so I always do it for the NetScaler anyway.
3. Upgrade your secondary node
FIRST upgrade the secondary node by following the steps of ‘Single ADC CLI Update’ .
THEN come back here, switch the nodes to their other state, and upgrade the new secondary node too.
💡 PRO TIP
Use these inline commands, in this order (feel free to copy and paste):
- Set primary node to stay primary:
set ha node -hastatus stayprimary- Set secondary node to stay secondary:
set ha node -hastatus staysecondary- Disable synchronization and propogation:
set ha node -haprop disabledset ha node -hasync disabledTo upgrade the secondary node:
- Set your primary node to enabled:
set ha node -hastatus enabled- Set secondary node to enabled
set ha node -hastatus enabled- Select 'Failover NetScalers'
force ha failover- Set your new Primary node to stay primary
- Set your new Secondary node to stay secondary
If you need to upgrade a NEW Secondary node, follow these steps:
- Set your primary node to enabled:
set ha node -hastatus enabled- Set your secondary node to enabled:
set ha node -hastatus enabled- Enable synchronization and propogation:
set ha node -haprop enabledset ha node -hasync enabled- Select 'Failover NetScalers':
force ha failover- And you're done!
How to configure a single Citrix NetScaler ADC CLI update
Here's how to run a CLI upgrade for a single NetScaler appliance:
1. Download the proper firmware version you require from the Citrix website.
💡 PRO TIP
Make sure your appliance is compatible with the firmware version!
2. Are you currently on a version lower than Citrix ADC 12.0 build 56.20 and onwards? Then make sure you upgrade your classic policies first. The conversion of policies is not covered in this blog due to its complexity.
3. Connect to your Citrix ADC appliance with any FTP tool. I use WinSCP.
4. Connect to your Citrix ADC appliance and upload your file to the /var/nsinstall/(create a folder here) directory. It’s good practice to use the build name + version as the folder name:

5. When done, open your SSH tool and connect to the Citrix ADC Appliance (I use Putty).
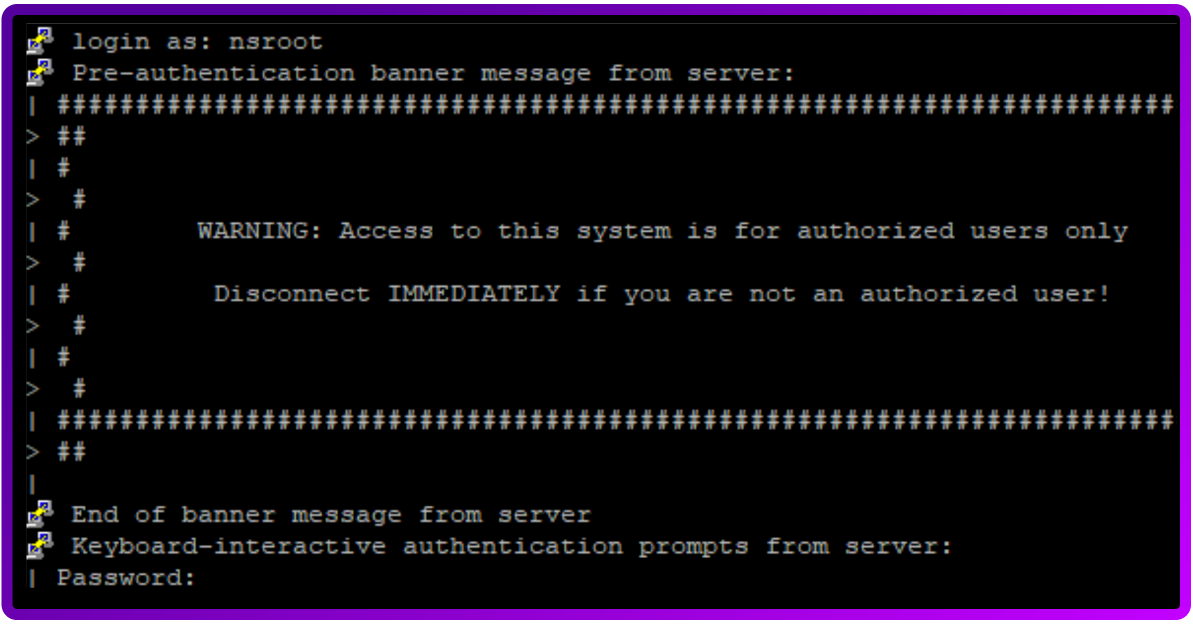
6. Login with your username/password:
7. Enter shell mode with the following command:
shell8. Proceed to the directory where you uploaded the file with the following command:
cd /var/nsintall/(yourfoldernamehere)
9. Extract your .tar file with the following command:
tar -xvzf filename.tgz
10. A number of files will then begin extraction. Wait for this to be done, then proceed with the following command:
./installns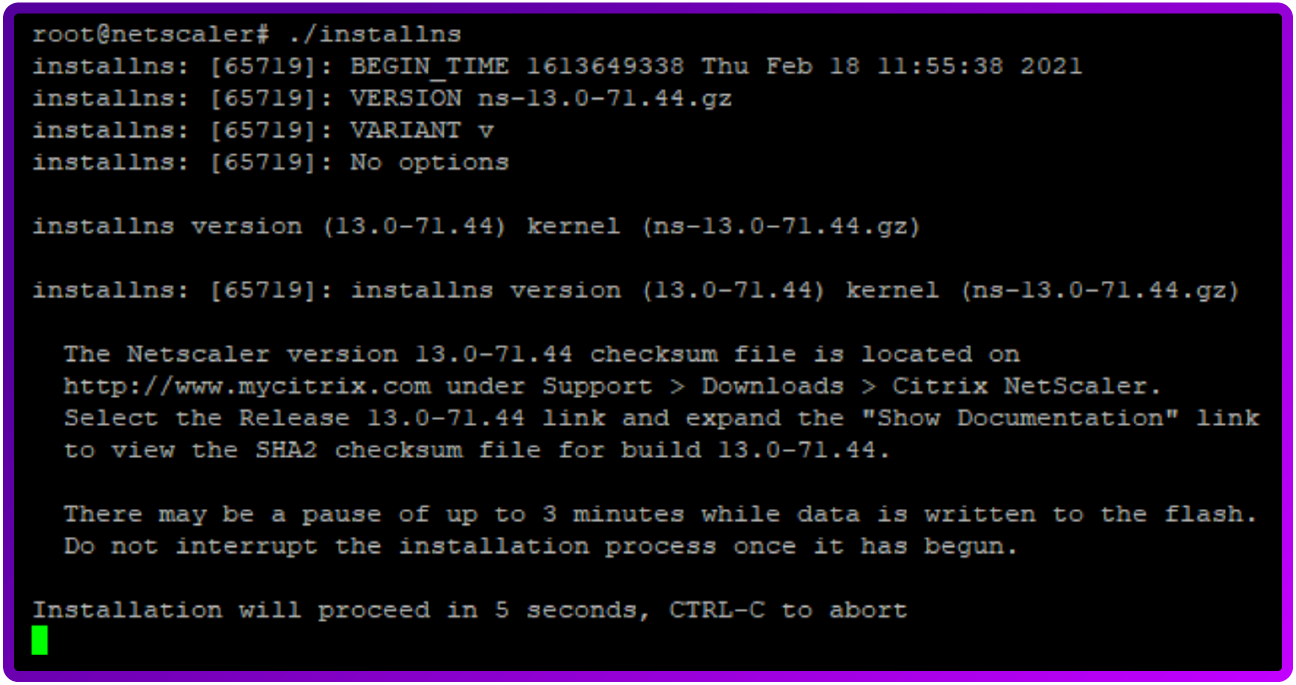
11. Some prompts may appear in your terminal. Answer them as you see fit.
12. Once the upgrade is done, you will be prompted to ‘reboot now'. Enter ‘Y’.
13. Proceed back to the HA steps outlined in the previous section, if applicable.
Phew! We made it!! If you have questions or need help, drop me a comment below!
*Citrix and NetScaler are trademarks of Citrix Systems, Inc. Loadbalancer.org Ltd has no affiliation with Citrix Systems, Inc., so the use of these names, trademarks and brands does not imply endorsement by either party.